
Access Settings
Access Settings allow administrators to control the entry points for new users on the Freedam platform. This interface centralizes how accounts are created, whether through direct invitations, open self-registration, or corporate Single Sign-On (SSO) providers.
By managing these settings, you can ensure that only authorized individuals gain access to your digital assets while automating the assignment of initial permissions for new members.
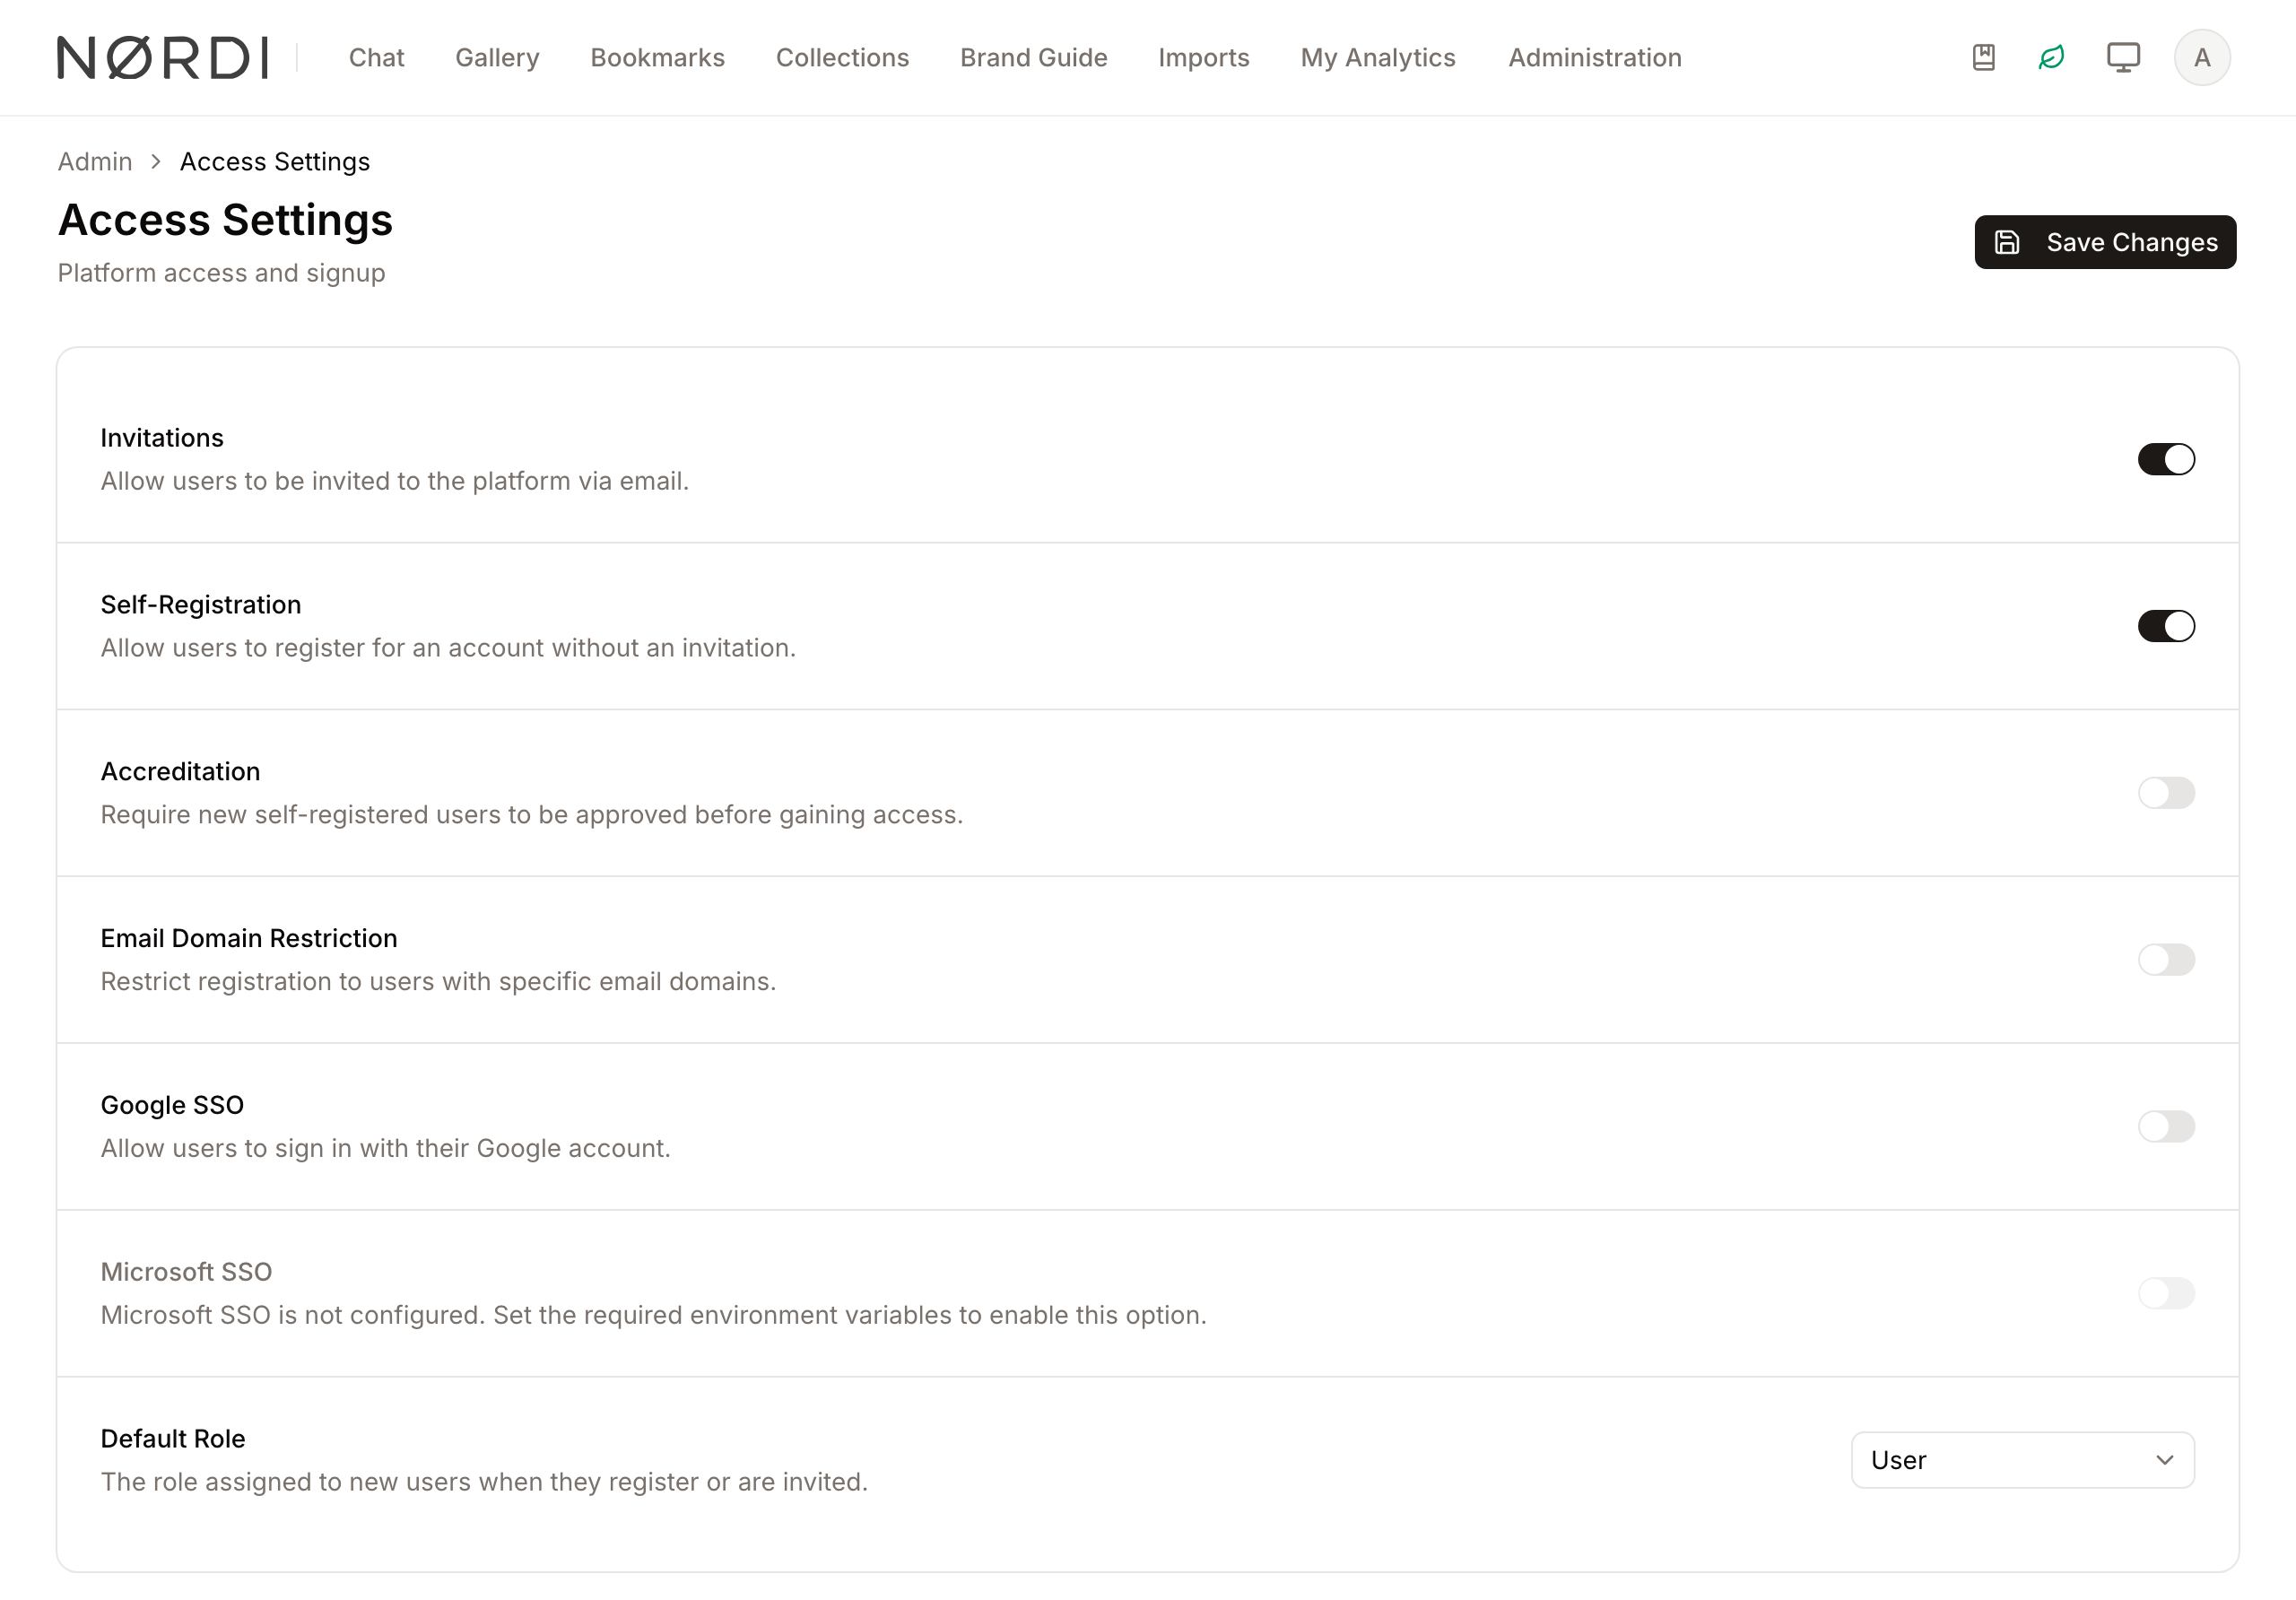
Page Overview
- Purpose: To define the security and onboarding rules for new user accounts.
- When to use it: Use this page during initial setup or when you need to change how users join the platform (e.g., switching from invitation-only to open registration).
- What you can do here:
- Enable or disable user-to-user invitations.
- Toggle public self-registration.
- Require administrative approval (accreditation) for new sign-ups.
- Restrict registration to specific corporate email domains.
- Enable Single Sign-On (SSO) with Google, Microsoft, or both.
- Require single sign-on for everyone except administrators.
- Set the default role assigned to every new user.
- Require approval for every new rendering.
Page Layout
- Top bar: Displays the page title "Access Settings" and the Save Changes button.
- Main area: A centralized card containing a list of toggle switches and configuration fields for registration and authentication.
Who can use it
Access Settings can only be opened and changed by workspace administrators with the System Settings permission. Other team members will not see the page in the admin navigation.
Main Features
Registration Control
- What it's for: Determining if users can create their own accounts or if they must be invited.
- Typical use: Turn off self-registration if you want a private, invite-only environment.
- Result: The "Sign Up" option will appear or disappear from the login screen. When self-registration is off, anyone landing on the sign-up page who does not carry a valid invitation link is blocked with a clear message that registration is by invitation only.
Accreditation (Admin Approval)
- What it's for: Adding a manual review step for new users.
- Typical use: Enable this if you allow self-registration but want to verify each person's identity before they see any assets.
- Result: New users are redirected to a request-access form instead of the normal sign-up flow. Their submission lands in the User Requests queue, where administrators - or a dedicated accreditation reviewer group if one has been configured - approve or deny the applicant. Nobody sees any assets until they are approved. People who follow an invitation link are not sent to this form: the invitation already counts as approval, so they go straight to account creation.
Domain Restriction
- What it's for: Limiting access to specific organizations.
- Typical use: Enter your company domain (e.g., "company.com") to prevent anyone with a personal email (like Gmail or Yahoo) from registering.
- Result: Registration attempts from non-listed domains are blocked before the account is ever created. The same allowlist is also enforced for SSO sign-in, so a personal Gmail or Outlook.com account will be rejected even when the matching provider is turned on.
Single Sign-On (SSO)
Freedam supports two SSO providers, each with its own independent switch:
-
Google - for Google Workspace and Gmail accounts.
-
Microsoft - for Microsoft Entra ID (formerly Azure AD) work or school accounts, and personal Microsoft accounts.
-
What it's for: Allowing users to log in with an account they already have, instead of creating another password.
-
Typical use: Streamlining the login process for employees who already live in Google Workspace or Microsoft 365.
-
Result: A "Continue with Google" and/or "Continue with Microsoft" button appears on the login page - one per enabled provider. If a provider's credentials have not been configured at the server level, its toggle stays disabled and the page will tell you so; no save is needed.
You can enable either provider on its own, or both at once. Turning one off does not affect the other, and users who already linked that provider simply lose it as a sign-in option - their account and assets are untouched.
Plan requirement
Single sign-on is included in the Business plan and in Tailored plans. On the Free and Team plans, the Google and Microsoft switches are still shown on this page, but they are locked and carry an upgrade notice. The SSO providers description then reads "{provider} SSO is not included in your current plan. Your saved setting is kept and applies again once your plan includes single sign-on."
A provider you switched on earlier, for example during the 30-day trial (which unlocks every feature), keeps its stored setting. While your plan does not include single sign-on:
- The login and registration pages show no SSO buttons.
- Require single sign-on has no effect, so password login always works.
- Users who only ever signed in through SSO can use the normal password reset to set a password.
- Their linked identity stays listed under user settings, in Connected accounts, with a notice explaining that single sign-on is not included in the workspace's current plan. They can still disconnect it.
After an upgrade, or a per-tenant override granted by the Freedam team, everything resumes exactly as configured, including enforcement. Nothing needs to be set up again. Trying to switch a provider on while the plan lacks SSO fails with "Single sign-on is not available on your current plan. Upgrade to enable a provider." Re-saving the page with a provider that is already on keeps working.

Require single sign-on
- What it's for: Making single sign-on the only way in for regular users, so access follows your company's Google Workspace or Microsoft account lifecycle.
- Where to find it: Just below the Google SSO and Microsoft SSO rows, look for Require single sign-on.
- Typical use: Once every employee signs in with SSO, turn this on so that disabling someone's corporate account also locks them out of Freedam.
- Result: The login page shows only the SSO buttons. Anyone who is not an administrator and tries to sign in with a password is refused with a message that the workspace requires single sign-on.
The switch can only be turned on while at least one SSO provider is switched on (and, for plan-gated workspaces, while the plan includes single sign-on). Until then it stays greyed out and its description asks you to switch on a provider first. If it was turned on earlier and the providers were later switched off, it has no effect and you can still turn it off.
Administrators always keep a way in with their password, so a misconfigured provider can never lock the workspace out. On the login page, an Administrator sign-in link below the SSO buttons opens the usual email and password form. The link is visible to everyone, but only accounts with the Administrator role can sign in through it.
The same rule applies to Sign in to your workspace on the Freedam website: a password sign-in there is refused with the single sign-on message unless the account has the Administrator role, so the website is not a way around enforcement.

Require Rendering Approval
- What it's for: Reviewing every new rendering before other people can see or download it.
- Where to find it: At the bottom of the settings list, look for Require Rendering Approval.
- Typical use: Turn it on when crops, social media exports and template results must be checked for brand compliance before they circulate.
- Result: New renderings (uploads, crops, social media exports and saved template generation results) show Pending and go to Administration → Asset Requests for review. Until a reviewer approves them, only their creator, the asset's owner and reviewers can see them, and nobody can download them. See Asset Requests.
AI edits always require approval, whether this switch is on or off. Turning the switch on or off does not change renderings that already exist: only renderings created afterwards follow the new setting. Template generation results are submitted when they are saved, never while they are unsaved drafts.
Detailed Feature Documentation
Default Role Assignment
- Purpose: Automatically assigns a specific set of permissions to every new user the moment they join.
- Where to find it: At the bottom of the main settings list, look for Default role for new users.
- What you'll see: A dropdown menu showing all available system roles (e.g., Viewer, Editor).
The default role is applied automatically to anyone who self-registers and to users approved from the accreditation queue. Direct invitations can override this by specifying a different role on the invitation itself.
How to use it:
- Locate the Default role for new users section.
- Click the dropdown menu (currently showing the active role).
- Select the desired role from the list.
- Click Save Changes in the top bar.

Email Domain Allowlist
- Purpose: To restrict self-registration to specific verified domains.
- Where to find it: Look for the toggle Restrict registration to specific email domains.
- What you'll see: When toggled on, a field labeled Allowed email domains appears where you can enter domain names.
How to use it:
- Switch the Restrict registration to specific email domains toggle to the "on" position.
- In the Allowed email domains field, type a domain (e.g.,
acme.com). - Press Enter or Comma to save the tag.
- Repeat for additional domains if necessary.
- Click Save Changes.

Complete Workflows
Workflow: Setting up a Private Corporate Portal
- Goal: Ensure only employees with a company email can join, but require admin approval for extra security.
- Prerequisites: Administrator access.
Steps:
- Navigate to Access Settings.
- Switch Users can self-register to ON.
- Switch Users need accreditation to ON.
- Switch Restrict registration to specific email domains to ON.
- In Allowed email domains, type your company domain and press Enter.
- Select "Viewer" (or your preferred base role) in Default role for new users.
- Click Save Changes.
- Expected result: Only users with your company email can sign up; they will remain "Pending" until you approve them, and they will start with "Viewer" permissions.
Workflow: Enabling SSO Login
- Goal: Allow users to bypass password creation by signing in with Google or Microsoft.
- Prerequisites: The chosen provider's OAuth credentials must be configured in the system environment, and your workspace plan must include single sign-on (Business, a Tailored plan, or the 30-day trial).
Steps:
- Locate the Google SSO or Microsoft SSO row - there is one per provider.
- If the description invites you to allow users to sign in with that account, flip the switch to ON.
- If the description mentions that the provider "is not configured," contact your system technical lead.
- If the switch is locked with an upgrade notice, your plan does not include single sign-on. Upgrade from Admin → Plan & Usage, then come back to this page.
- Repeat for the second provider if you want to offer both.
- Click Save Changes.
- Expected result: The login screen will now display one authentication button per enabled provider.
If your plan later drops single sign-on, the switches lock again but keep their saved position. The SSO buttons disappear from the login and registration pages and password login always works in the meantime. Once the plan includes single sign-on again, or the Freedam team grants your workspace an override, the providers you had enabled come back on their own, with any Require single sign-on enforcement applied as before.
Workflow: Requiring single sign-on
- Goal: Make Google or Microsoft sign-in mandatory for everyone except administrators.
- Prerequisites: At least one SSO provider is set up and working (see the previous workflow). Check that you can sign in with it yourself before enforcing it.
Steps:
- Make sure Google SSO, Microsoft SSO, or both are switched ON.
- Switch Require single sign-on to ON.
- Click Save Changes.
- Expected result: The login page only offers the SSO buttons, plus a small Administrator sign-in link. Users who try a password are told the workspace requires single sign-on.
- If it doesn't work: If the switch is greyed out, no provider is switched on yet, or your plan does not include single sign-on.
Limits and guardrails
- Each allowed domain must be a valid, lowercase domain name (for example
acme.comorteam.acme.co.uk). Entries that are not real domain names are rejected with a friendly message when you try to save. - When the domain restriction is turned on, you must provide at least one domain before you can save the page.
- Leading
@signs and mixed capitalisation are cleaned up automatically -@Company.COMbecomescompany.com- and duplicate entries are removed silently. - Invitations always bypass the allowlist. This is intentional: it lets you onboard an outside contractor without having to add their personal domain for everyone.
- Invitations also bypass the registration mode. A valid invitation link opens the account creation form even when self-registration is off or accreditation is on.
- Require single sign-on never applies to administrators. They can always sign in with their password through Administrator sign-in on the login page.
What happens behind the scenes
- Every change made on this page is recorded in a setting change log with the administrator's name, the old value, the new value, their IP address, and the time of the change. The full history is available for compliance and auditing.
- Saving the page also refreshes the onboarding checklist so that newly completed steps (for example configuring an SSO provider) show as done for every administrator.
- When accreditation is enabled, a dedicated reviewer group - if one has been assigned under User Groups - receives the pending requests instead of the general administrator pool.
- New users who self-register (without an invitation) are still asked to verify their email address before they can sign in. Users who arrive through an invitation link are considered verified and skip this step.
Tips and Best Practices
- Accreditation Dependency: If you turn off "Users can self-register," the "Users need accreditation" setting will automatically be disabled, as invited users are typically considered pre-approved.
- Domain Formatting: You don't need to include the "@" symbol when entering allowed domains. The system will automatically clean entries like
@company.comtocompany.com. - Invitation Safety: Note that "Restrict registration to specific email domains" only applies to self-registration. If an admin or user sends a direct invitation, the recipient can join regardless of their email domain.
Troubleshooting
Issue: Cannot enable an SSO provider
- Symptoms: The switch for Google SSO or Microsoft SSO is greyed out and cannot be toggled.
- Cause: That provider's technical connection (OAuth Client ID and Secret) has not been set up in the server configuration. The two providers are configured independently, so one can be available while the other is not.
- Fix: Contact your IT department or system administrator to configure the environment variables for the provider you want to offer.
Issue: SSO switches are locked with an upgrade notice
- Symptoms: The Google SSO and Microsoft SSO switches are shown but locked, and the description says the provider is not included in your current plan.
- Cause: Your workspace plan does not include single sign-on. It is part of the Business plan and Tailored plans, and of the 30-day trial.
- Fix: Upgrade from Admin → Plan & Usage, or ask the Freedam team for a per-tenant override. Your saved settings are kept: any provider you switched on before, and any Require single sign-on enforcement, applies again as soon as the plan includes single sign-on.
Issue: Cannot turn on Require single sign-on
- Symptoms: The Require single sign-on switch is greyed out and its description asks you to switch on an SSO provider.
- Cause: Enforcement needs a provider people can actually sign in with. No provider is switched on in the form, the provider is not configured, or your plan does not include single sign-on.
- Fix: Switch on Google SSO or Microsoft SSO first; the enforcement switch unlocks immediately, before you save.
Issue: An administrator cannot find the password form
- Symptoms: The login page shows only SSO buttons and the administrator's SSO account is unavailable.
- Cause: Require single sign-on is on, which hides the password form behind a link.
- Fix: Click Administrator sign-in below the SSO buttons to open the email and password form. Only accounts with the Administrator role can sign in there; everyone else is asked to use single sign-on.
Issue: Microsoft users are asked for administrator approval
- Symptoms: A user signing in with a Microsoft work account sees a Microsoft consent screen saying approval from an administrator is required, and never reaches Freedam.
- Cause: This is a Microsoft policy, not a Freedam setting. Microsoft blocks end users from consenting to a multi-tenant application until its publisher has been verified.
- Fix: Your system technical lead needs to attach a verified publisher to the Freedam app registration in Microsoft Entra. Until then, an administrator of the user's own Microsoft tenant can grant consent on their behalf.
Issue: Save Changes fails with an error
- Symptoms: A red error message appears after clicking Save Changes.
- Cause: You likely enabled "Restrict registration to specific email domains" but did not provide any domains in the list.
- Fix: Add at least one valid domain to the Allowed email domains field before saving.
- Prevention: Always ensure the domain tags are visible in the input field before clicking save.