
Custom Studio Skills
Custom skills let your workspace add its own tools to Studio's tool rail, next to the built-in ones. An administrator designs the tool once - a reusable AI instruction with a curated set of options - and from then on anyone on the team produces consistent, on-brand results by picking an option and clicking Generate. No prompt-writing skills required from the people who use it.
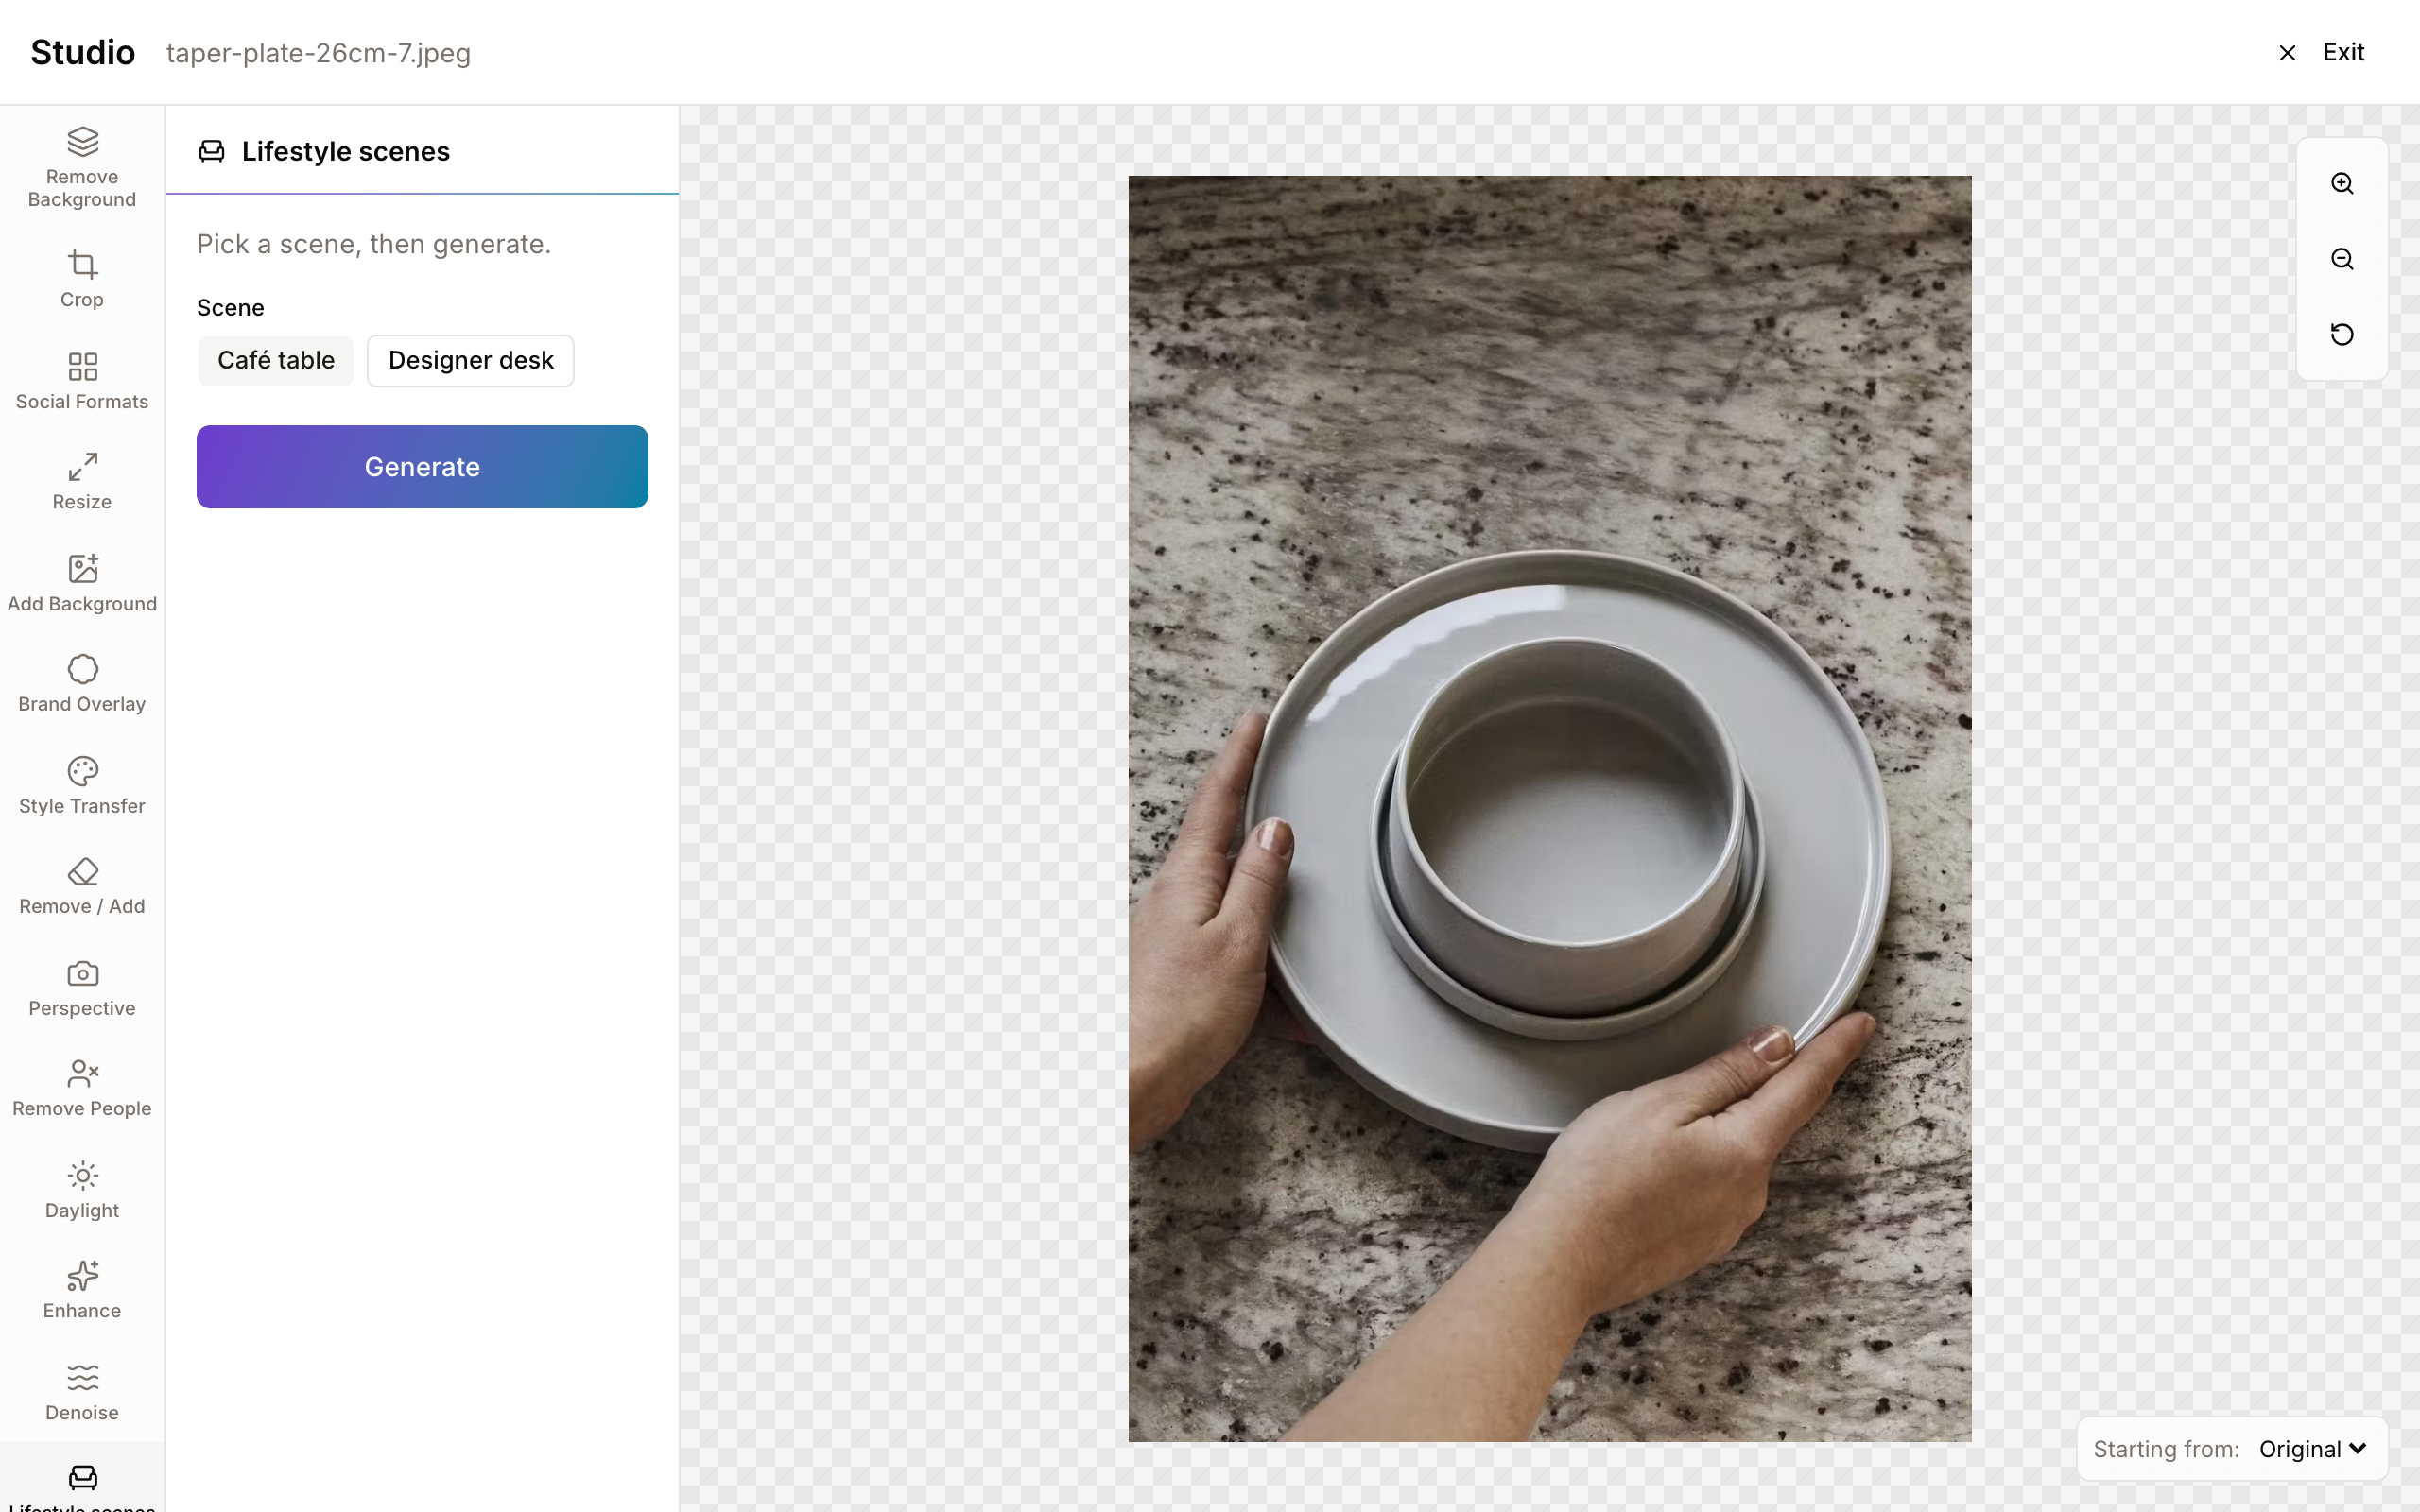
The idea in one example. An accessory brand wants product photos shown in real-life settings. An administrator creates a "Lifestyle scenes" skill with two options - Café table and Designer desk - each backed by a carefully written scene description. A marketer opens Studio, picks Café table from a thumbnail card, presses Generate, and gets the product placed on a rustic café table in soft morning light. Same prompt quality every time, for every person on the team.
Using a custom skill (everyone)
If your workspace has custom skills enabled, they simply appear in the Studio tool rail like any other tool - same icons, same panel, same version workflow.
- Open any image in Studio.
- Pick the custom skill in the left rail (or the bottom tool bar on mobile).
- The panel shows a short helper sentence and the skill's options. Options with images render as thumbnail cards; options without images render as buttons. Some skills also add a free-text field or a number input.
- Choose an option, press Generate, and the result lands in the version strip at the bottom - non-destructive, exactly like every built-in tool. Save, promote, or discard it as usual.
A few things worth knowing:
- You only ever see labels and pictures. The AI instructions behind each option are your workspace's own recipe and never leave the server.
- The rail is curated. Administrators decide which tools appear and in which order, so your rail may differ from another workspace's - or even hide some built-in tools.
- If a custom skill disappears mid-session, an administrator disabled or removed it. A generation that was still running fails with a clear message rather than producing a half-result.
Creating a custom skill (administrators)
You need the Manage Studio skills permission (administrators have it by default). Open Administration → Studio Skills.
The catalog
The dashboard lists every tool the rail can show - built-in and custom together, in rail order:
- Drag rows to reorder; the Studio rail follows immediately.
- Flip the switch to show or hide any tool, including built-ins. Hiding a tool also blocks new runs of it.
- Custom skills carry a Custom badge plus edit and delete actions; the row shows how many option lists and choices they define.

The editor
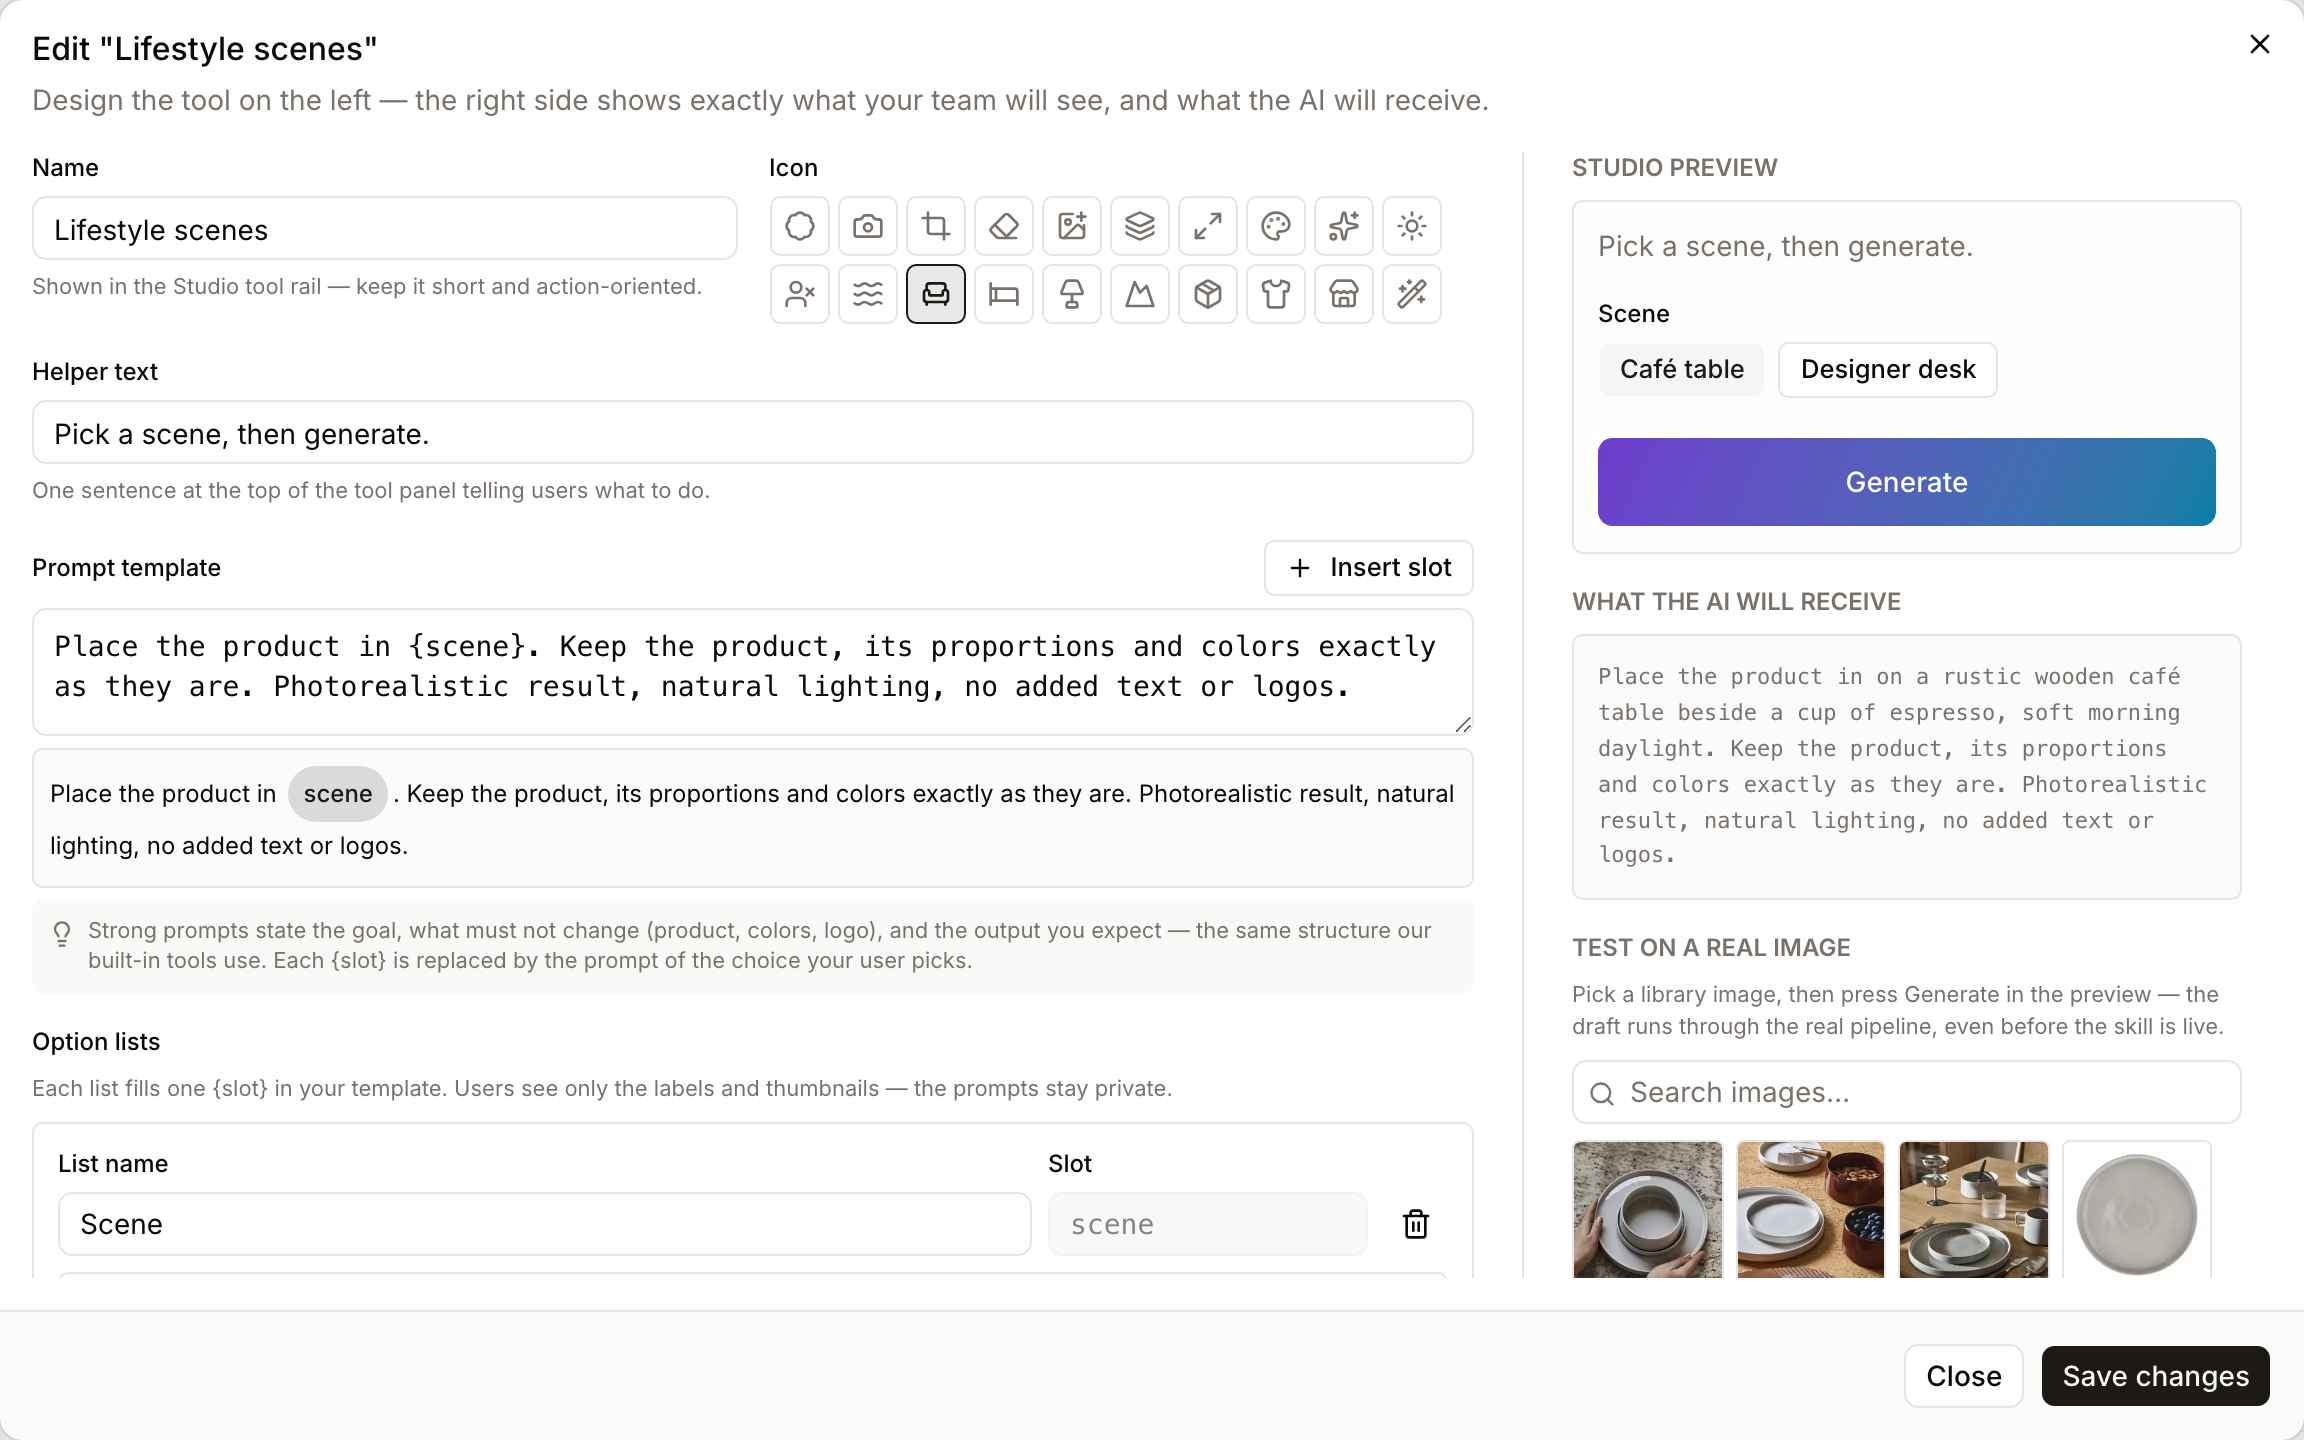
The fastest way to learn is Start from the example on your first visit - it prefills the entire "Lifestyle scenes" skill for you to reshape. A skill is made of:
- Name, icon, helper text, description - what your team sees in the rail and panel. Pick the icon from the same curated set the built-in tools use.
- Prompt template - the instruction sent to the AI, written once by you. Placeholders like
{scene}appear as chips; the Insert slot button adds a placeholder and its option list together so they always stay in sync. Good templates state the goal, what must not change (product, colors, logo), and the expected output - the same structure the built-in tools use, and the editor shows these tips inline. - Option lists - one list per placeholder. Each choice pairs the label users see with the hidden prompt fragment the AI receives, plus an optional thumbnail. Drag to reorder; use Bulk add to paste one label per line and flesh out the prompts afterwards.
- Optional plain fields - a free-text or numeric input that can also be woven into the template (for example an "extra instructions" box).
While you edit, the right-hand column shows a live preview of the actual Studio panel and, below it, exactly the prompt the AI will receive for the currently selected options. What you see is what runs.
Test before you ship
From the editor, pick any image from your library and press Generate in the preview. The draft runs through the real generation pipeline - billed like a normal Studio run - even while the skill is still disabled. When a result looks right, one click on Use as choice thumbnail turns it into that option's card image: the quickest route to a polished, illustrated skill.
When you're happy, flip the enable switch. The confirmation toast offers Open Studio to try it so you can see it live immediately.
Rules and limits
- Up to 25 custom skills per workspace, 50 choices per list, and 5 000 characters per template.
- Every
{placeholder}must match exactly one option list (or one text/number field), and every list must be used exactly once - the editor explains any mismatch in plain language when you save. - Custom skill text is written in one language of your choice; it is not translated by the platform.
- Choice thumbnails accept JPEG, PNG, and WebP up to 10 MB.
- Custom skills always follow the same pipeline: your source image, one AI image edit driven by your rendered template, one new version in the session.
Privacy and audit
- Prompt templates and per-choice fragments are visible only in the Skills dashboard and the Studio audit view - never in anything a regular user's browser receives.
- Every run records full provenance: the skill, the chosen options, and the exact resolved prompt. Administrators with the Studio audit permission can review it from AI Settings → Studio.
- Renaming a choice never breaks history - options keep a stable identity behind the scenes.
- Deleting a skill removes it from the rail immediately, but past runs keep their audit trail, including the skill's name at the time it ran.
Troubleshooting
- "Your template mentions {x} but has no matching list or field" - add a list for that placeholder (or remove it from the template). The Insert slot button prevents this by creating both together.
- Thumbnails won't attach on a brand-new skill - save the skill first; thumbnails belong to the saved skill.
- A colleague can't see the new skill - check it's enabled in the catalog, and that they have the Studio permission; the rail updates the next time they open Studio.
- A run failed with "This tool was disabled or removed…" - the skill was switched off or deleted between queueing and running; re-enable it or pick another tool.