
System Settings
The System Settings feature is the central control hub for Freedam administrators. It allows you to manage global parameters that dictate how the application behaves, from file upload limits and security protocols to AI provider configurations and performance tuning.
This interface provides a safe environment for making bulk changes, offering a "Pending Changes" workflow that ensures you can review all modifications before they are applied to the live system.
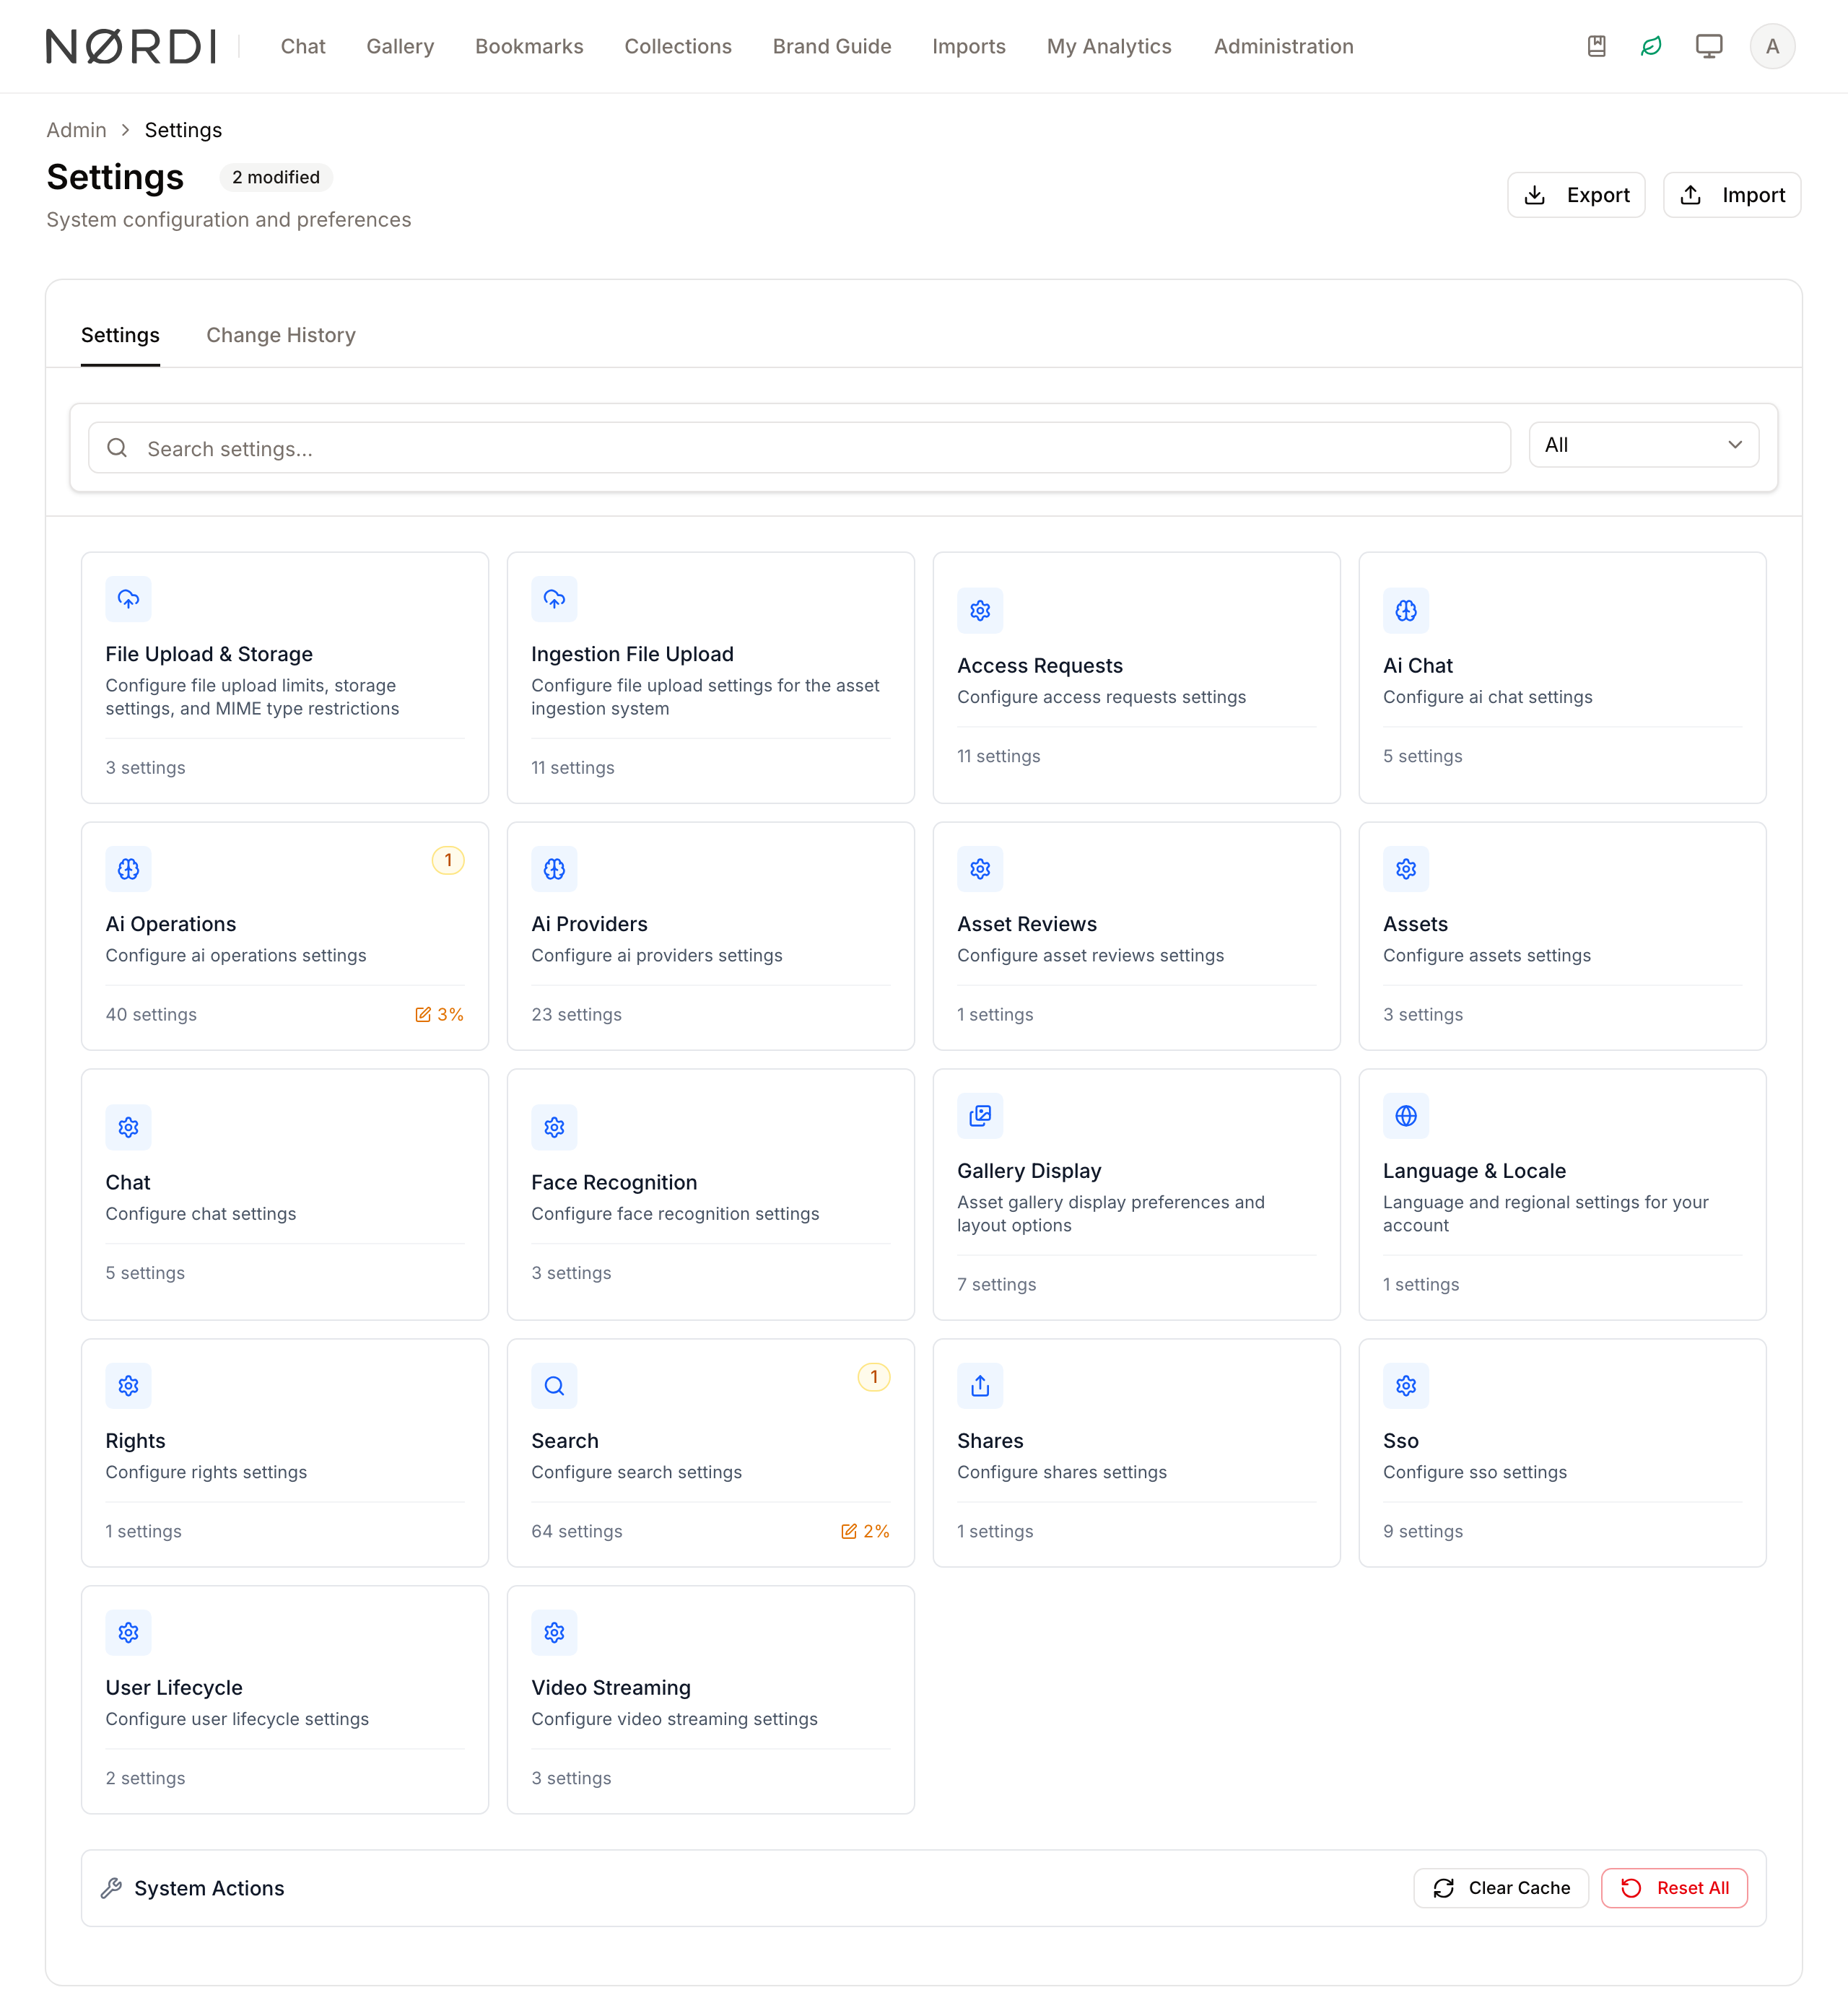
Page Overview
- Purpose: To provide a centralized interface for managing all system-wide configurations and operational limits.
- When to use it: Use this page when you need to adjust application behavior, update API keys for third-party services, review the history of configuration changes, or migrate settings between environments.
- What you can do here:
- Browse and edit settings organized by functional categories.
- Search for specific configuration keys across the entire system.
- Review a detailed audit log of who changed what and when.
- Export and import configuration files for backup or migration.
- Perform system maintenance tasks like clearing the application cache.
Who can use it
System Settings is a system administrator feature. Only users whose role includes the "Configure system-wide settings" privilege can open the page, change values, run imports and exports, reset to defaults, or clear caches. Standard users never see the Admin navigation entry.
Page Layout
- Top bar: Displays the page title, a "modified" badge showing the count of non-default settings, and primary action buttons for Export and Import.
- Main area: Housed within a central card, this area features two primary tabs: Settings (for active configuration) and Change History (for audit logs).
- Settings Tab: Contains a search bar at the top, followed by a grid of category cards (e.g., Security, File Upload, AI Providers). When a category is selected, it displays a list of individual setting rows.
- System Actions: Located at the bottom of the main grid, providing maintenance tools like Clear Cache and Reset All.
Main Features
Configuration Categories
- What it's for: Grouping related settings to make navigation intuitive.
- Typical use: Clicking on "Security & Rate Limiting" to update session timeouts or "File Upload & Storage" to change maximum file sizes.
- Result: Opens a detailed view of all settings within that specific functional area.
Pending Changes Workflow
- What it's for: Preventing accidental or partial configuration updates.
- Typical use: Modifying several settings within a category and reviewing the "Unsaved Changes" banner.
- Result: Changes are only written to the database after you click Save Changes.
Configuration Import/Export
- What it's for: Backing up system state or moving settings between staging and production.
- Typical use: Clicking Export to download a JSON file of current settings.
- Result: Generates a portable file containing your entire system configuration.
Change History Audit
- What it's for: Accountability and troubleshooting.
- Typical use: Filtering the history by a specific "User" or "Setting key" to see why a behavior changed.
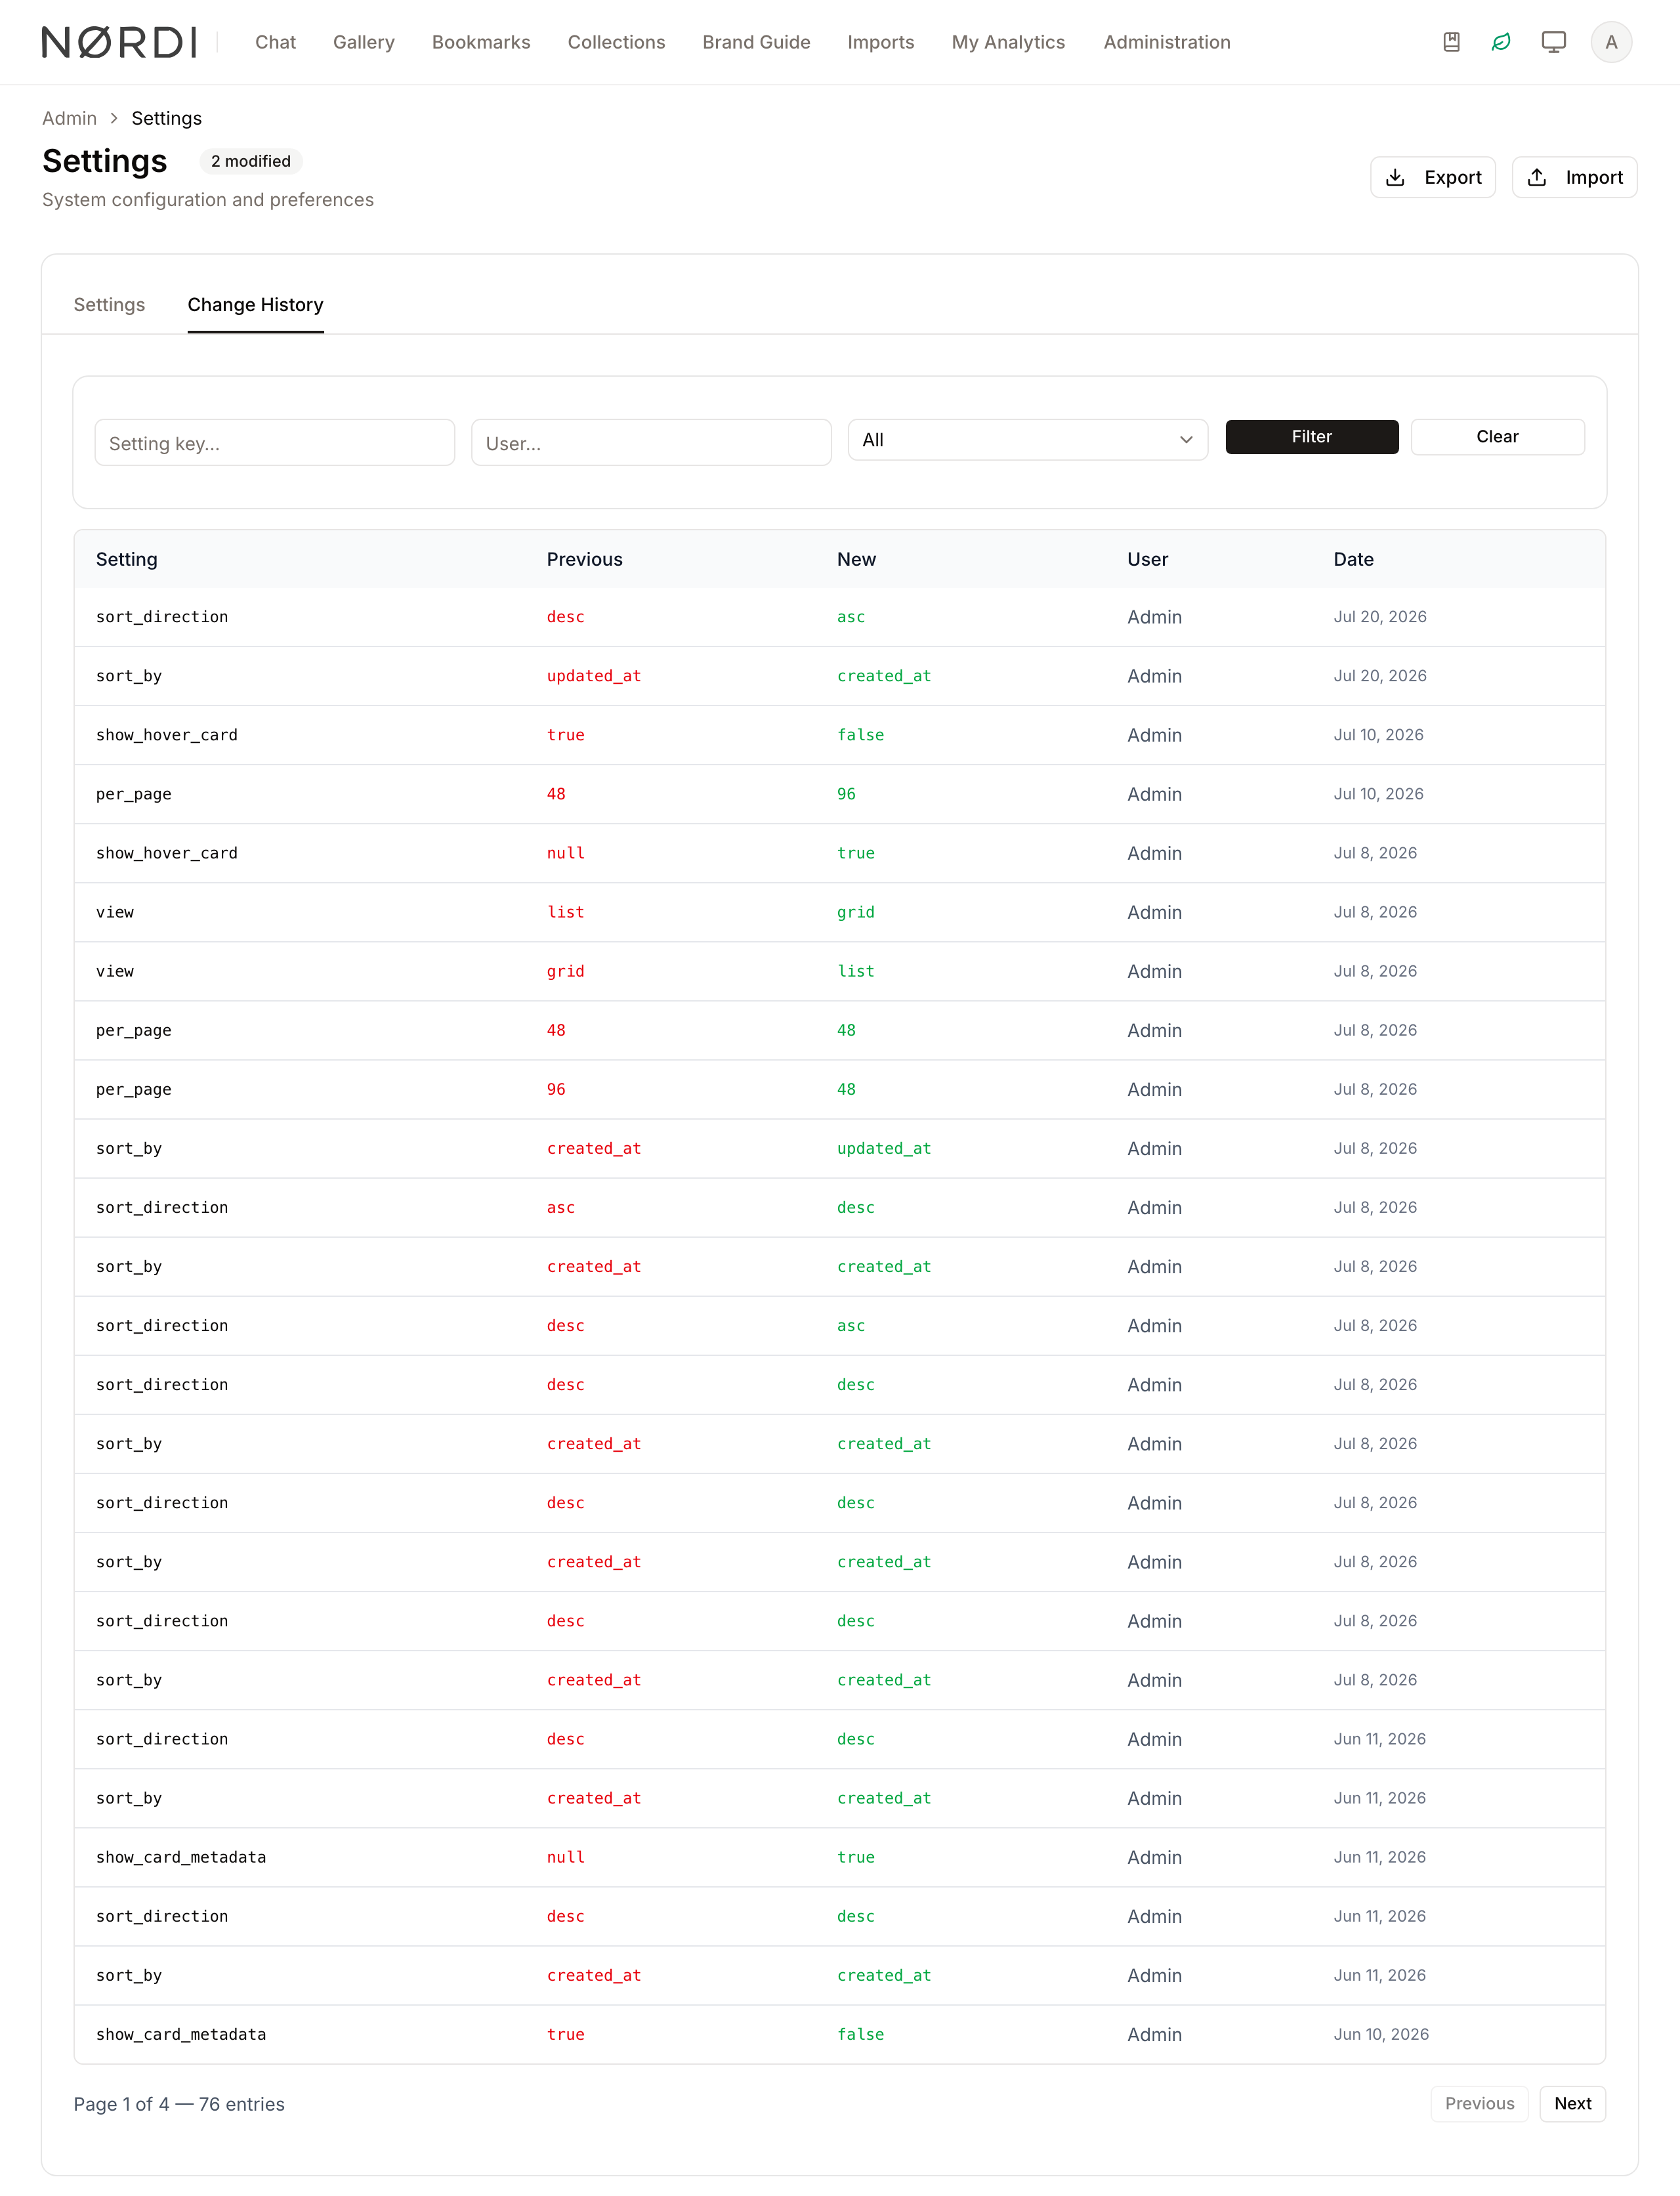
- Result: Displays a table showing the previous value, the new value, the editor, and the timestamp.
Detailed Feature Documentation
Search Settings
- Purpose: Quickly find a specific setting without browsing categories.
- Where to find it: At the top of the Settings tab in the search field.
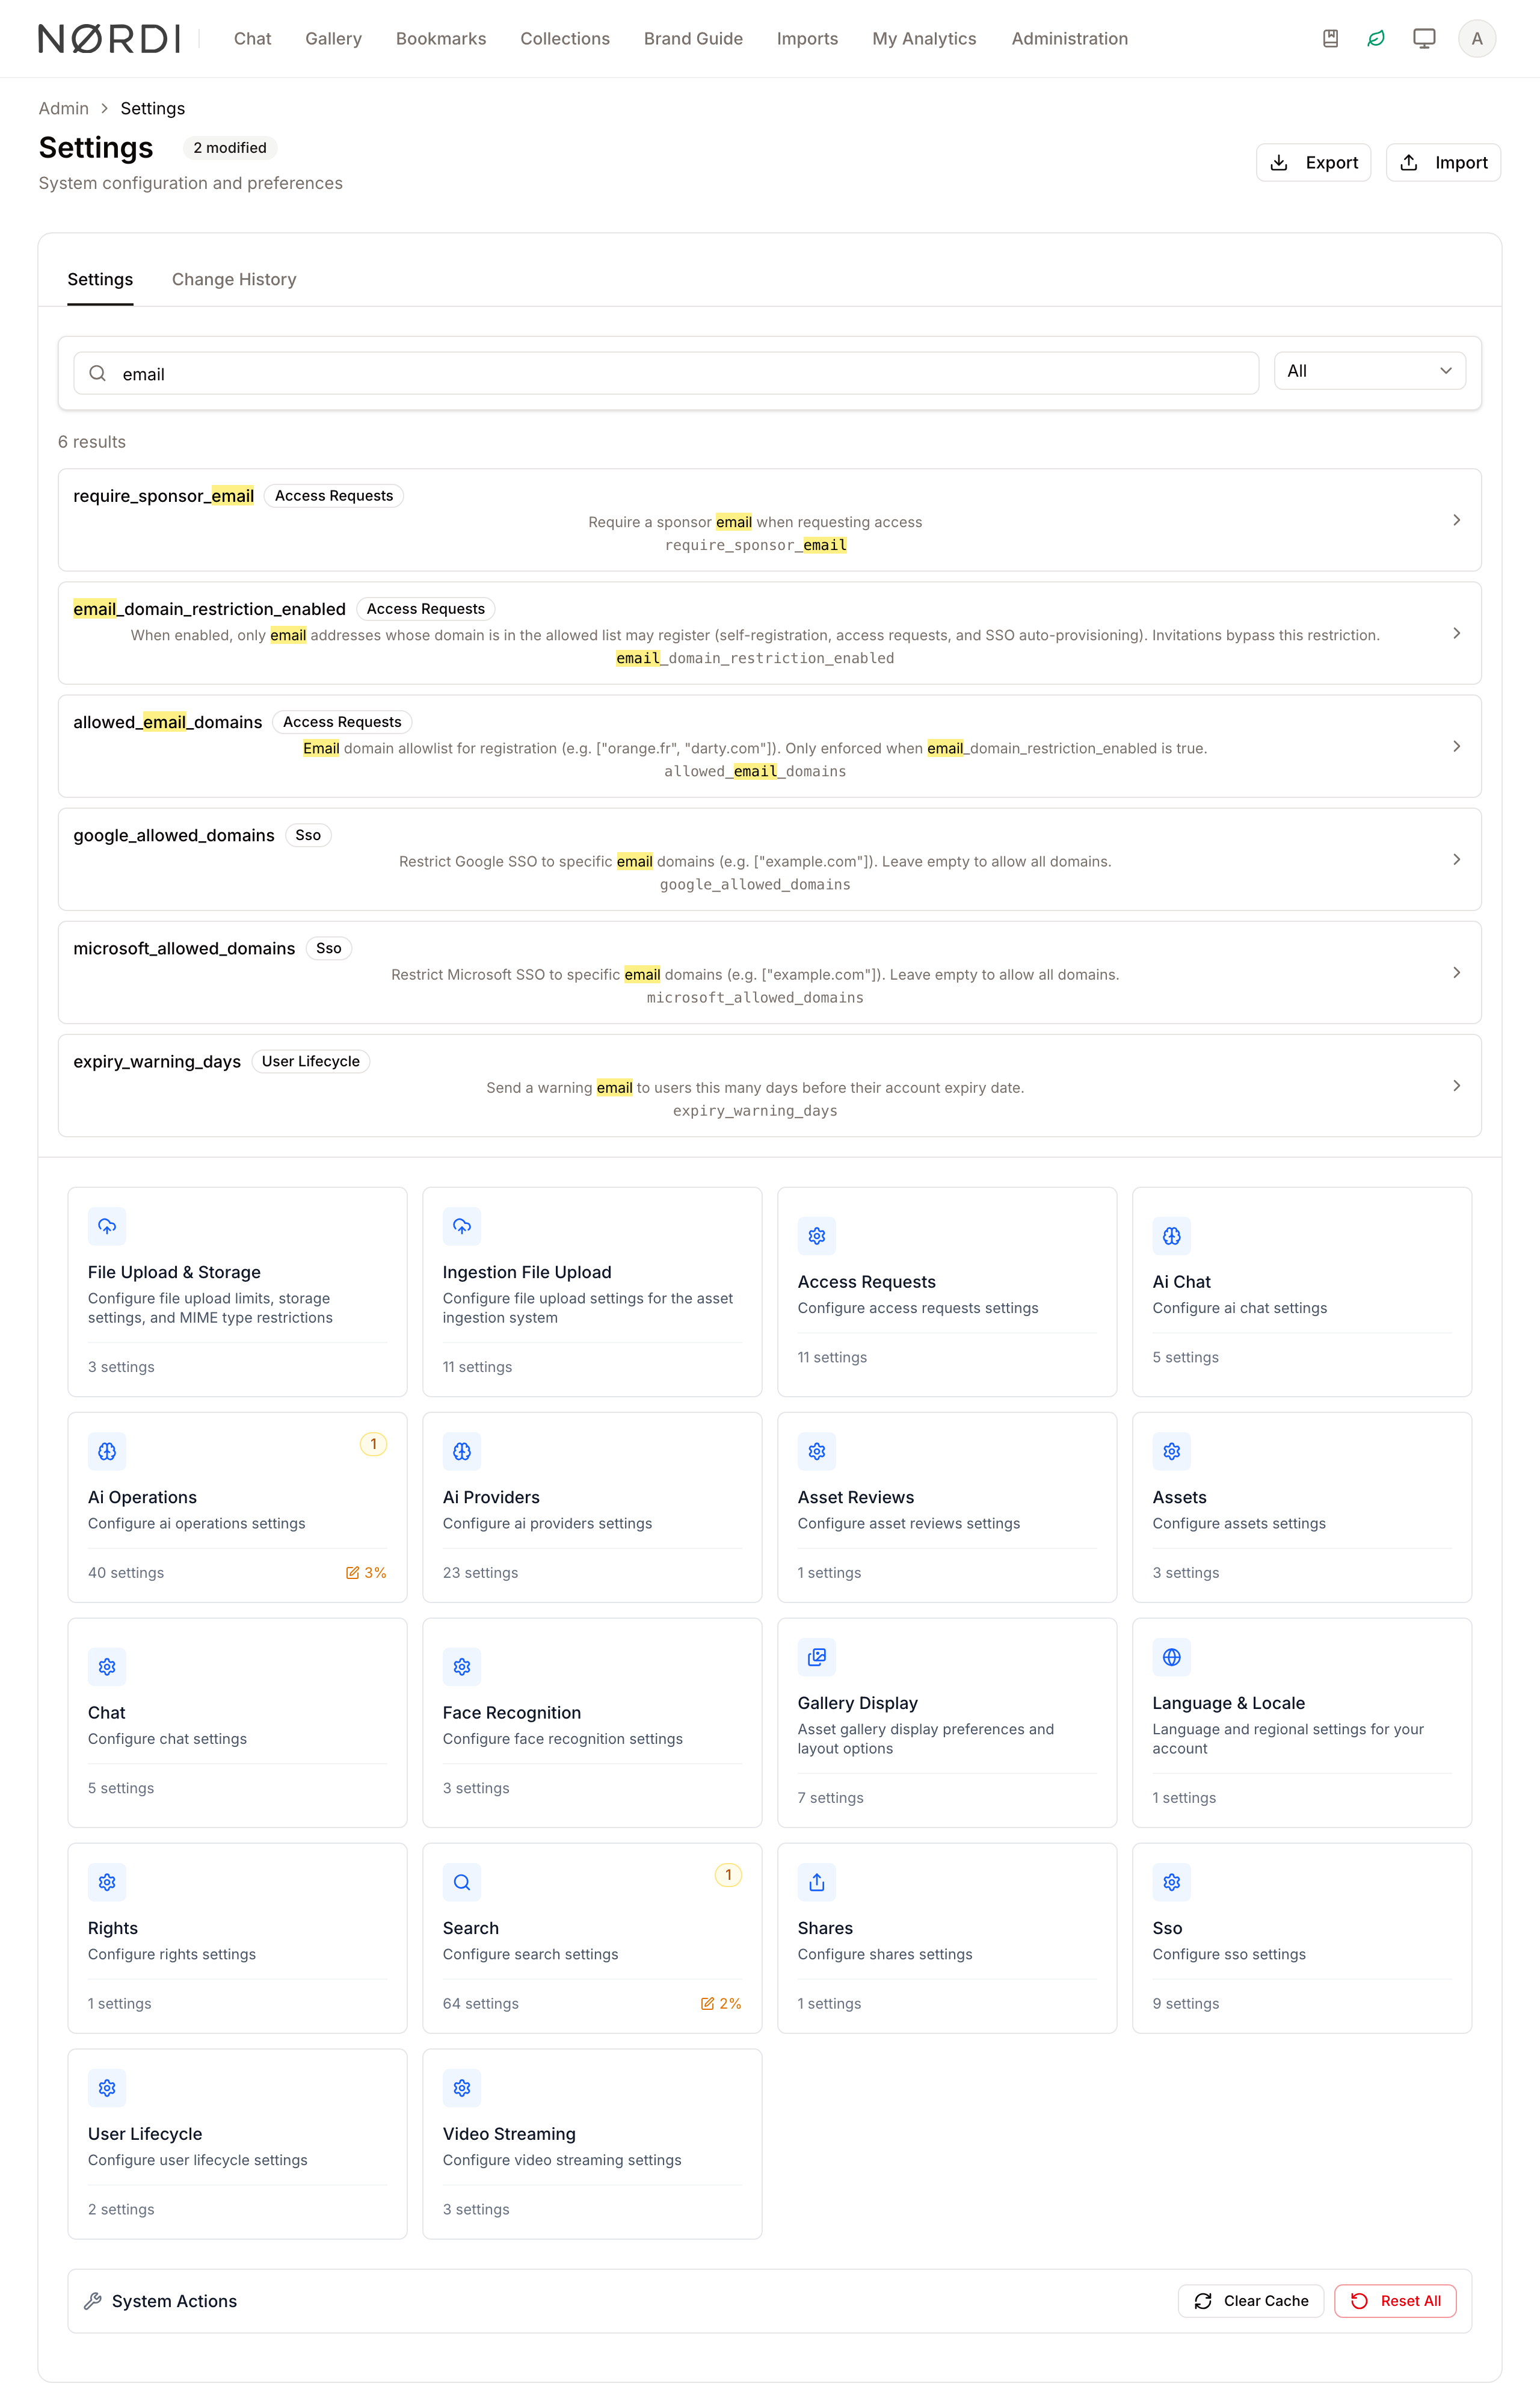
- What you'll see: A list of matching settings with highlighted text, showing their current category and modification status.
How to use it:
- Type at least two characters into the Search settings... field.
- (Optional) Select a specific category from the Category dropdown to narrow results.
- Click any result to jump directly to that setting's location.
Search looks through every setting's name, description, and current value, so you can find an option even if you only remember what it does rather than what it is called.
System Actions
- Purpose: Perform high-level maintenance and recovery tasks.
- Where to find it: At the bottom of the main Settings grid.
- What you'll see: Buttons for Clear Cache and Reset All.
How to use it:
- To refresh application data, click Clear Cache.
- To revert the entire system to factory defaults, click Reset All.
- Confirm the action in the warning dialog that appears.
Change History
- Purpose: Review a chronological log of all configuration modifications.
- Where to find it: Click the Change History tab at the top of the main card.
- What you'll see: A filterable table showing the "Setting," "Previous" value (in red), "New" value (in green), "User," and "Date."
How to use it:
- Use the Setting key... or User... fields to find specific entries.
- Click Filter to update the list.
- Use the Previous and Next buttons at the bottom to navigate through pages of logs.
Complete Workflows
Workflow: Updating System Settings
- Goal: Safely modify one or more system parameters.
- Prerequisites: Administrator permissions.
Steps:
- Select a category card (e.g., Security & Rate Limiting) from the main grid.
- Locate the setting you wish to change.
- For text or numbers, type the new value into the Value: field. For toggles, click the Switch.
- Observe the Pending badge that appears next to the setting name.
- Click Save Changes in the top right of the category view.
- Expected result: A success toast appears, and the Pending badge changes to Modified.
Workflow: Importing Configuration from a Backup
- Goal: Restore settings from a previously exported JSON file.
- Prerequisites: A valid
.jsonconfiguration file under 5MB.
Steps:
- Click Import in the top bar.
- Select your
.jsonfile from your computer. - In the confirmation dialog, click Preview Changes.
- Review the summary showing "Will be updated," "No changes," and "Errors."
- If the preview is correct, click Confirm Import.
- Expected result: The system updates all matching keys and displays a summary of the updated settings.
Import and export in detail
- Exports are produced in JSON by default and can also be generated as CSV when you only need a human-readable inventory. You can export the complete configuration, limit the export to a single category, or restrict it to settings that differ from their defaults.
- Imports accept JSON only and are capped at 5 MB, which is ample for the whole configuration. The importer refuses files that reference settings that do not exist in your system so that a file exported from a newer or customised installation can't silently create stray entries.
- Preview / dry-run mode runs the entire import in memory and reports which entries would change, which are already up to date, and which would be rejected - without writing anything to the system.
- Duplicates inside a single import file are caught before any change is applied, so copy-paste mistakes won't be half-applied.
User-level overrides
Some settings can be marked as "user-overridable" so that individual users can pick their own value from their personal preferences (for example, a default view or a notification style) while still inheriting the system default if they haven't chosen anything. The system administrator controls, per setting, whether that override is allowed and whether the setting is visible to users at all. Only system administrators can toggle those two flags.
Tips and Best Practices
- Use the Preview: Always use the Preview Changes button during an import to ensure you aren't accidentally overwriting critical API keys.
- Copy Original: When editing complex JSON or Array settings, use the Copy Original button to keep a backup of the working configuration before you start typing.
- Clear Cache: If settings don't seem to take effect immediately (especially performance or asset processing settings), use the Clear Cache action.
Troubleshooting
Issue: Import button is disabled or fails
- Symptoms: The "Confirm Import" button cannot be clicked, or a red error toast appears.
- Cause: The uploaded file may contain invalid JSON, exceed the 5MB size limit, or contain settings that fail database validation.
- Fix:
- Check the Preview Changes dialog for specific error messages per setting.
- Ensure the file extension is exactly
.json.
- Prevention: Only import files that were generated using the Export feature on this page.
Issue: Setting value reverts after typing
- Symptoms: You type a value, but it disappears or shows a red error message.
- Cause: The value entered violates a system constraint (e.g., entering text in a number field or exceeding a maximum character limit).
- Fix: Check for a "Database Constraint" warning box below the field which lists the maximum allowed value.