
Invitations
The Invitations feature allows you to grow your team by sending secure, time-limited email invites to new users. Instead of creating accounts manually, you can send a link that allows recipients to set up their own profiles and credentials.
You can invite one person or a whole batch at once, choose the role new members will receive, and track every invitation from a centralized dashboard - from initial send to account activation.
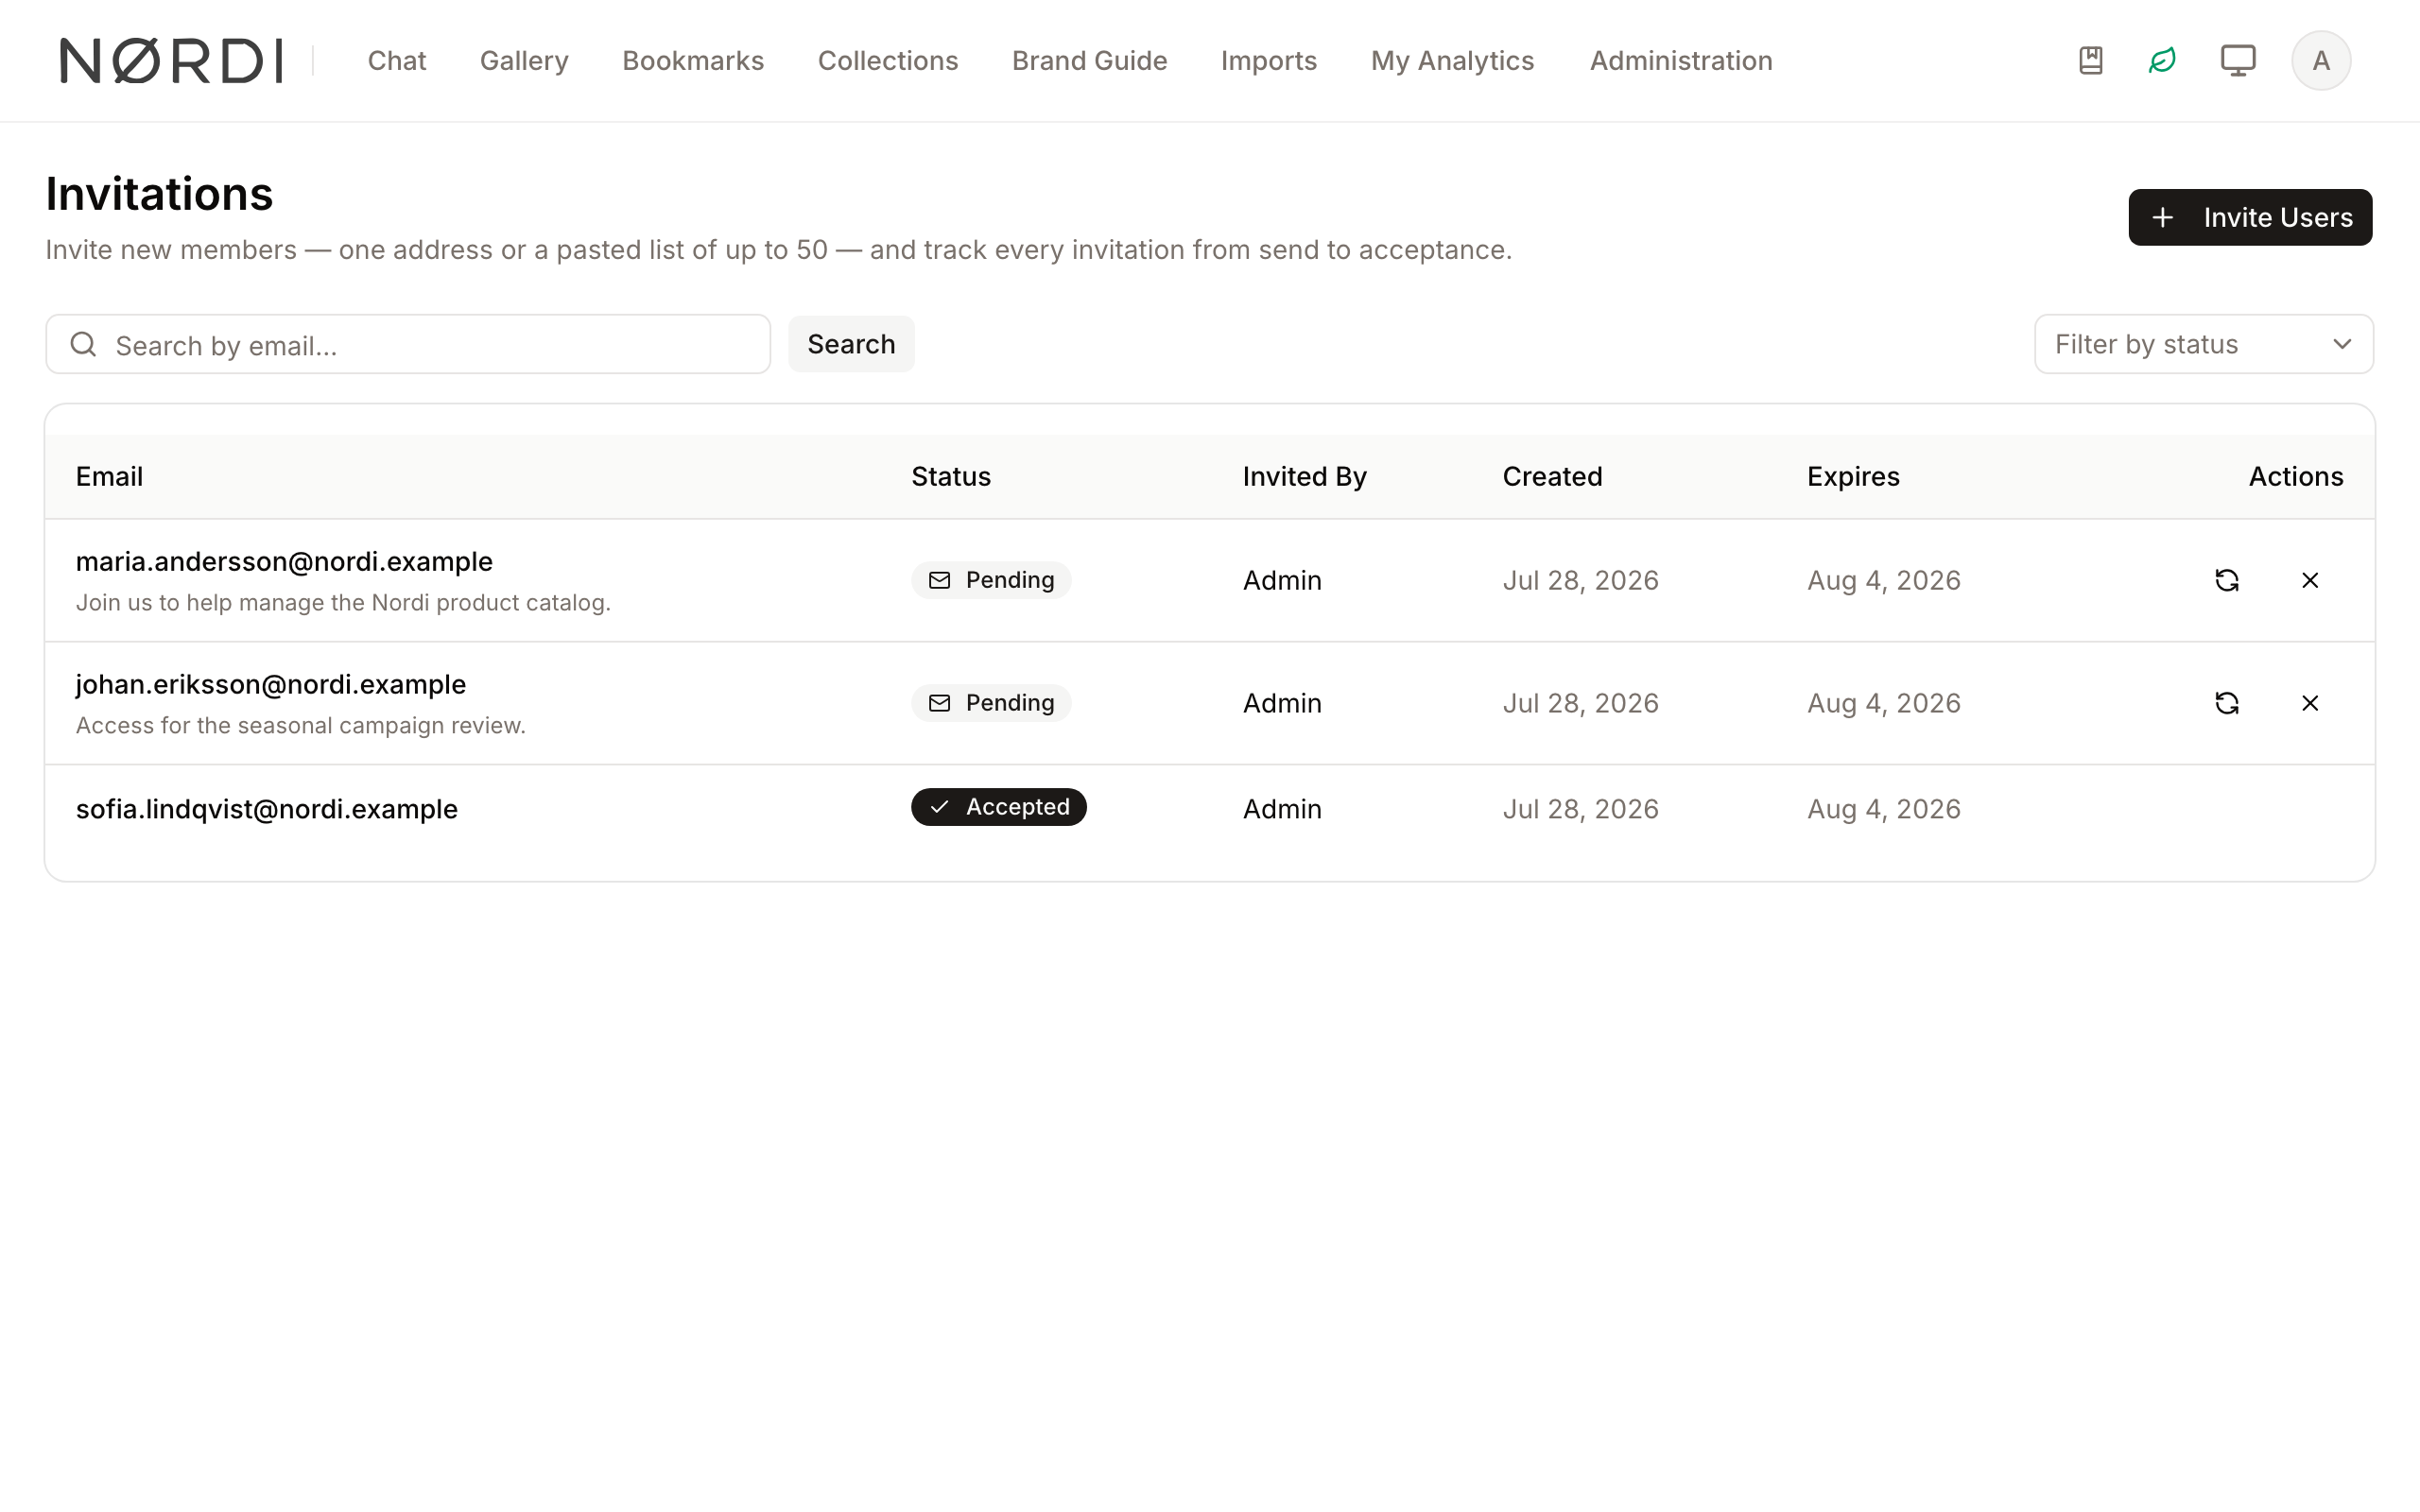
Page Overview
- Purpose: To manage the lifecycle of user invitations from initial send to account activation.
- When to use it: Use this page when you need to add new members to your organization or check if a colleague has accepted their pending invite.
- What you can do here:
- Send invitations to one or many email addresses at once, with custom messages.
- Choose the role invited users will receive when they join.
- Monitor invitation statuses (Pending, Accepted, Expired, etc.).
- Resend invitations to users who missed the original email.
- Cancel pending invitations to revoke access.
- Filter and search through your invitation history.
Page Layout
- Top bar: Displays the page title and the Invite Users button for starting new invitations.
- Main area: Contains a searchable, filterable table listing all invitations with details like recipient email, status, and expiration date.
- Filters: Located above the table, featuring a search field for emails and a status dropdown.
- Dialogs: Pop-up windows used for entering invitation details or confirming the cancellation of an invite.
Main Features
Batch Invitations
- What it's for: Sending registration links to one or many email addresses in a single step.
- Typical use: Onboarding a new employee, or inviting an entire department at once.
- Result: Each recipient receives an email with your personal message and a link to create their account. Every invitation carries its own unique, random 32-character token, so links can only be used by the person who receives them.
Role Selection
- What it's for: Deciding what invited users will be able to do before they even join.
- Typical use: Inviting external partners as viewers while colleagues join as editors.
- Result: When the recipient accepts, their account is created with the role you chose. If you leave the picker on Default role, the workspace's standard new-user role applies.
Status Tracking
- What it's for: Seeing the real-time progress of sent invites.
- Typical use: Checking if an invite has "Expired" or if the user has already "Accepted."
- Result: Visual badges update automatically as recipients interact with the email. An invitation moves through five possible states: Pending, Accepted, Declined, Expired, and Cancelled.
Invitation Management
- What it's for: Controlling active invites that haven't been used yet.
- Typical use: Resending an invite that is about to expire or cancelling one sent to the wrong address.
- Result: Resending refreshes the expiration timer; cancelling immediately invalidates the link in the user's inbox.
Who can use it
- Workspace admins (users with the "Send and manage user invitations" permission) can see and act on every invitation sent from the workspace.
- Other team members with invitation rights only see invitations they sent themselves - they cannot see or cancel invitations created by colleagues.
- If the workspace admin has turned invitations off globally, the Invite Users button disappears for everyone, regardless of individual permissions.
Detailed Feature Documentation
Send Invitations
- Purpose: To initiate the onboarding process for one or more new users.
- Where to find it: In the Top bar, look for the Invite Users button.
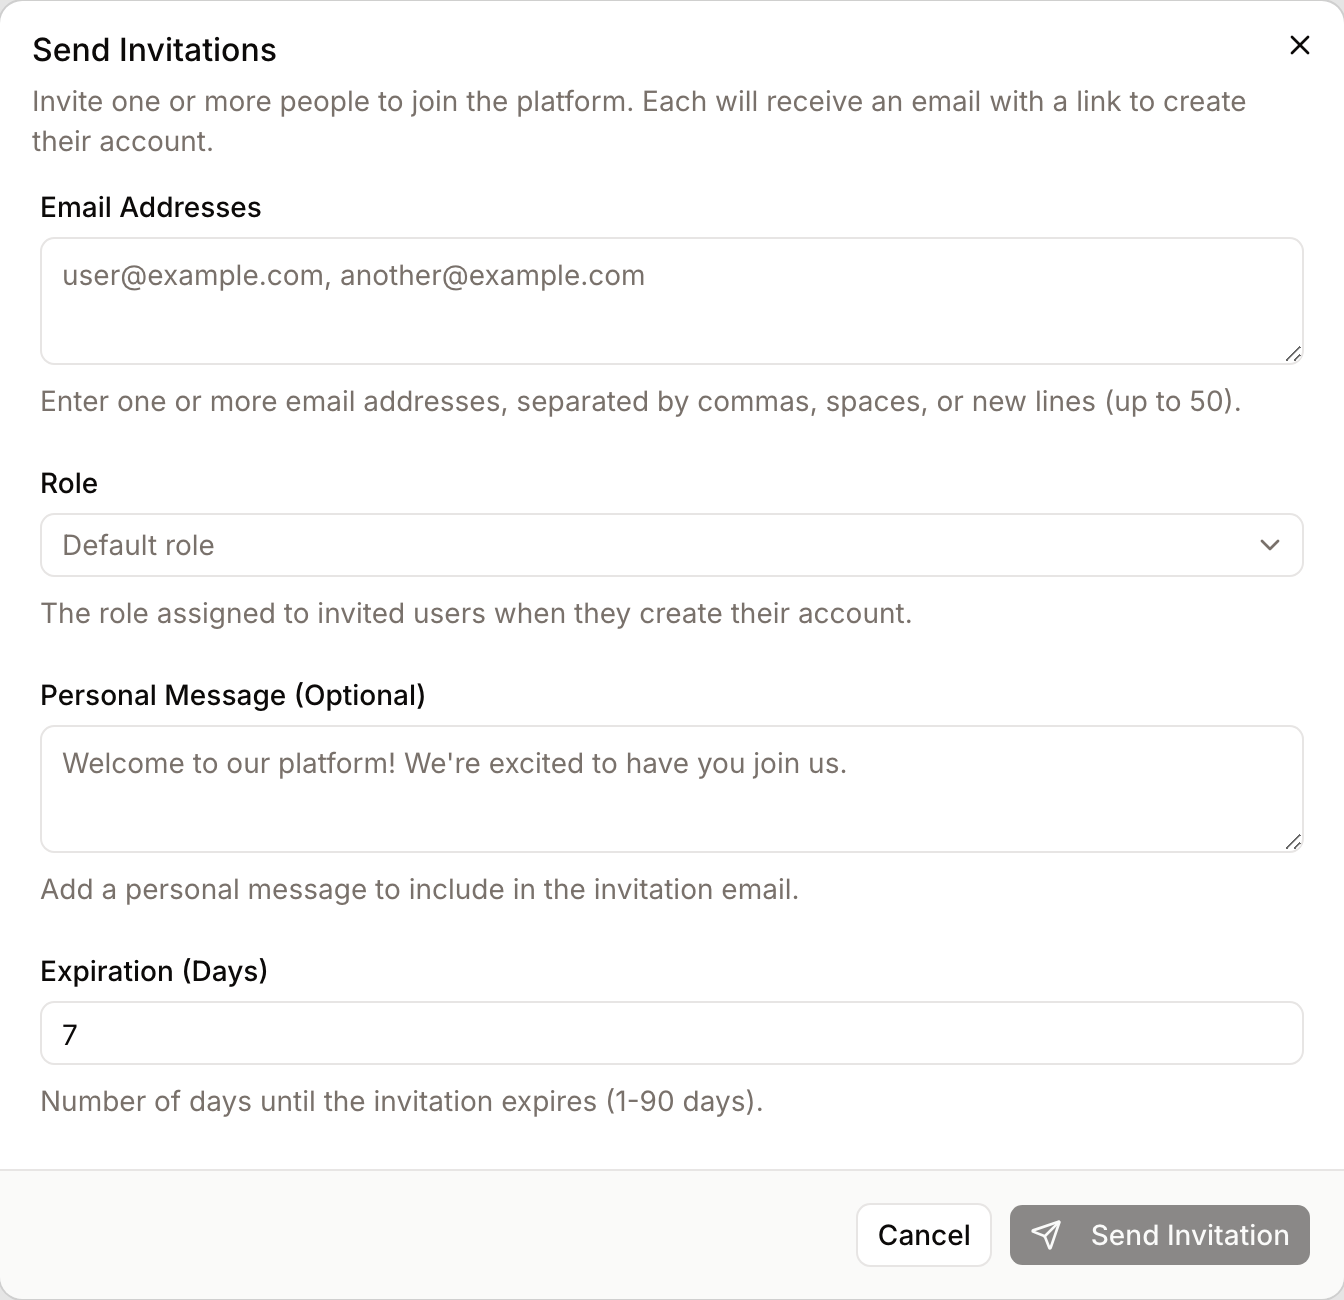
- What you'll see: A "Send Invitations" dialog box with fields for email addresses, role, message, and expiration.
How to use it:
- Click Invite Users.
- Enter one or more addresses in the Email Addresses field - separate them with commas, spaces, or new lines (you can paste a list straight from a spreadsheet or email thread). A counter below the field confirms how many people will be invited.
- (Optional) Pick a Role for the invited users. Leave it on Default role to use the workspace's standard new-user role.
- (Optional) Type a note in the Personal Message field to provide context to the recipients. The same message is included in every email of the batch.
- Set the Expiration (Days) (default is 7 days).
- Click Send Invitation (the button shows the number of invitations when you enter several addresses).
Search and Filter
- Purpose: To quickly find specific invitations in a large list.
- Where to find it: In the area above the table.
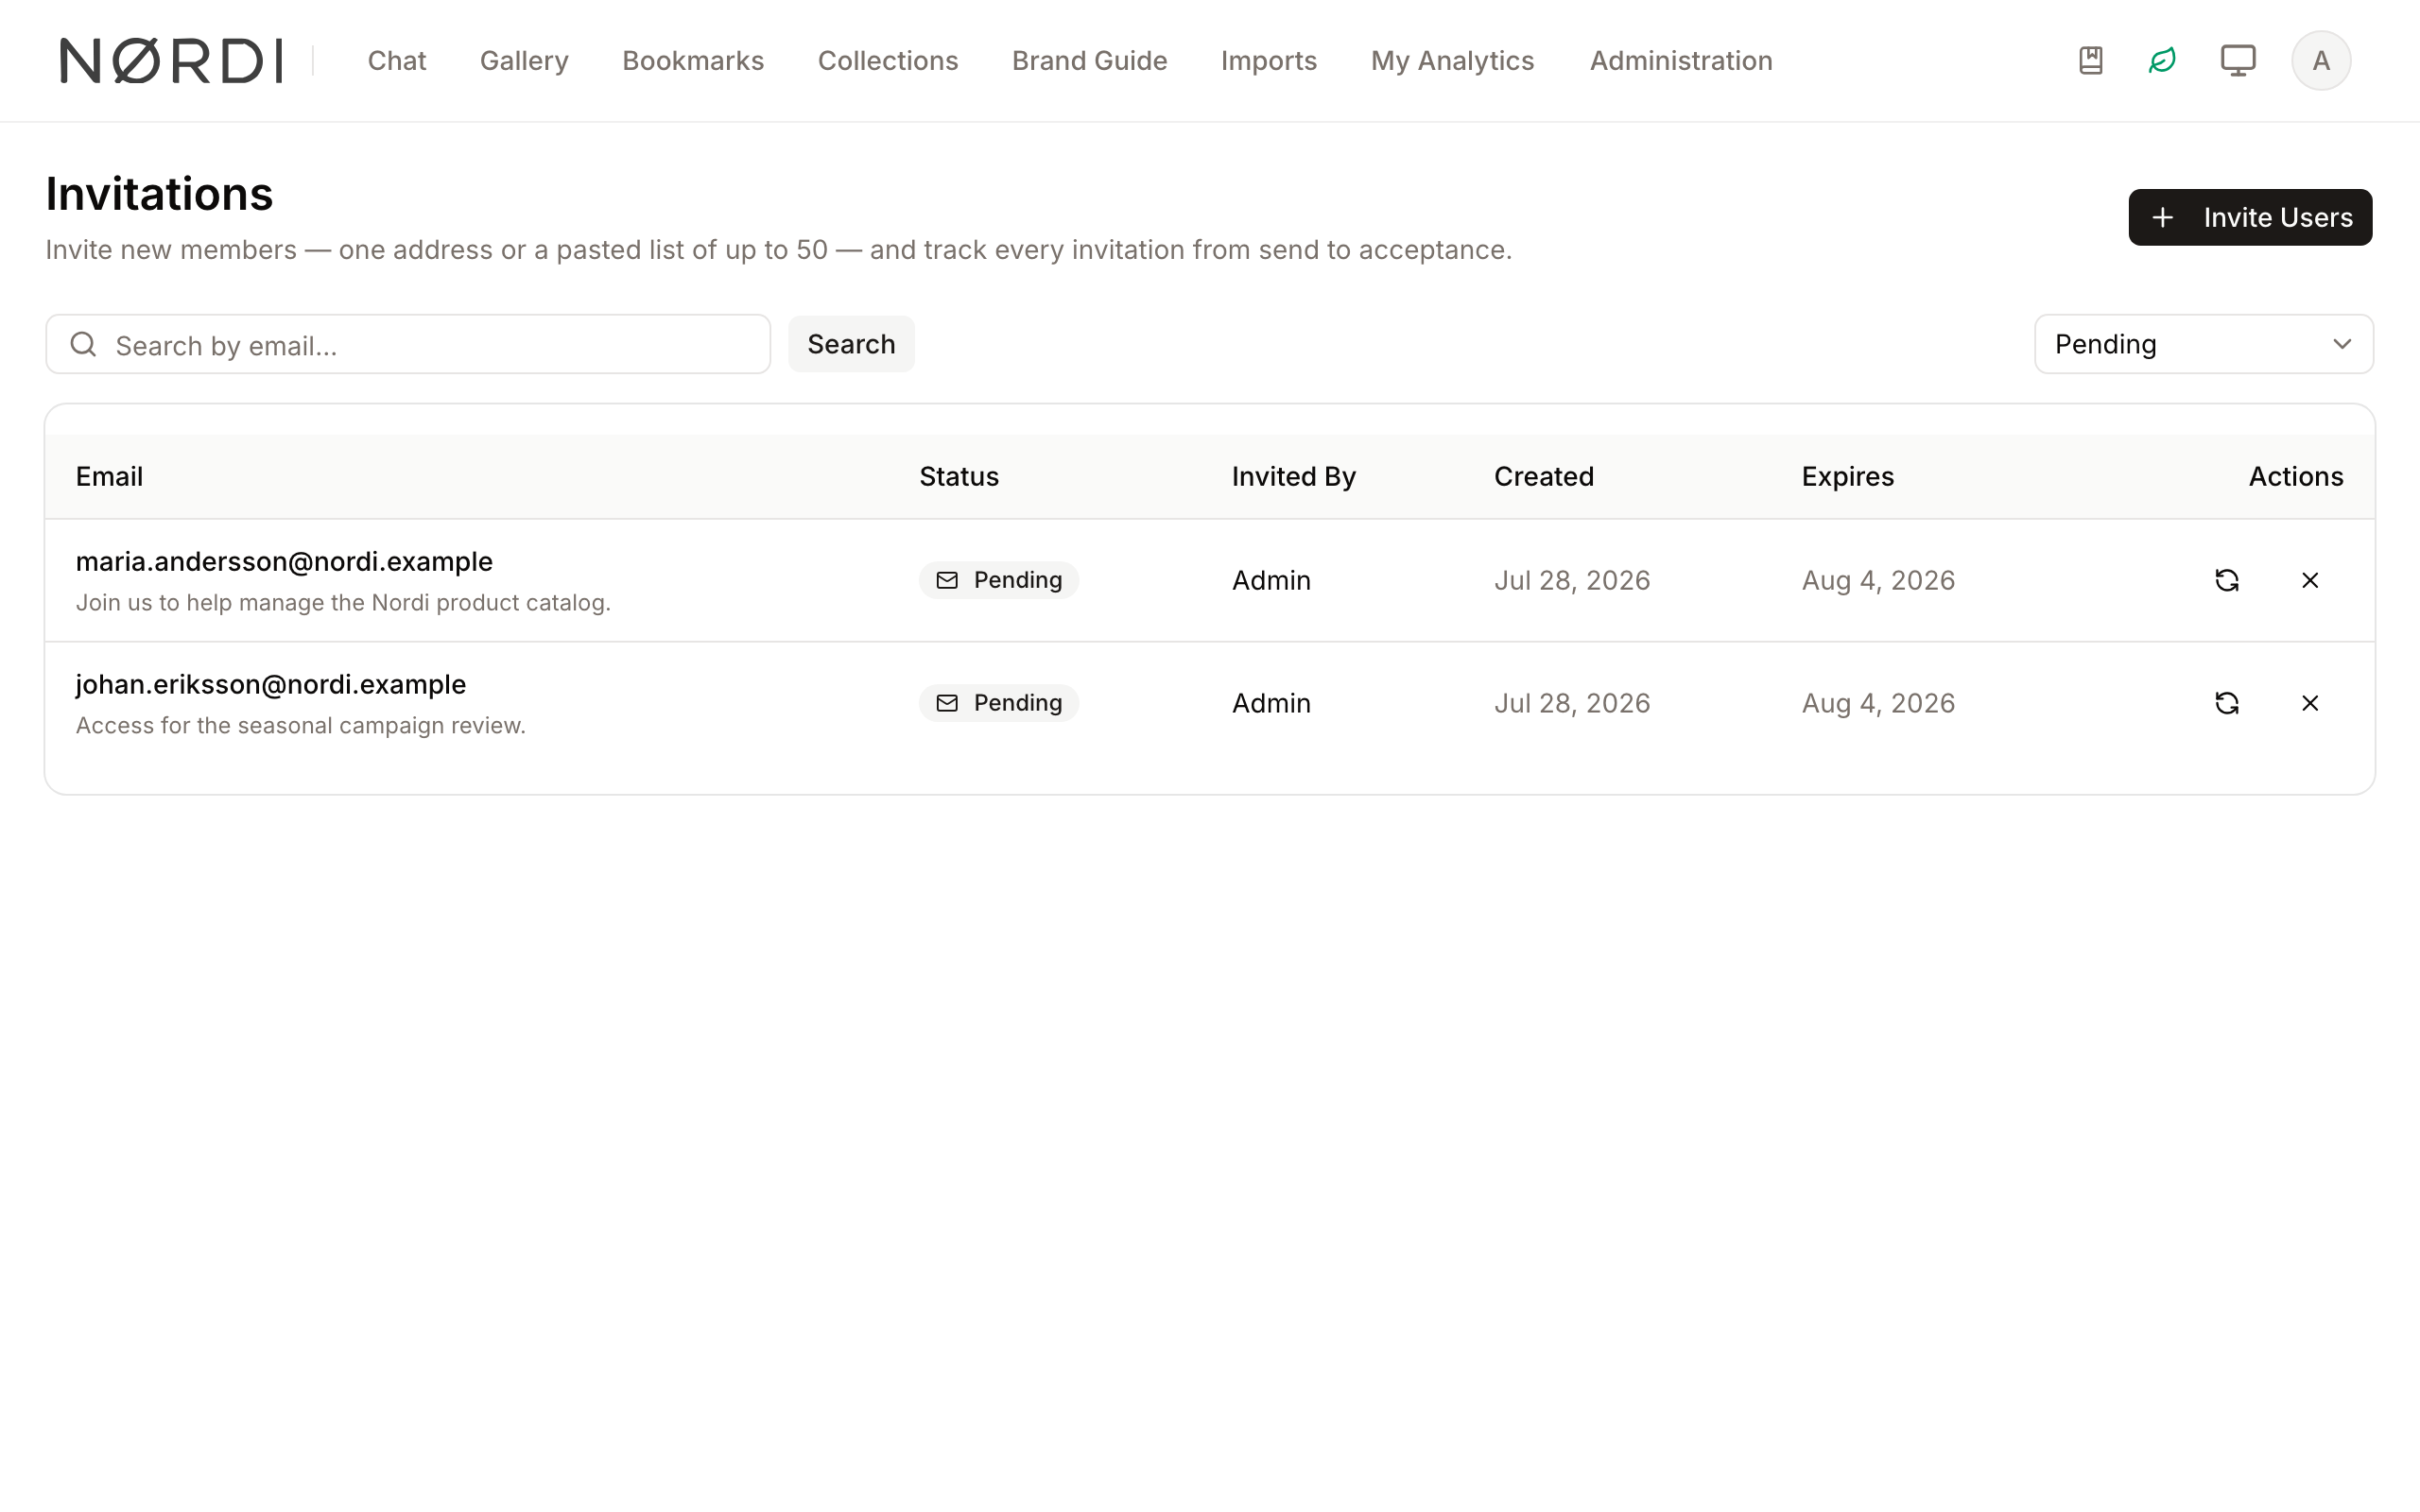
- What you'll see: The table rows update instantly to match your search terms or selected status.
How to use it:
- Type an email address into the Search by email... field and click Search (or press Enter).
- Click the Filter by status dropdown to show only specific types, such as "Pending" or "Expired".
- To clear filters, select the "Filter by status" placeholder or clear the search text and click Search.
Resend or Cancel
- Purpose: To manage "Pending" invitations that have not yet been accepted.
- Where to find it: In the Actions column of the invitations table (only visible for Pending status).
- What you'll see: A "Resend" icon (circular arrow) and a "Cancel" icon (X).
How to use it:
- To resend: Click the Resend invitation icon. The system will refresh the link and send a new email.
- To cancel: Click the Cancel invitation icon.
- In the confirmation dialog that appears, click Cancel Invitation to finalize - or Keep Invitation to back out safely.
Complete Workflows
Workflow: Inviting a New Team Member
- Goal: Successfully send an invite and ensure the user receives it.
- Prerequisites: You must have administrative permissions to manage invitations.
Steps:
- Click Invite Users in the top right.
- In Email Addresses, type the user's work email.
- In Personal Message, type "Welcome to the team! Please set up your account by Friday."
- Set Expiration (Days) to "5".
- Click Send Invitation.
- Expected result: A success message appears, and a new row with "Pending" status appears in the table.
- If it doesn't work: Check that the email address is formatted correctly. If some addresses fail, the error message lists exactly which ones so you can retry just those.
Workflow: Inviting a Whole Team at Once
- Goal: Onboard a group of users with the right role in one action.
- Prerequisites: You must have administrative permissions to manage invitations.
Steps:
- Copy the list of email addresses from your source (a spreadsheet column works fine).
- Click Invite Users and paste the list into Email Addresses - the counter below the field shows how many recipients were recognized.
- Pick the appropriate Role for the whole group.
- Click Send Invitations.
- Expected result: One "Pending" row per recipient appears in the table, and each person receives their own personal invitation link.
- If it doesn't work: Addresses that already have a pending invitation or an existing account are listed in the error message - remove them from the field and send again. A single batch is limited to 50 addresses; split larger lists.
Workflow: Renewing an Expired Invite
- Goal: Give a user more time to accept an invitation that has already passed its expiration date.
- Prerequisites: The invitation must currently show as "Expired" or "Pending".
Steps:
- Locate the user in the list (use the Search field if necessary).
- Click the Resend invitation icon in the Actions column.
- Wait for the loading icon to disappear.
- Expected result: The "Expires" date in the table updates to 7 days from today, and the status returns to "Pending".
- If it doesn't work: If the user has already "Accepted" or "Declined," the resend button will not be available.
Emails sent by the invitation system
- Invitation email: Sent to each recipient with your personal message, the acceptance link, and the expiration date.
- Expiry reminder: If an invitation is still unused 48 hours before it expires, the recipient automatically receives one reminder with a fresh copy of the link. No action is needed on your side.
- Acceptance notification: When a recipient creates their account, you receive an email confirming they joined - no need to keep checking the table.
- New-invitation request: If someone opens an expired or cancelled link, the error page lets them ask you for a new invitation with one click. You'll receive an email naming the person, and can resend from the invitations page.
Limits and guardrails
- Batch size: Up to 50 addresses per send. Duplicate addresses within one batch are merged automatically, and letter case doesn't matter -
[email protected]and[email protected]are the same recipient. - Expiration window: Invitations expire after 7 days by default. You can set any value from 1 to 90 days when sending.
- Personal message length: Up to 1,000 characters. Leave it blank if you prefer.
- No duplicates: If a pending, unexpired invitation already exists for an address, the system refuses to create a second one and names the address - resend the existing invite instead.
- No invites to existing members: If an address already belongs to a Freedam account, the invite is rejected with a message naming that address.
- Send limit: A single user can send at most 10 invitation batches per minute, and resend at most 5 invitations per minute. This protects recipients from accidental flooding.
- If an email can't be delivered: Only the failed invitations are rolled back - the rest of the batch goes through, and the error message lists the addresses to retry.
What happens behind the scenes
- A valid invitation link always leads to the account creation form, whatever the workspace's registration settings. Even when self-registration is off, or new sign-ups need accreditation, the invited person is not sent to the request-access form: the invitation itself is the approval.
- When someone clicks a valid invitation link and creates their account, Freedam automatically links the new user to the invitation, marks the invitation as Accepted, assigns the role chosen at invite time, and skips the usual email verification step - the invite itself proves the address works.
- When an invitation is resent after it has already expired, its clock is reset: the status flips back to Pending and a fresh 7-day window begins.
- Cancelled invitations cannot be resurrected. If you cancel by mistake, simply send a new invitation to the same email.
- Recipients who open an expired, cancelled, accepted, or declined link see a clear explanation page showing who invited them - and for expired or cancelled invites, a button to request a new invitation directly from that person.
Tips and Best Practices
- Check Expiration: Invitations expire after 7 days by default. If you know a recipient is on vacation, set the Expiration (Days) to a higher value (up to 90) when sending. Recipients also get an automatic reminder 48 hours before their invite lapses.
- Personalize: Use the Personal Message field so recipients know the email isn't spam.
- Pick the role up front: Choosing the right role at invite time saves you from editing each account after people join.
- Monitor Status: Regularly filter by "Expired" to see which users failed to sign up, so you can follow up or reclaim the seat.
Troubleshooting
Issue: Invitation link doesn't work for the recipient
- Symptoms: User reports an "Invalid" or "Expired" error page when clicking the email link.
- Cause: The invitation may have passed its expiration date, or it was cancelled by an admin after being sent.
- Fix: The recipient can click Ask ... for a new invitation right on the error page - you'll get an email and can resend. Alternatively, find the invitation in your list and click the Resend invitation icon yourself.
- Prevention: Ensure the Expiration (Days) provides enough time for the user to respond.
Issue: Some addresses in my batch were refused
- Symptoms: An error message lists one or more email addresses after clicking Send.
- Cause: Those addresses either already have a pending invitation or already belong to an existing account.
- Fix: Remove the listed addresses from the field and send the batch again. For addresses with a pending invite, use Resend invitation in the table instead.
Issue: "Invite Users" button is missing
- Symptoms: The top bar only shows the title "Invitations" without the action button.
- Cause: You may not have the required administrative permissions, or invitations have been disabled for your account.
- Fix: Contact your system administrator to verify your "Admin Invitations" permissions.