
Users
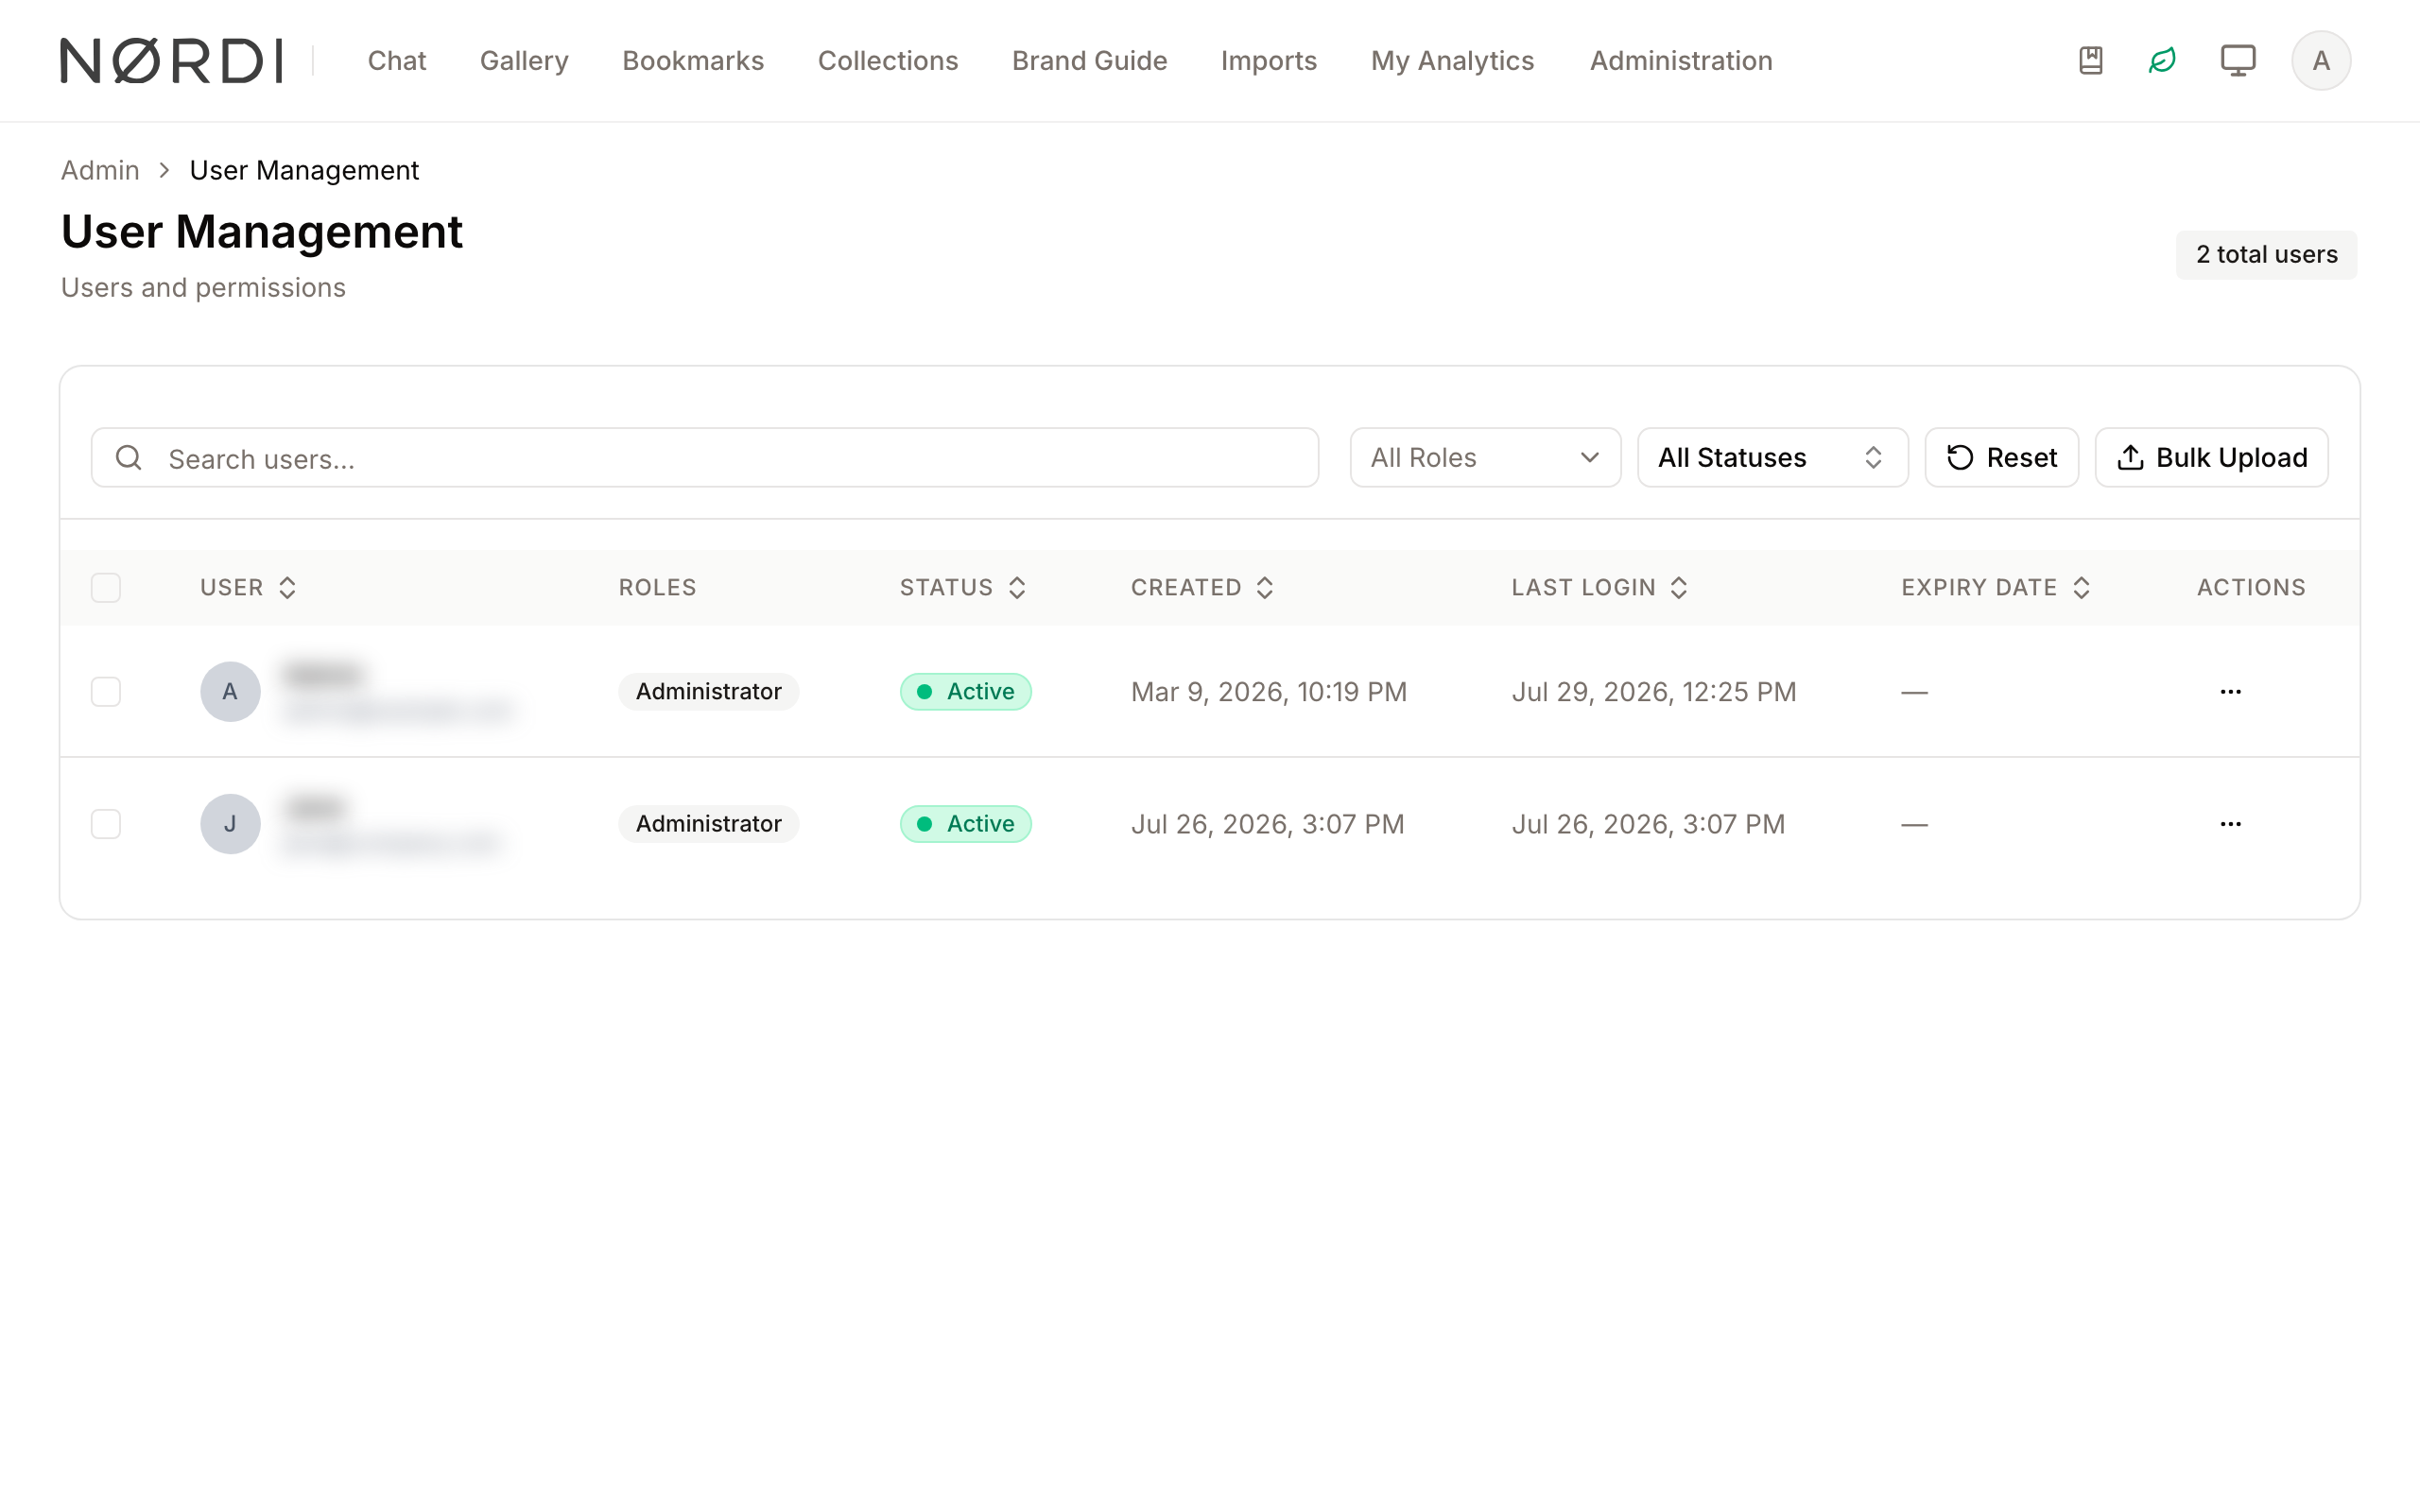
The Users feature is the central hub for administrators to manage access to the Digital Asset Management (DAM) system. It provides a comprehensive interface for overseeing every person with an account, ensuring that only authorized individuals can view or modify your organization's assets.
From this page, administrators can create users, update profile information, assign security roles, and monitor account activity. It also includes critical governance tools, such as setting account expiry dates and managing the transfer of asset ownership when a user is removed from the system.
Page Overview
- Purpose: To provide a centralized directory for managing user identities and system permissions.
- When to use it: Use this page when you need to onboard new team members, change a user's access level, deactivate accounts, or audit who has access to the system.
- What you can do here:
- Search and filter the user directory by name, email, role, or status.
- View detailed user profiles including verification status and account history.
- Assign or change system roles to control feature access.
- Set automatic account expiry dates for temporary contractors or partners.
- Perform bulk actions like status updates or CSV-based user imports.
- Securely delete users while transferring their owned assets to a new owner.
Page Layout
- Top bar: Displays the "User Management" title, a summary of total users, and breadcrumb navigation for system context.
- Main area: Contains the search bar, filter controls (Role and Status), and the primary user table.
- User Table: A sortable list showing user avatars, names, emails, assigned roles, current status, and key dates (Created, Updated, Expiry).
- Dialogs: Contextual pop-ups appear for viewing user details, editing profiles, confirming deletions, and managing CSV uploads.
Main Features
User Directory & Search
- What it's for: Quickly locating specific users within large organizations.
- Typical use: Type a name or email into the search field to find a specific account.
- Result: The table updates in real-time to show only matching users.
Role Assignment
- What it's for: Defining what a user can see and do in the DAM.
- Typical use: Selecting a role (e.g., Administrator, Editor) from the dropdown within a user's profile.
- Result: The user's permissions are immediately updated based on the selected role's configuration.
Account Status Management
- What it's for: Controlling whether an account is currently active or restricted.
- Typical use: Using the "Change Status" menu to move a user to "Active", "Deactivated", or other custom statuses.
- Result: The user's ability to log in or perform actions is updated, and a colored status badge appears in the table.
Bulk CSV Upload
- What it's for: Onboarding large groups of users simultaneously.
- Typical use: Uploading a formatted CSV file containing names and emails to create multiple accounts at once.
- Result: New accounts are created, roles are assigned, and welcome emails are sent automatically.
Detailed Feature Documentation
User Search and Filtering
- Purpose: To narrow down the user list based on specific criteria.
- Where to find it: At the top of the main card area.
- What you'll see: A search input field and dropdown menus for "All Roles" and "Status".
How to use it:
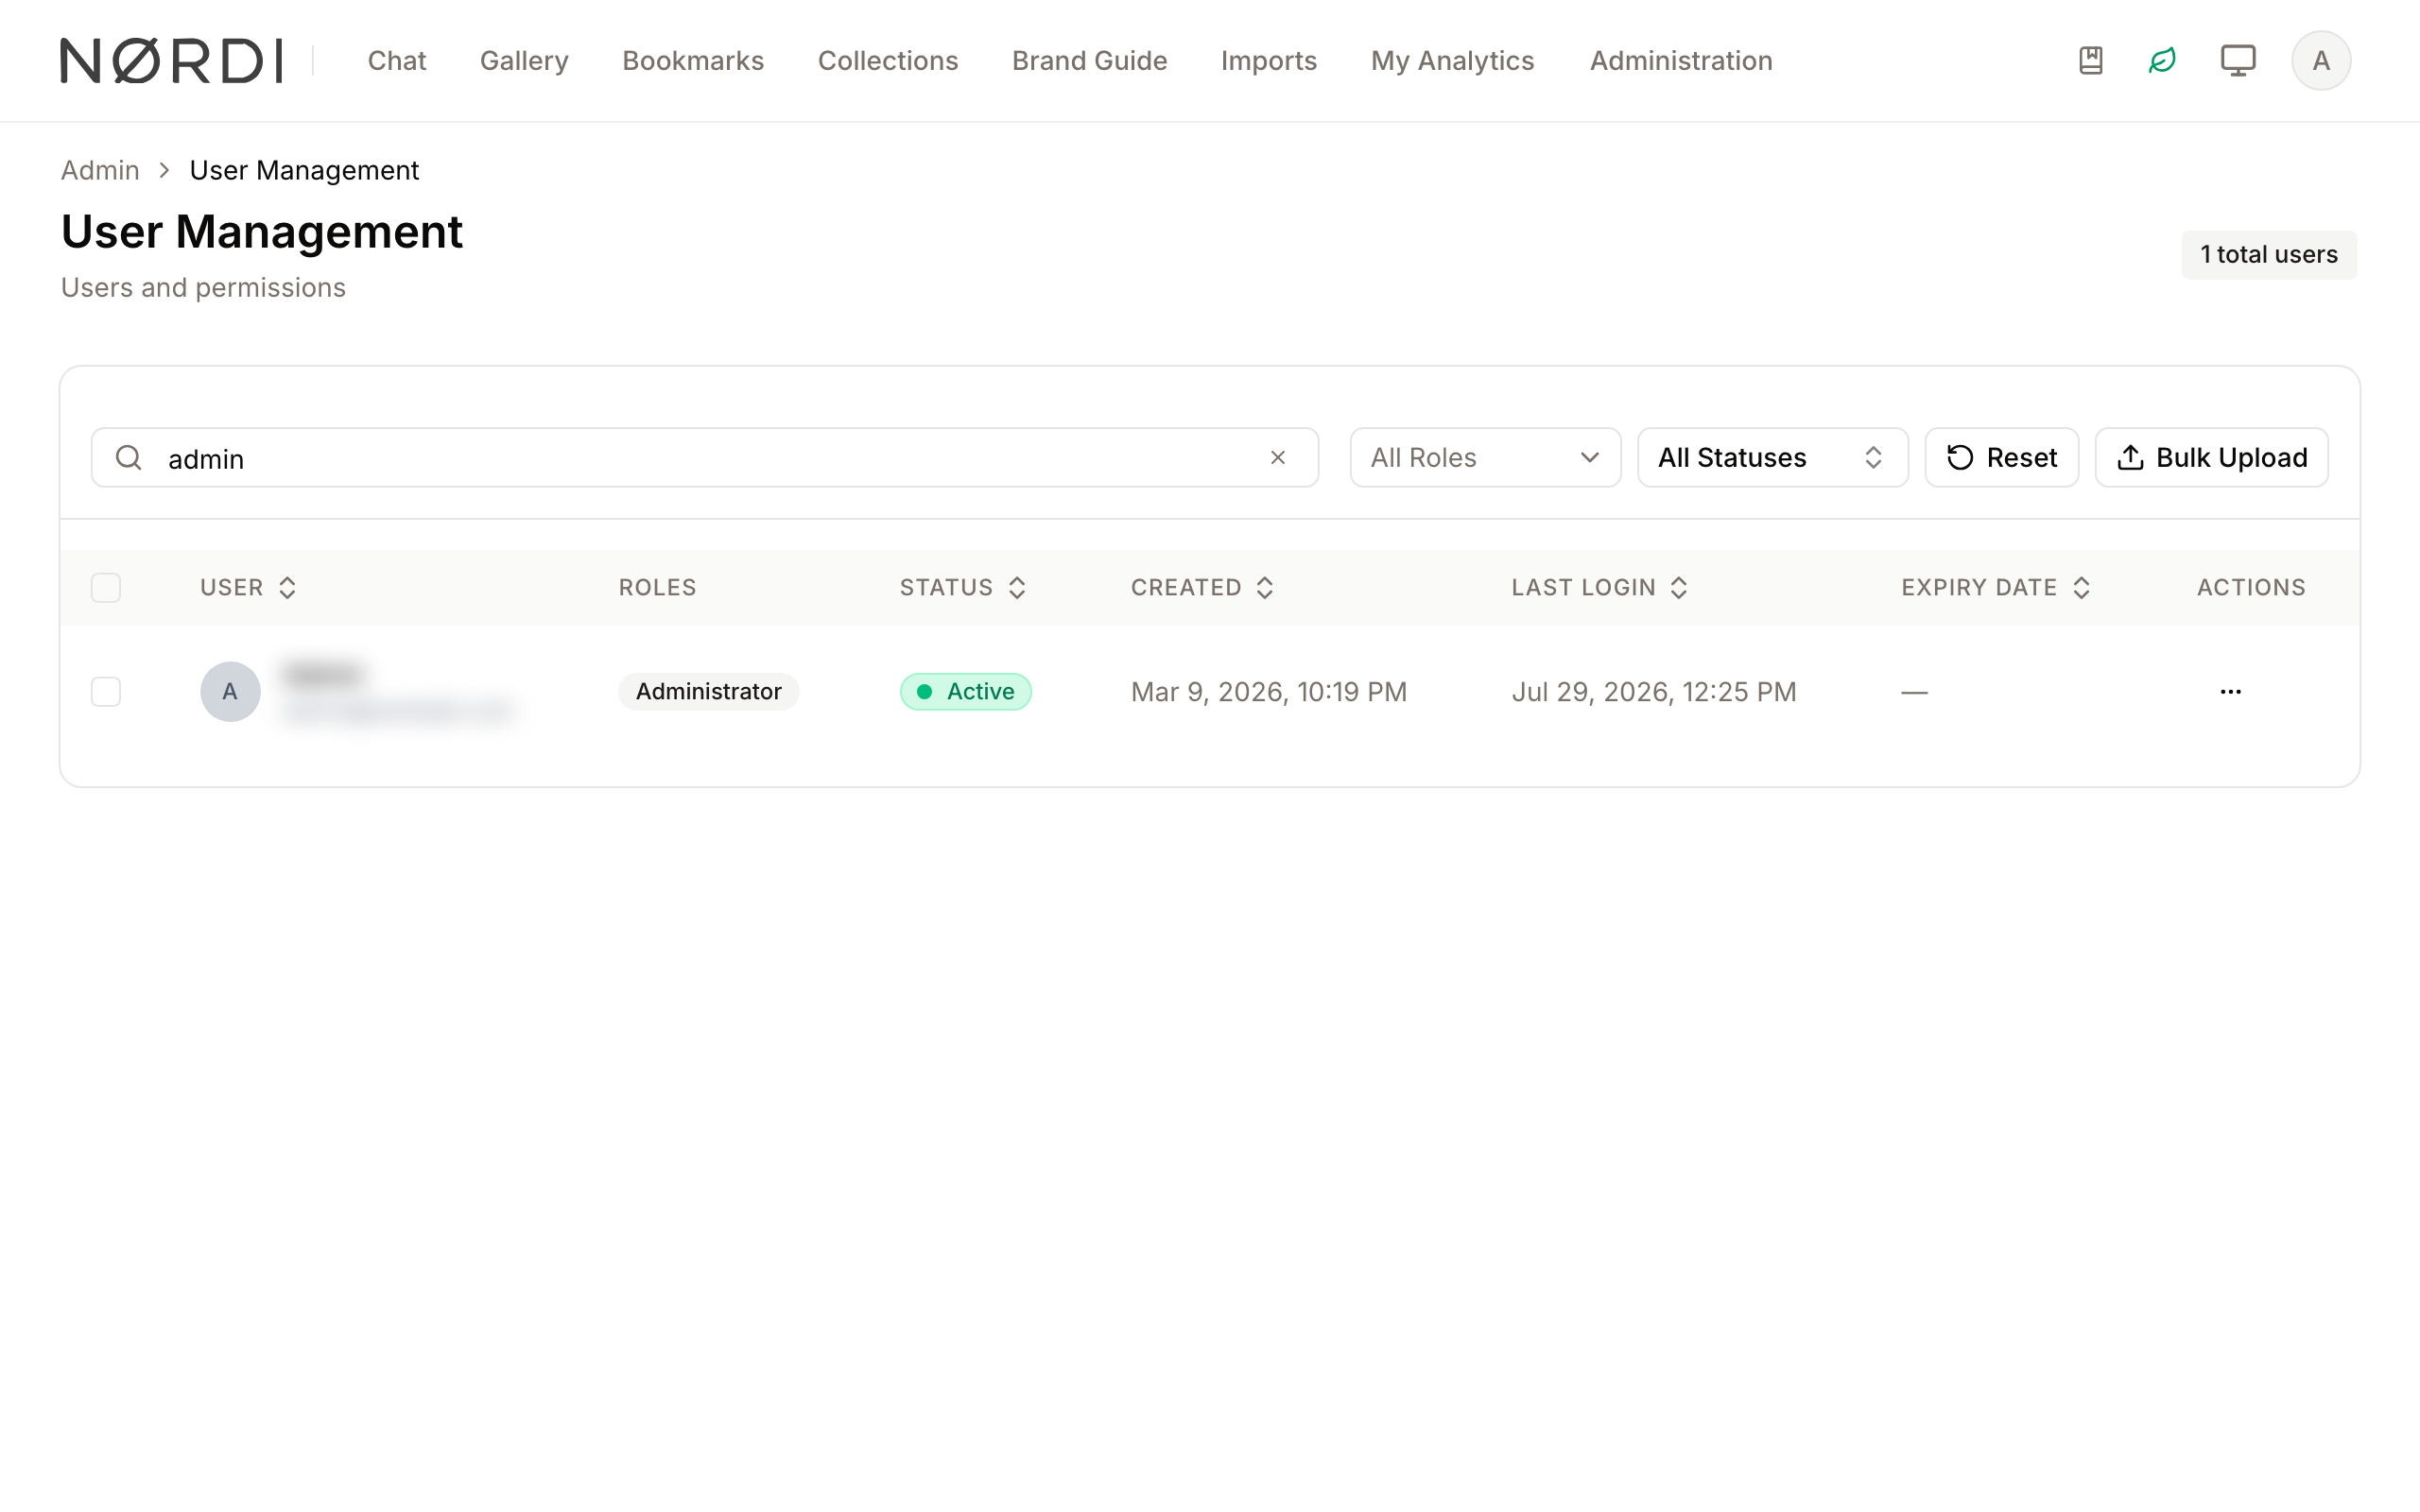
- Type a name or email into the Search users by name or email... field.
- Click the Role filter (dropdown) to show only users with a specific permission level.
- Click the Status filter (button) to select one or more account states (e.g., Active, Pending).
- Click Reset to clear all active filters and show the full list.
Bulk User Upload
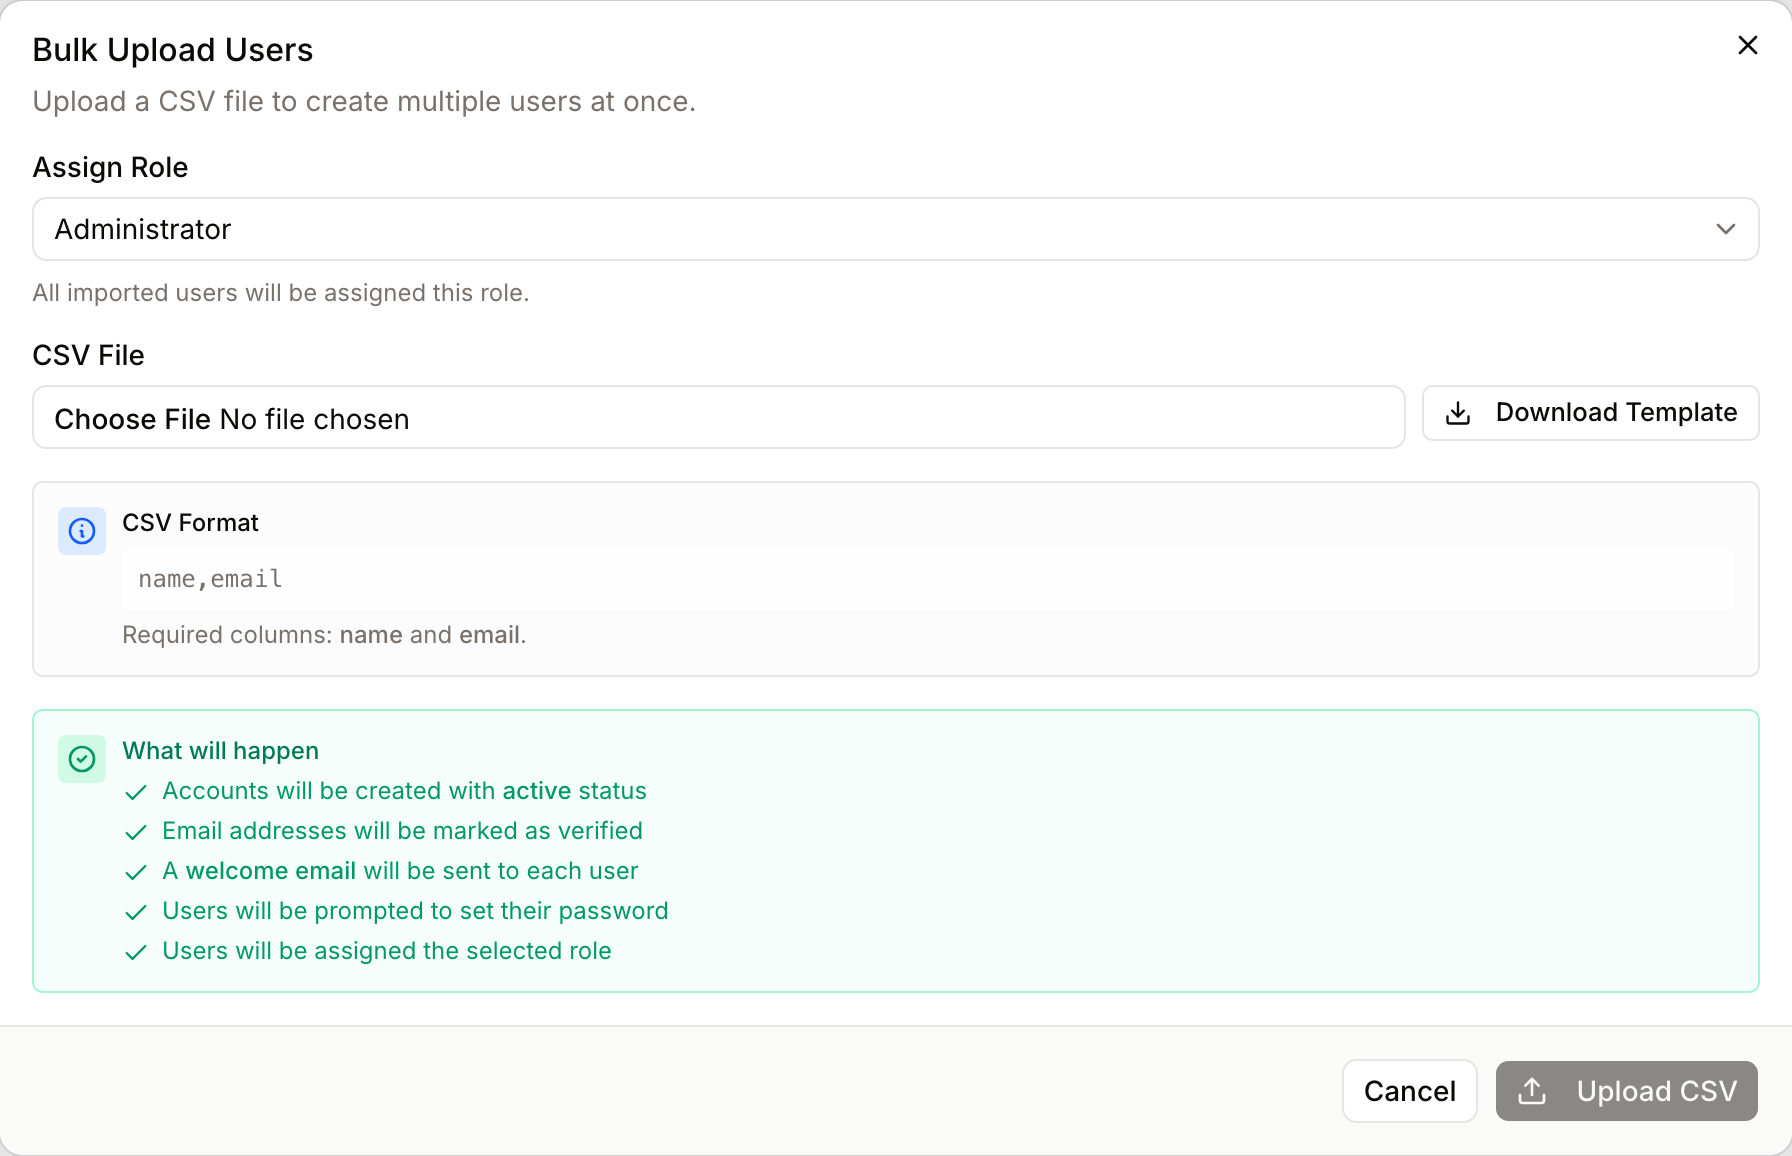
- Purpose: To create many user accounts at once using a spreadsheet.
- Where to find it: Click the Bulk Upload button in the top right of the main area.
- What you'll see: A dialog window with role selection, a file upload area, and a link to download a template.
How to use it:
- Click Template to download the required CSV format.
- Fill out the CSV with "name" and "email" columns.
- In the dialog, select a role from the Assign Role to All Users * dropdown.
- Click CSV File to select your prepared file.
- Click Upload CSV.
Account Expiry
- Purpose: To automatically deactivate an account on a specific future date.
- Where to find it: In the user table, click the Actions (three dots) menu for a user and select Set Expiry Date.
- What you'll see: A calendar picker dialog.
How to use it:
- Select a date in the Expiry Date field.
- Click Set Expiry Date.
- To remove an existing expiry, open the dialog and click Remove Expiry.
Complete Workflows
Workflow: Deactivating a User and Transferring Assets
- Goal: Safely remove a user's access while ensuring their uploaded assets remain available under a new owner.
- Prerequisites: You must have administrative permissions and know who the new asset owner should be.
Steps:
- Locate the user in the table and click the Actions (three dots) menu.
- Select Delete.
- If the user owns assets, the system will display an "Owned Assets" warning.
- In the New Asset Owner search field, type the name of the person who will take over the assets.
- Select the new owner from the results list.
- Click Delete User.
- Expected result: The user is removed from the system, and all their assets are reassigned to the selected person.
- If it doesn't work: Ensure you have selected a valid new owner; the "Delete User" button remains disabled until a new owner is chosen for users with assets.
Workflow: Changing Status for Multiple Users
- Goal: Update the status of several users at once (e.g., deactivating a group of seasonal workers).
- Prerequisites: Users must be visible in the current table view.
Steps:
- Click the Checkbox next to each user you wish to update.
- Click the Bulk Actions button that appears at the top of the table.
- Select Change Status.
- Choose the new status (e.g., Deactivated) from the sub-menu.
- Click Change status in the confirmation dialog.
- Expected result: All selected users will show the new status badge in the table.
Who can use it
This page is reserved for people with the "Manage users" permission - usually workspace administrators and team leads. Standard members see their own profile only. The page description for this permission is simply "create, edit, and manage user accounts" - the full lifecycle of every account in your workspace.
Every action on this page is checked individually, so even an admin can edit a user only if their permission allows it.
Limits and guardrails
- Administrator seat cap: Your subscription plan sets the maximum number of people who can hold an administrator-level role at the same time. If you try to promote someone past the cap, the change is blocked and the dialog shows the limit along with a "Request upgrade" link that opens a conversation with your workspace owner. The cap is enforced when you edit a user, during bulk CSV upload, and when reassigning roles.
- Self-protection: You cannot delete, deactivate, or remove the administrator role from your own account. The system checks this silently and returns a clear message if you try, so you can never lock yourself (or the last admin) out of the admin console.
- Asset hand-off is mandatory: If the user you are removing still owns uploaded assets, deletion is refused until you pick a new owner. This protects your library from orphaned files.
- Status changes are logged: Every update - role swap, status change, expiry date - is attributed to the admin who performed it, so you always know who made the change.
What happens behind the scenes
- Welcome email flow: New accounts (single or bulk) are created with a random password and an automatically generated secure password-reset link. The user receives a branded welcome email with that link and sets their own password on first visit. The email also serves as email verification, so no separate "verify your email" step is needed.
- Bulk CSV upload - row-by-row rollback: Each row in your CSV is processed in its own transaction. If a row's welcome email fails to send (for example because your mail server is temporarily down), that single user is rolled back so you don't end up with accounts that never got their invitation. Good rows continue to be imported, and the result screen lists exactly which lines succeeded and which failed, with the reason. Duplicate emails within the same CSV are flagged without creating partial users.
- CSV validation: Uploads require exactly two columns -
nameandemail(lowercase headers). Names must be under 255 characters, emails must be valid and unique against existing users, and empty rows are skipped automatically. - Email changes re-verify: If you change a user's email address, their verified status is cleared and they will need to verify the new address before some features work again.
Tips and Best Practices
- Use the Template: Always use the provided CSV template for bulk uploads to avoid formatting errors.
- Monitor Expiry: Users with an expiry date within the next 7 days will show a yellow warning badge in the table.
- Self-Protection: The system prevents you from deleting or deactivating your own account to ensure you aren't locked out of the admin panel.
- Verification Status: Check the "Email Address" section in the user view dialog to see if a user has verified their email (indicated by a green "Verified" badge).
Troubleshooting
Issue: Cannot assign the Administrator role
- Symptoms: A warning message appears stating "Administrator limit reached" or the "Save" button is disabled.
- Cause: Your current subscription plan has a cap on the number of users with administrative roles.
- Fix: Either change an existing administrator to a different role to free up a seat, or click Request upgrade to contact your workspace admin.
- Prevention: Regularly audit your administrator list to ensure only necessary personnel have high-level access.
Issue: CSV Upload fails with errors
- Symptoms: The upload dialog shows a list of errors with line numbers.
- Cause: Missing headers, invalid email formats, or duplicate email addresses in the CSV file.
- Fix: Review the "Errors" section in the upload results, correct the specific lines in your CSV, and use the Upload Another button to retry.
- Prevention: Ensure the CSV headers are exactly
name,email(lowercase).