
Collection Rules
Collection Rules allow administrators to automate the organization of assets within Freedam. By defining specific conditions, such as file type, upload date, or custom metadata, you can ensure that assets are automatically assigned to the correct collections without manual intervention.
This feature is essential for maintaining a consistent folder structure and reducing the administrative overhead of managing large volumes of digital assets. You can create complex hierarchies and even instruct the system to create new collections on the fly based on asset properties.
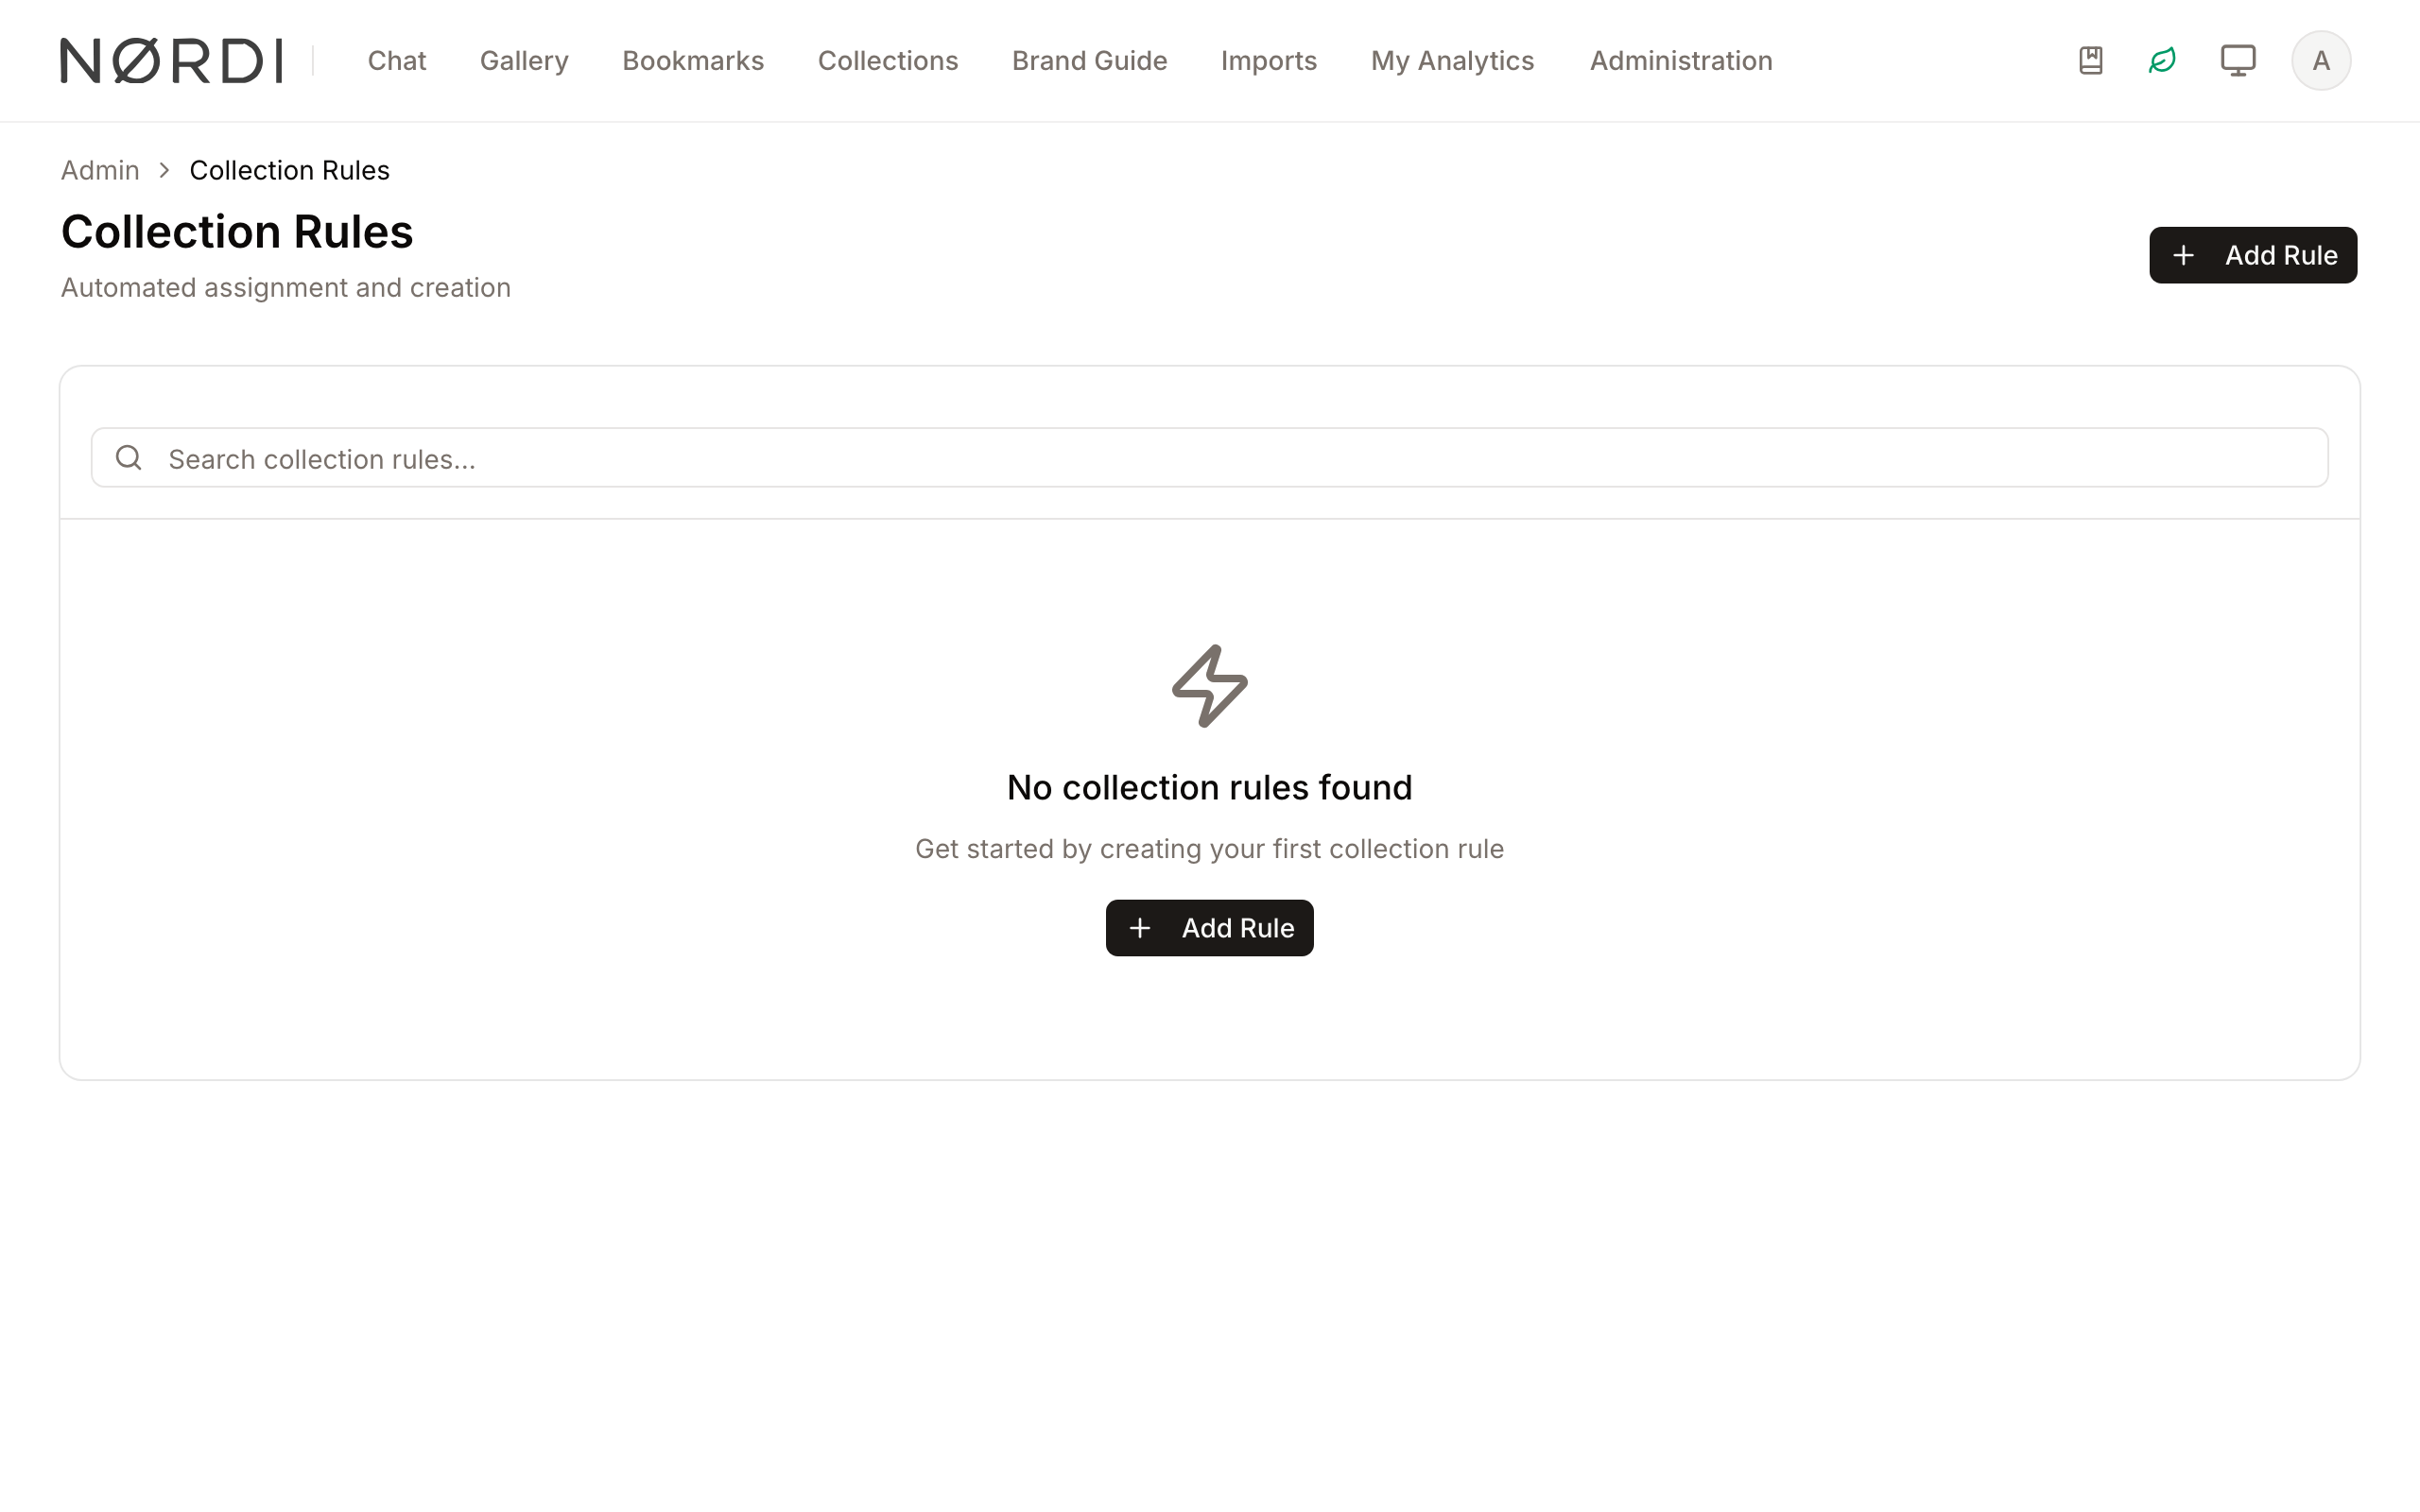
Page Overview
- Purpose: To manage the logic that automatically routes assets into specific collections.
- When to use it: Use this page when you want to standardize how assets are filed, such as placing all "2024" photos into a specific year-based collection automatically.
- What you can do here:
- Create new automation rules with specific priorities.
- Define complex "And/Or" conditions for asset matching.
- Build dynamic path templates using placeholders like year, month, or filename.
- Activate or deactivate rules globally.
- Monitor and edit existing rule configurations.
Page Layout
- Top bar: Displays the page title and the Add Rule button to start creating a new automation.
- Main area: Contains a searchable list of all collection rules, showing their priority, status (Active/Inactive), and the collection type they affect.
- Search and Filters: A search bar at the top of the list allows you to find rules by name or description.
- Rule Dialog: A multi-tab interface (Basic Info, Conditions, Actions) that opens when creating, viewing, or editing a rule.
Main Features
Rule Prioritization
- What it's for: Determines the order in which rules are evaluated.
- Typical use: If an asset matches multiple rules, the rule with the lower number (e.g., 1) takes precedence over higher numbers (e.g., 50).
- Result: Ensures predictable asset routing when multiple organizational logic sets overlap.
Dynamic Path Templates
- What it's for: Creating collection structures based on asset data.
- Typical use: Setting a path like
Social Media/{year:created_at}/{filename}. - Result: Assets are filed into folders named after their creation year and filename automatically.
Automated Hierarchy Creation
- What it's for: Ensuring the destination collection exists.
- Typical use: Enabling the Create missing collections toggle.
- Result: If the rule points to a collection that doesn't exist yet, Freedam creates it automatically during the assignment process.
Detailed Feature Documentation
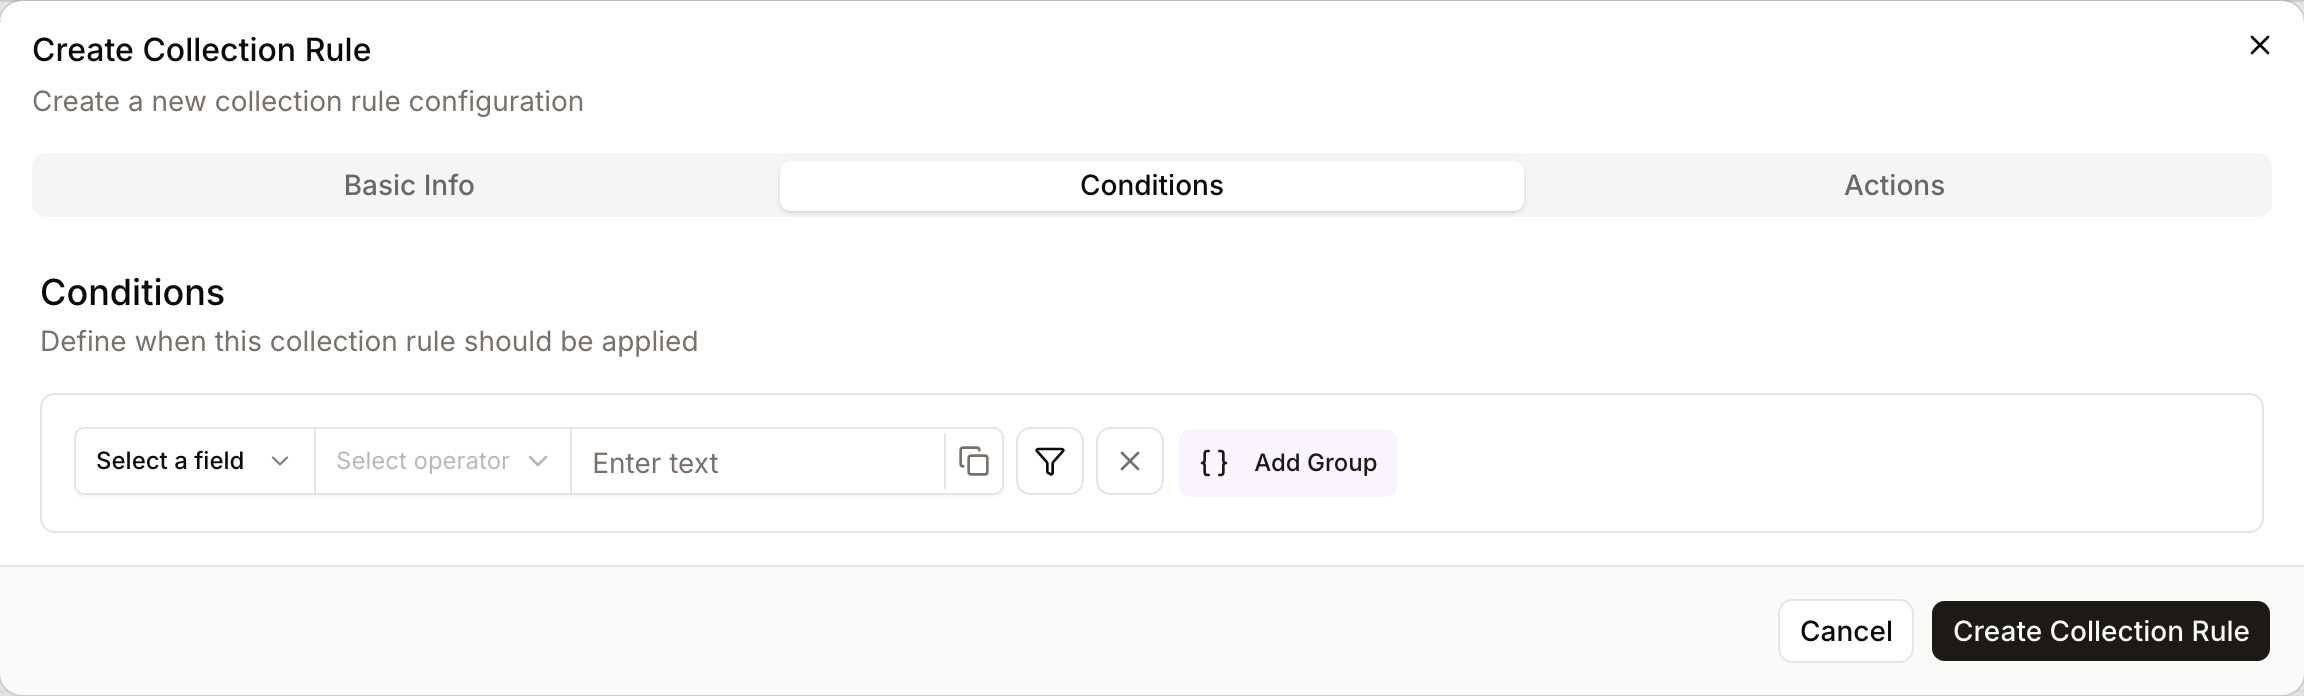
Condition Builder
- Purpose: To define exactly which assets a rule should apply to.
- Where to find it: Inside the Add Rule or Edit dialog, under the Conditions tab.
- What you'll see: A rule engine interface where you can add groups of conditions using "And" or "Or" logic.
How to use it:
- Open the Conditions tab in a rule dialog.
- Select a field to monitor (e.g., Filename, MIME Type, or Date).
- Choose an operator (e.g., "equals", "contains", "starts with").
- Enter the value to match against.
- Add additional rows to narrow down the scope of the rule.
Available operators include equals / does not equal, contains / does not contain, starts with, ends with, is in list / is not in list, greater than, less than (and their "or equal" variants), is empty, and is not empty. Operators that don't need a comparison value (like "is empty") will hide the value field automatically. You can mix filters and sub-groups freely to build nested "AND" / "OR" logic of any depth.
Placeholder Library
- Purpose: To insert dynamic asset data into your collection paths.
- Where to find it: In the Actions tab, look for the Add Placeholder button next to the Collection Path Template field.
- What you'll see: A categorized list of available data points including Date (Year, Month, Quarter), File (Filename, Extension), and Metadata (Title, MIME Type).
How to use it:
- Click Add Placeholder while editing a Path Template.
- Browse categories like date or file.
- Click a placeholder (e.g.,
{year:created_at}) to insert it into your template. - Use the Custom Placeholder field at the bottom to type in specific metadata keys not listed in the defaults.
What each placeholder expands to when a new asset matches:
- Date placeholders pull from the asset's upload or update date:
{year:…}gives a four-digit year,{month:…}a two-digit month,{day:…}the day,{quarter:…}becomesQ1–Q4, and{week:…}becomesW1–W53. - File placeholders read straight from the uploaded file:
{filename}is the name without its extension,{extension}is just the extension, and{original_filename}is the complete original name. - Metadata placeholders such as
{title},{description}, or any custom metadata field key (for example{project_code}) insert that field's current value. Vocabulary fields resolve to the human-readable label rather than the internal code. - Smart extractors such as
{extract:filename:0}split a filename on underscores and grab the Nth segment - ideal for naming conventions likePROJECT_Client_Asset.jpg. The extractor also supports simple text patterns and regular expressions when you need more flexibility.
Unsafe characters are stripped from the final folder name automatically (so a placeholder like {title} will never produce a path containing slashes, colons, or question marks), and empty placeholders collapse instead of creating blank folders.
Complete Workflows
Workflow: Automatically Organize Uploads by Year
- Goal: Ensure every asset uploaded is placed in a collection named after the current year.
- Prerequisites: Administrative access to Collection Rules.
Steps:
- Click Add Rule in the top bar.
- In the Basic Info tab, enter "Yearly Archive" in Rule Name and set Priority to "10".
- Switch to the Actions tab.
- Select the appropriate Collection Type from the dropdown.
- In the Collection Path Template, type
Archives/and then click Add Placeholder to select{year:created_at}. - Ensure the Create missing collections switch is toggled to Active.
- Click Create Collection Rule.
- Expected result: New assets will now be assigned to a collection path like "Archives/2024" automatically.
Workflow: Deactivating a Rule Temporarily
- Goal: Stop a rule from running without deleting its configuration.
- Prerequisites: An existing active rule.
Steps:
- Locate the rule in the Collection Rules list.
- Click the More actions (three dots) icon at the end of the row.
- Select Deactivate.
- Alternatively, click the rule name to open it and toggle the Active switch to off, then click Save Changes.
- Expected result: The rule status badge will change to "Inactive" and assets will no longer be processed by this rule.
Who Can Use It
Collection Rules are available to administrators with the Manage Collection Rules permission. The same permission covers creating, editing, deleting, activating, deactivating, and testing rules with the path-template preview.
How Rules Run Behind the Scenes
- Collection Rules are evaluated during asset ingestion, right after the file has been processed and its metadata extracted. The rule's conditions are checked against the asset's file properties and metadata; if they match, the path template is expanded and the asset is filed into the resulting collection.
- Rules run in priority order (lowest number first), so you can use priority to guarantee that specific, narrow rules win over broad catch-all rules.
- Hierarchy is walked step by step. Each
/in the path template becomes one level of the collection tree. At every level, Freedam first looks for an existing collection with that name under the current parent; if none exists and Create missing collections is enabled, a new collection is created on the spot. The new collections adopt visibility and description defaults from the collection type's hierarchy configuration. - Hierarchy limits are enforced. If your collection type sets a maximum depth, path templates that resolve to a deeper path will be rejected rather than creating an invalid hierarchy, and collection types that don't support hierarchy at all can only accept single-segment paths.
- Test before you save. The path resolution preview runs the template against a sample file (or the file you drop into the tester) and shows exactly which folders would be reused and which would be created. No collections are actually created during a test.
- Failures on a single asset - for example, a missing collection type or an invalid path - are logged and shown in the ingestion batch results, but they never stop the rest of the batch from completing.
Tips and Best Practices
- Start Broad, Then Refine: Use higher priority numbers (like 50 or 100) for general rules and lower numbers (1-10) for specific exceptions.
- Use Path Previews: When building a template in the Actions tab, check the Path Resolution box at the bottom to see exactly how the final path will look.
- Test with Filenames: Use the
{extract:filename:0}placeholder if your organization uses specific naming conventions (likePROJECT_Asset.jpg) to automatically create project-based collections.
Troubleshooting
Issue: Assets are not being assigned to the expected collection
- Symptoms: Assets remain unassigned or go to the wrong folder after upload.
- Cause: A higher priority rule (lower number) might be matching the asset first, or the conditions are too restrictive.
- Fix:
- Check the Priority column in the main list; move your rule to a lower number if needed.
- Review the Conditions tab to ensure the logic (And/Or) correctly identifies the asset.
- Prevention: Always use the Path Resolution preview in the Actions tab to verify your template logic before saving.
Issue: "Collection Type" error when saving
- Symptoms: An error message appears under the Collection Type dropdown.
- Cause: This field is required and must match the type of collection you intend to create or assign to.
- Fix: Select a valid type from the Collection Type dropdown in the Actions tab.