
Trash
The Trash feature serves as a safety net for your digital assets. When an asset is deleted from the main library, it is moved here for a 30-day retention period. This allows administrators to recover accidentally deleted files or review items before they are permanently removed from storage.
This tool is primarily for system administrators and users with asset management permissions to ensure data integrity and manage storage space by clearing out unneeded files.
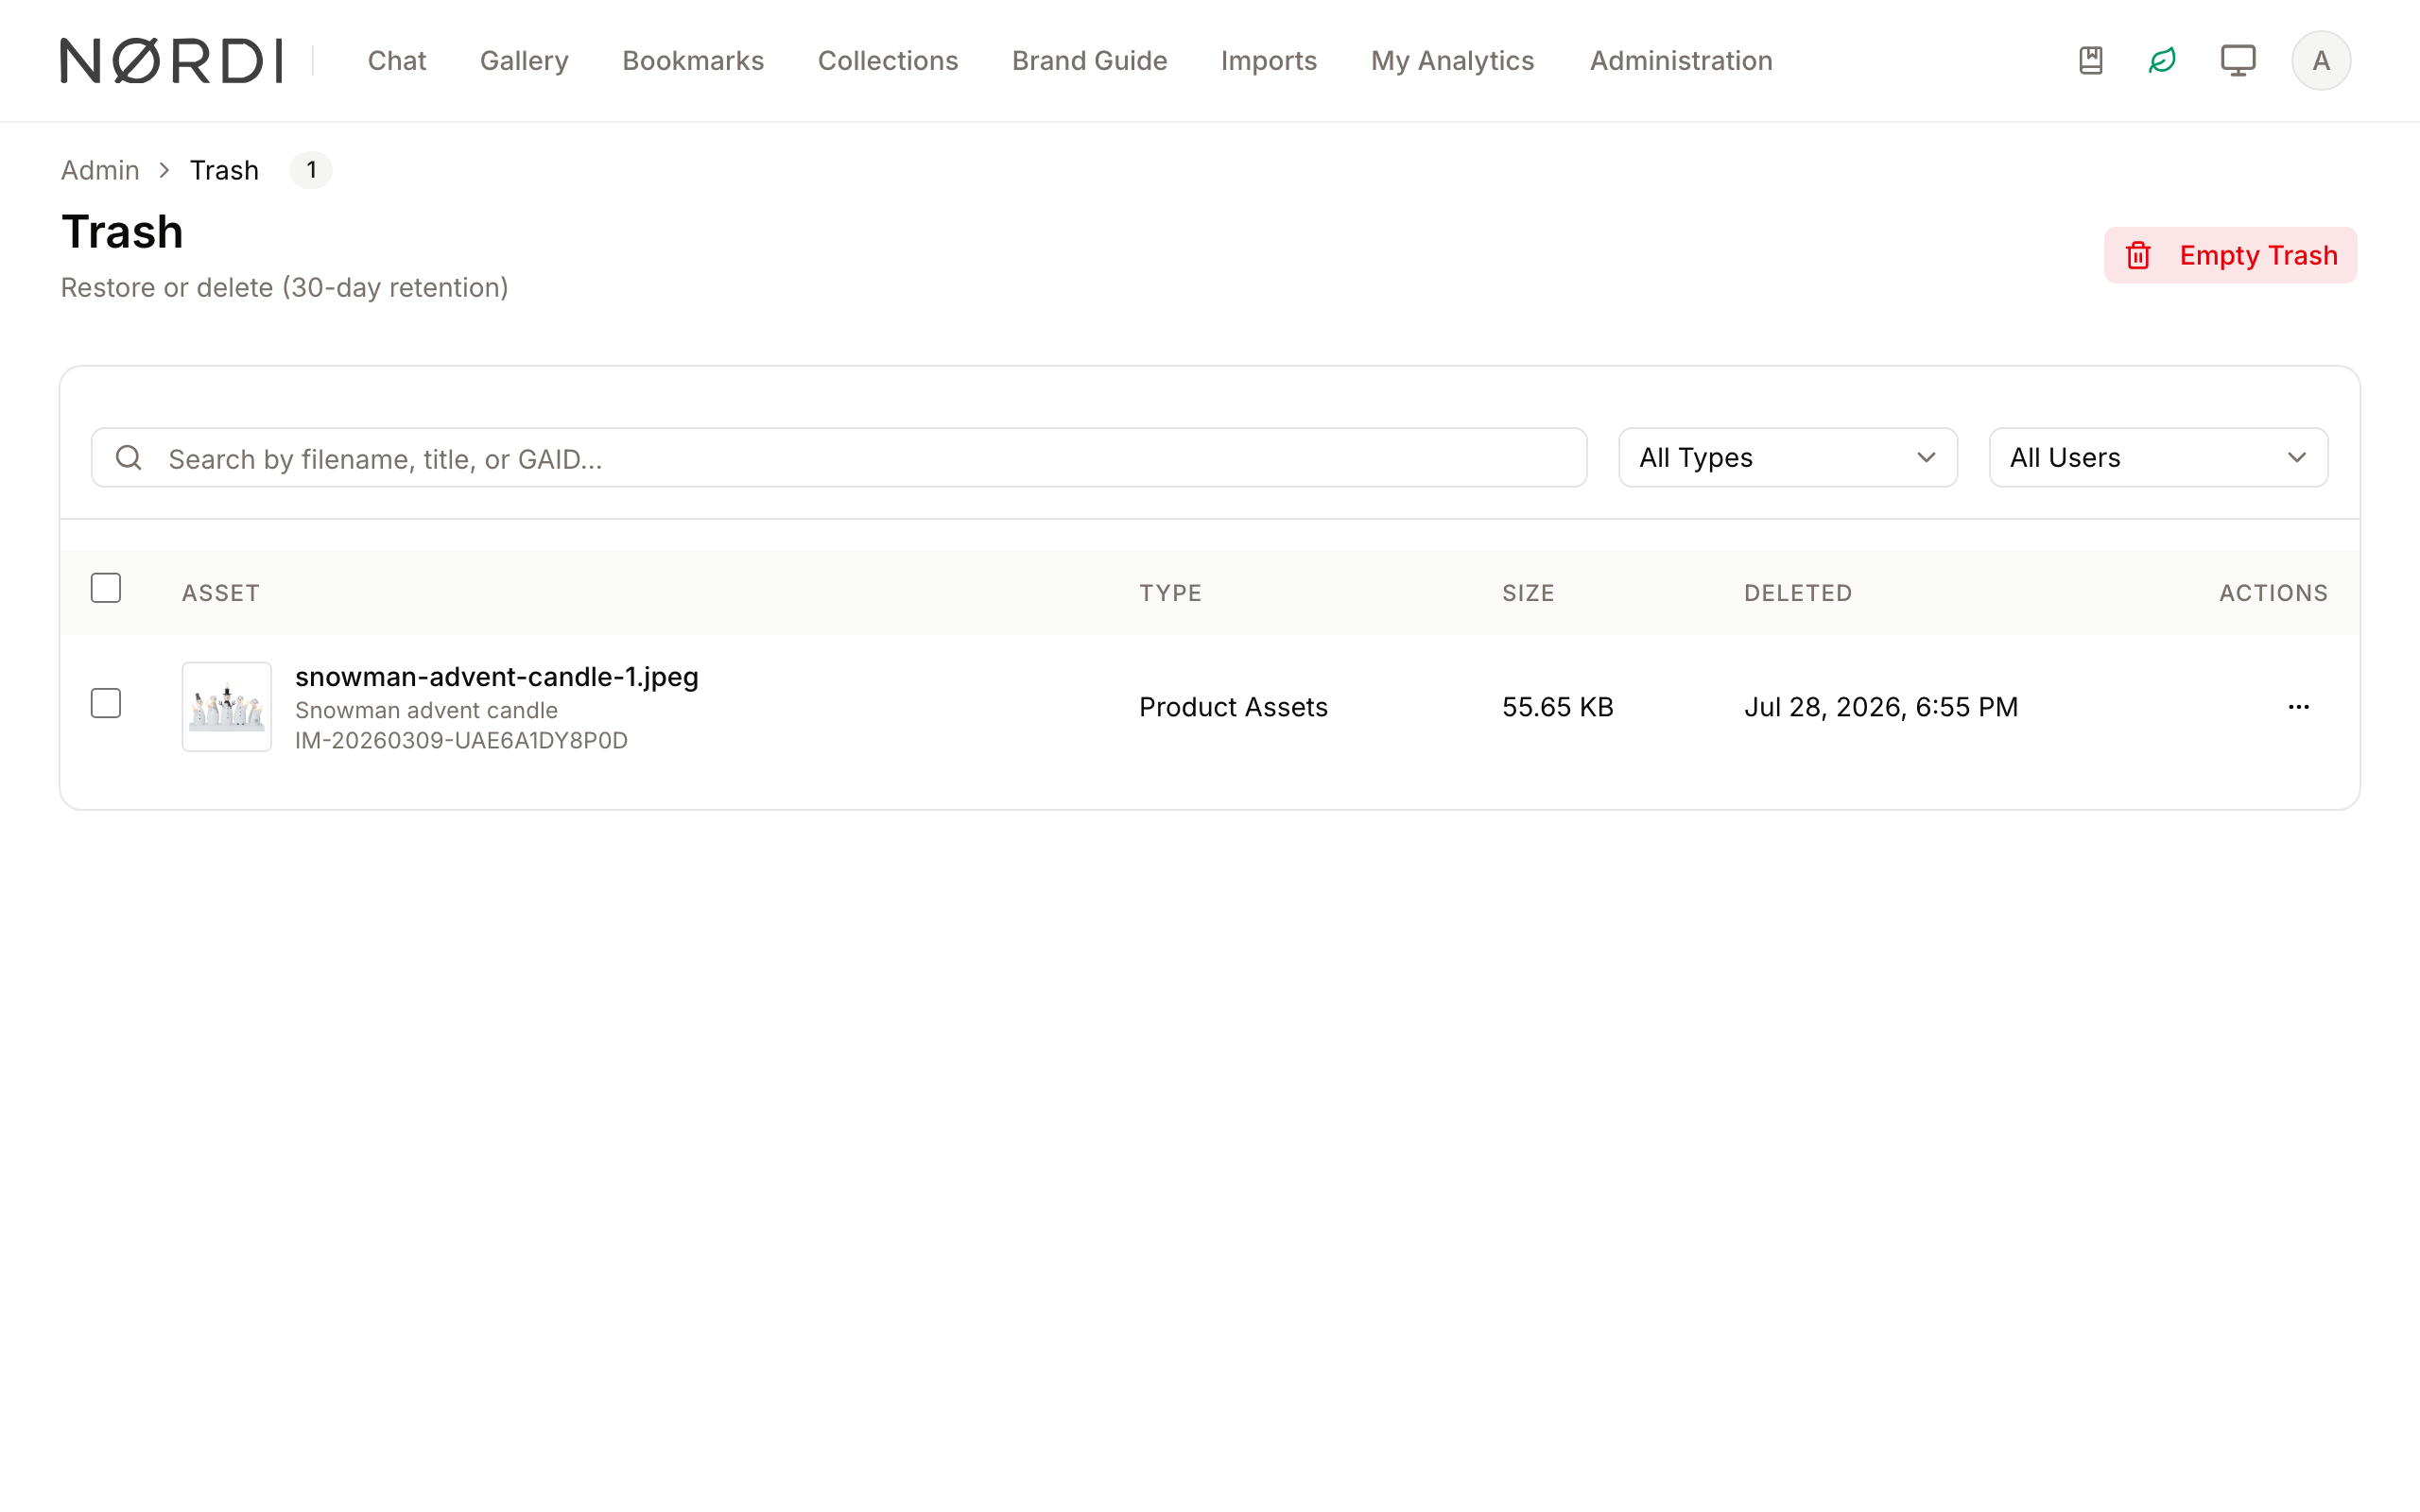
Page Overview
- Purpose: To provide a centralized location for managing soft-deleted assets.
- When to use it: Use this page when you need to recover a file deleted by a user, or when you want to manually clear storage by permanently deleting files.
- What you can do here:
- Search for deleted assets by filename, title, or ID.
- Filter the list by asset type or the user who performed the deletion.
- Restore assets to their original location in the library.
- Permanently delete specific assets or empty the entire trash.
- View details such as file size and the exact date/time of deletion.
Who can use it
- Viewing the Trash and restoring items is available to anyone whose role includes the "delete assets" privilege - typically content managers, librarians, and administrators.
- Permanently deleting a single asset, deleting several at once, or emptying the entire trash is reserved for system administrators. The Empty Trash button and the "Delete Permanently" bulk action will simply not appear for users who do not have that level of access.
Page Layout
- Top bar: Displays the "Trash" title with a count of current items, a brief description of the 30-day retention policy, and the Empty Trash button.
- Main area: Contains the search bar, filter dropdowns, and a data table listing all trashed assets with thumbnails, metadata, and action menus.
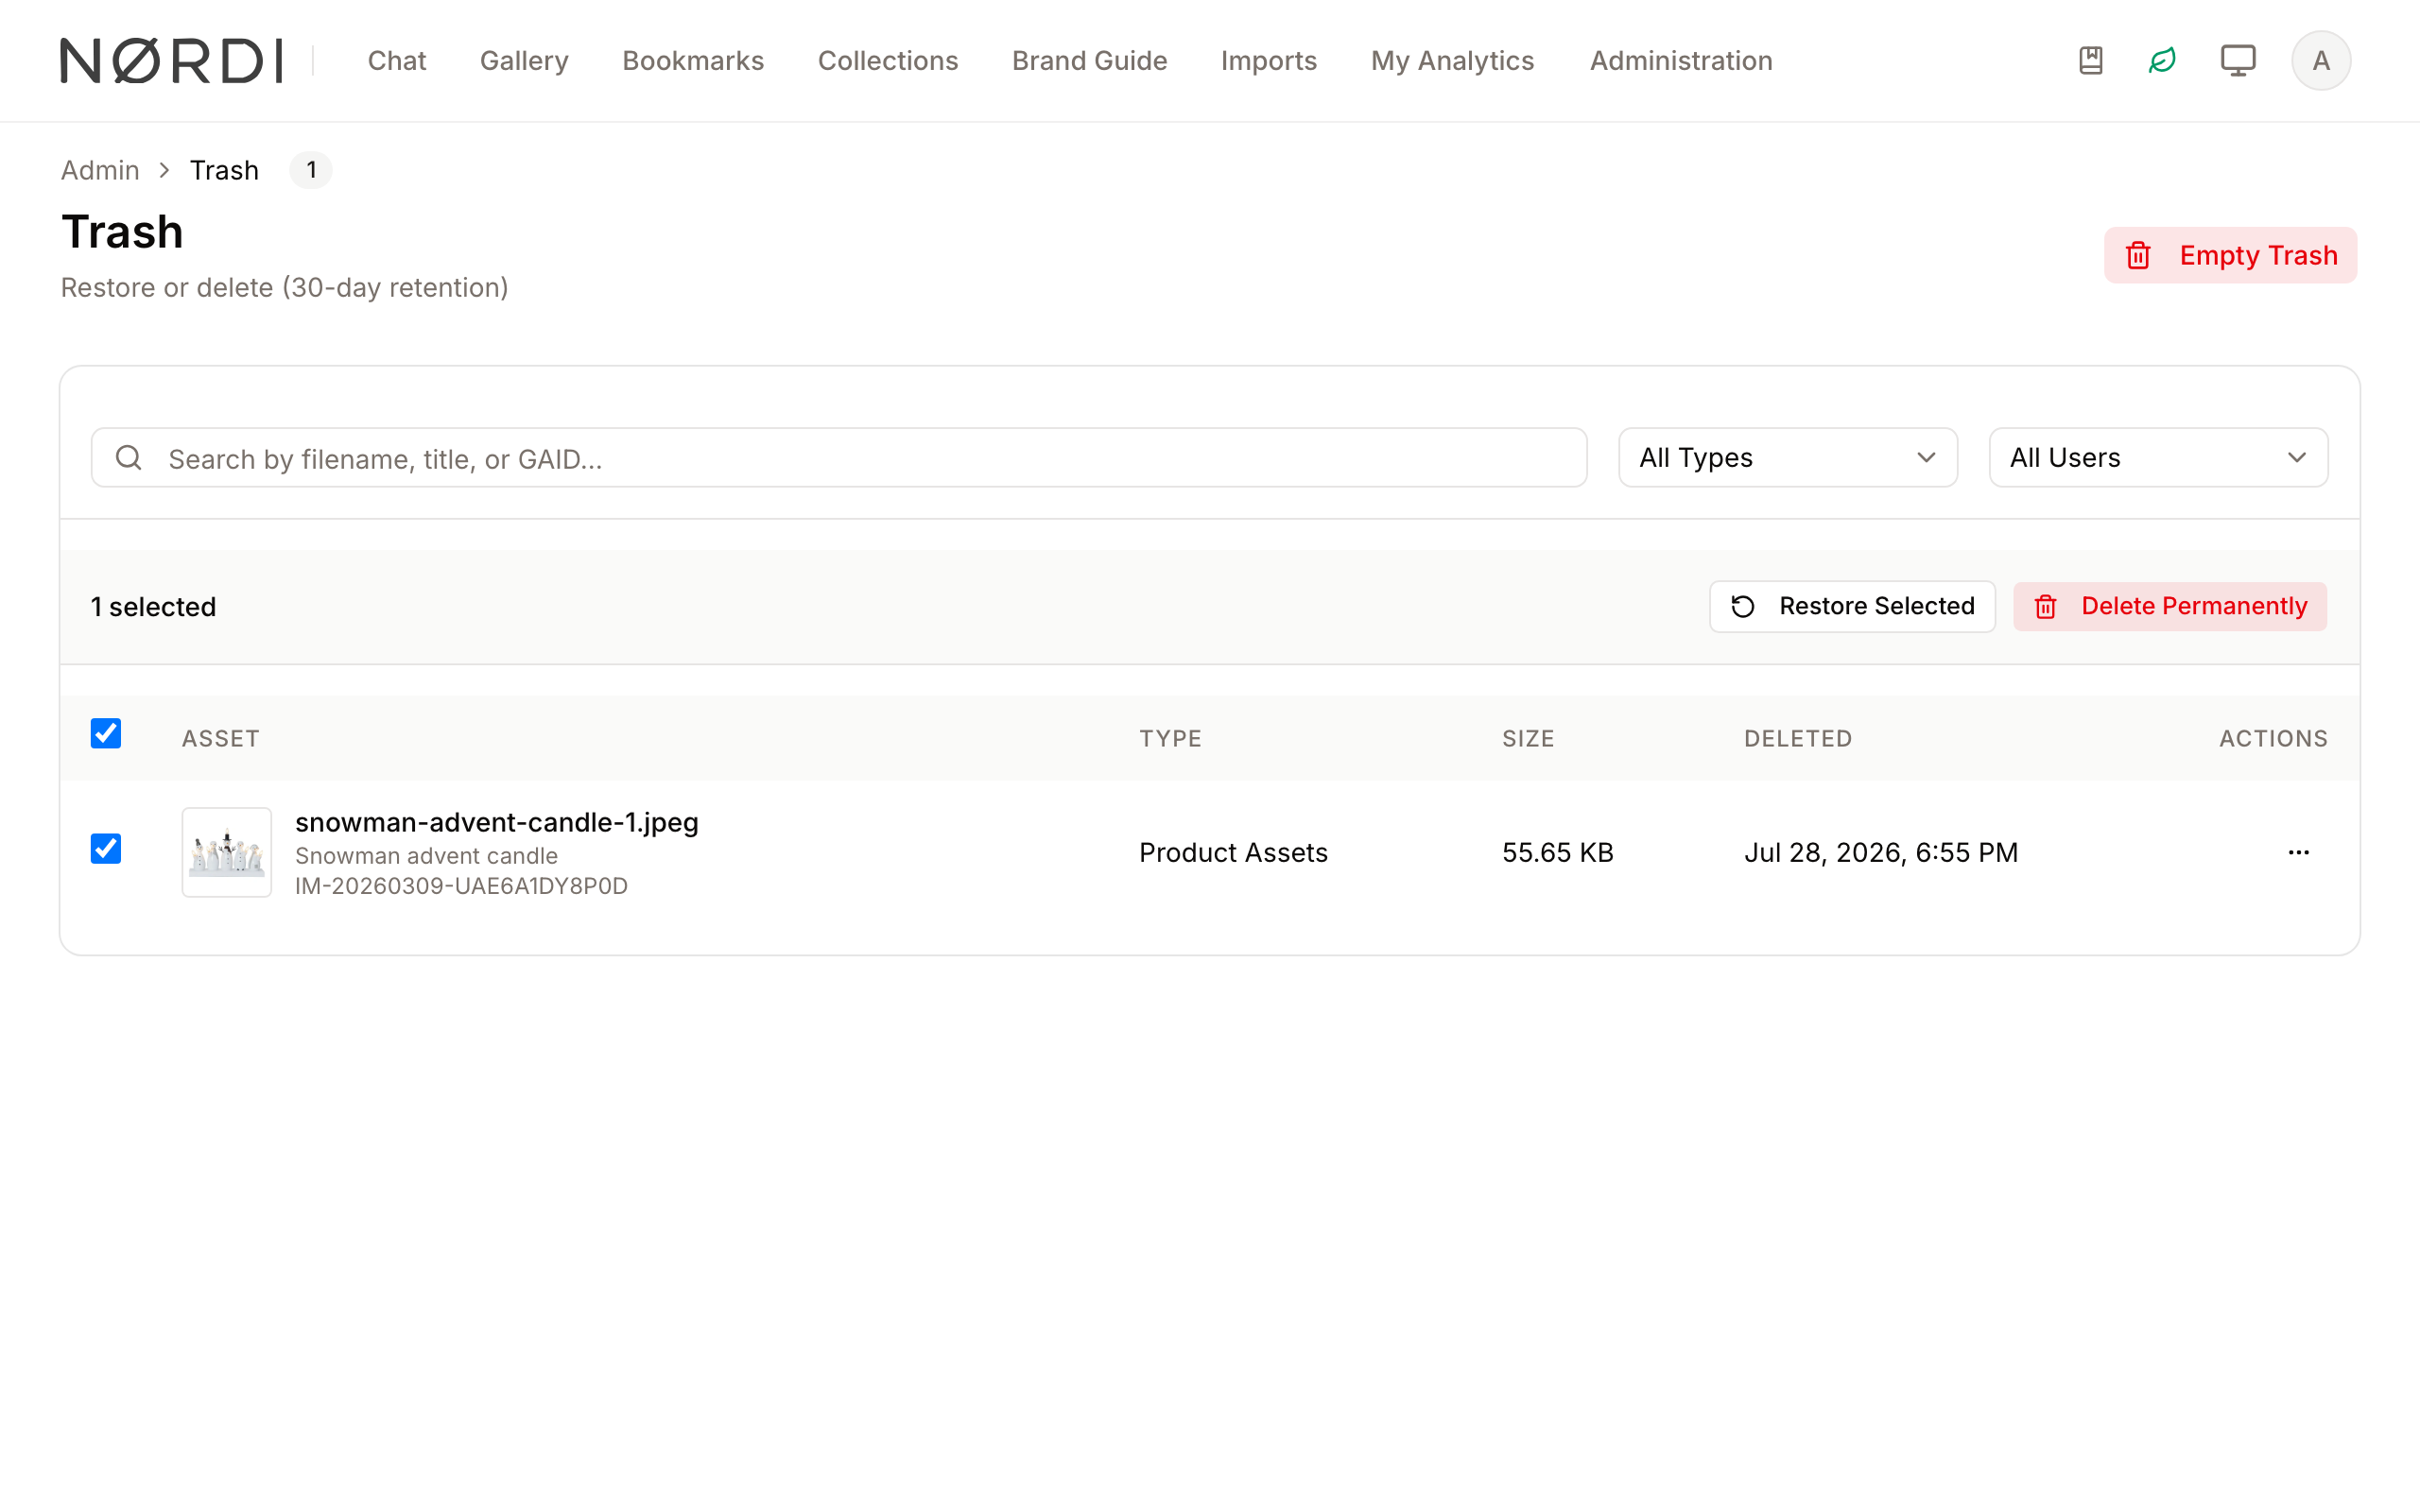
- Bulk Actions Bar: Appears only when one or more assets are selected via checkboxes, providing options to restore or delete the selection.
- Dialogs: Confirmation windows that appear when you choose to restore, delete, or empty the trash to prevent accidental permanent data loss.
Main Features
Asset Search and Filtering
- What it's for: Quickly locating specific deleted files within a large list.
- Typical use: Typing a known filename into the search bar or selecting a specific user from the "All Users" dropdown to see what they recently deleted.
- Result: The asset list updates in real-time to show only items matching your criteria.
Asset Restoration
- What it's for: Returning a file to the active digital asset management library.
- Typical use: Recovering a file that was deleted by mistake.
- Result: The asset is removed from the Trash and becomes visible and searchable again in its original location.
Permanent Deletion
- What it's for: Immediately removing files from the system and freeing up storage space.
- Typical use: Manually purging large video files that are confirmed to be no longer needed.
- Result: The file and its metadata are completely removed from the database and physical storage; this action cannot be undone.
Detailed Feature Documentation
Search and Filter
- Purpose: To narrow down the list of trashed assets.
- Where to find it: At the top of the main card area.
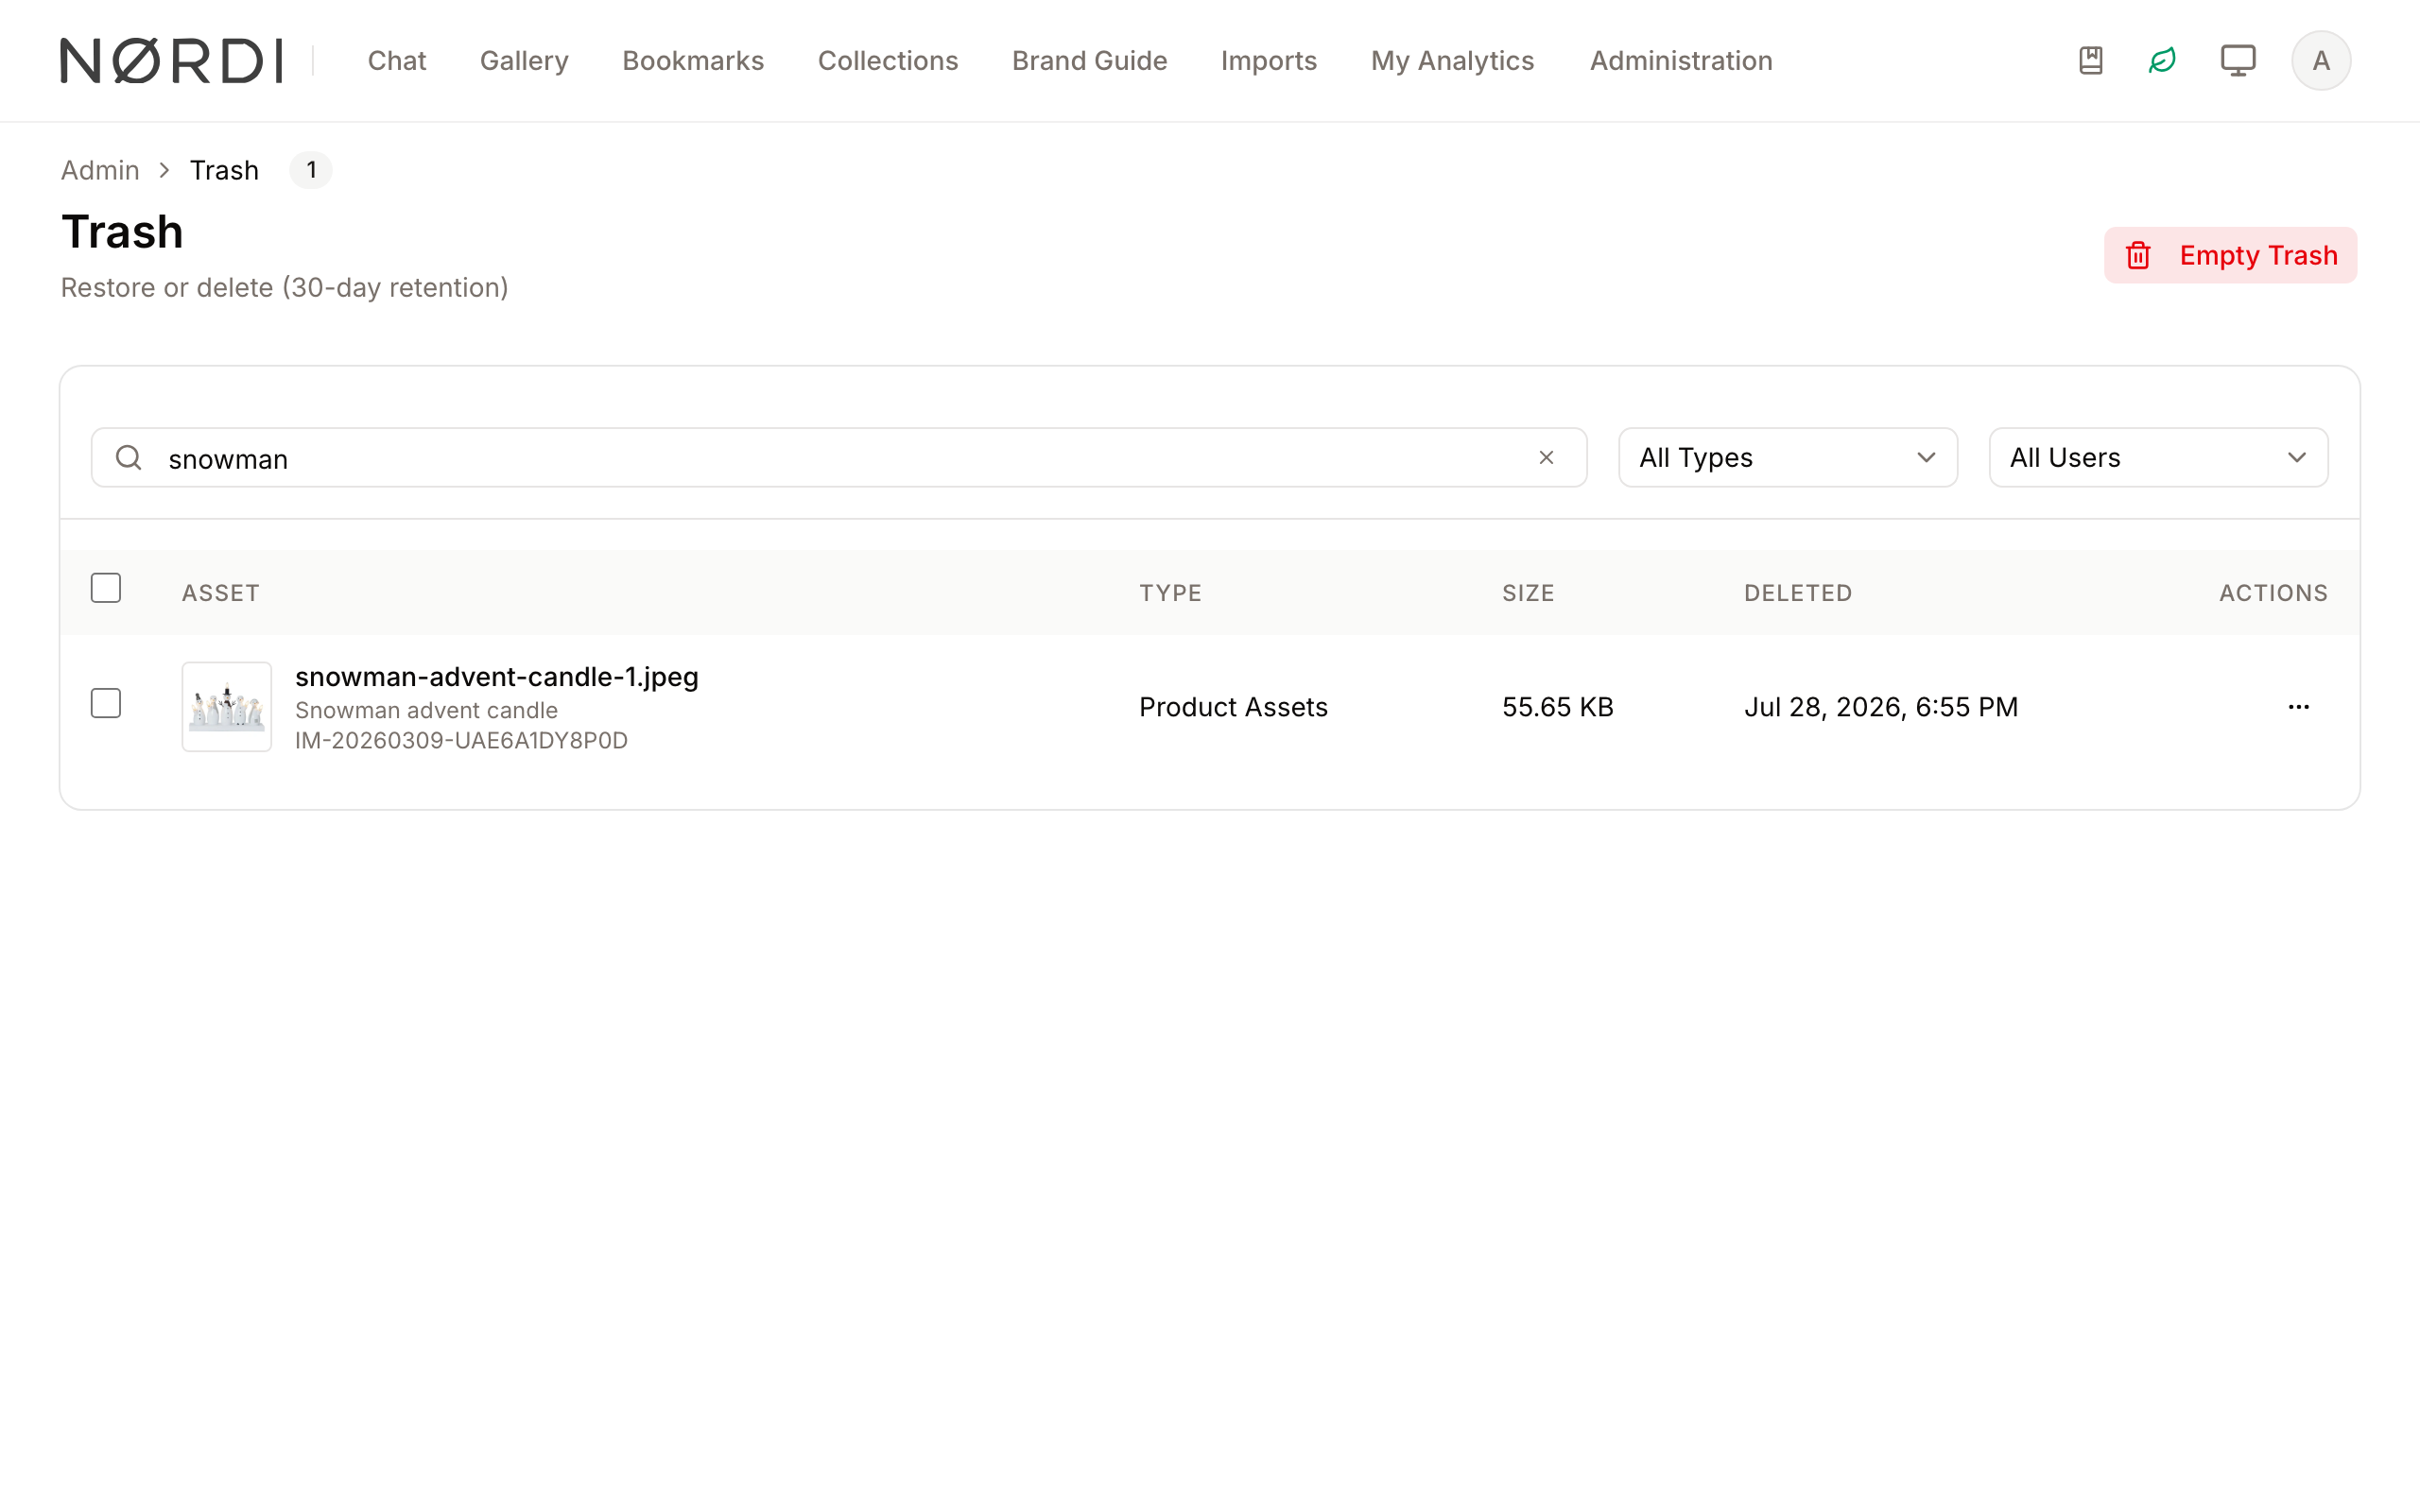
- What you'll see: A search field and two dropdown menus for "All Types" and "All Users".
How to use it:
- Click into the Search by filename, title, or GAID... field and type your search term.
- Click the All Types (dropdown) to filter by specific asset classes (e.g., Images, Videos).
- Click the All Users (dropdown) to filter by the person who deleted the asset.
- Click the X icon in the search bar or the Clear filters button (if no results) to reset the view.
Bulk Actions
- Purpose: To process multiple assets at once.
- Where to find it: Checkboxes on the left side of the table and the bar that appears at the top of the list.
- What you'll see: A blue-tinted bar showing the number of selected items and buttons for "Restore Selected" and "Delete Permanently".
How to use it:
- Click the checkbox in the table header to select all items on the current page.
- Alternatively, click individual checkboxes next to specific assets.
- Click Restore Selected to recover them or Delete Permanently to remove them.
- Confirm the action in the dialog that appears.
Complete Workflows
Workflow: Recovering an Accidentally Deleted Asset
- Goal: Restore a specific file to the library.
- Prerequisites: You must have asset deletion/management permissions.
Steps:
- Type the filename or GAID into the Search field.
- Locate the asset in the list and click the MoreHorizontal (icon) button at the end of the row.
- Select Restore from the dropdown menu.
- In the "Restore Assets" dialog, click the Restore button.
- Expected result: A success message appears, and the asset disappears from the Trash list.
Workflow: Clearing Storage Space
- Goal: Permanently remove all items currently in the trash.
- Prerequisites: Requires administrative system settings permissions.
Steps:
- Click the Empty Trash button in the top right corner of the page.
- Review the "Empty Trash" dialog which shows the total number of assets to be deleted.
- Click the red Empty Trash button to confirm.
- Expected result: The table clears, and the "Nothing in trash" empty state message is displayed.
What happens behind the scenes
- Daily automatic cleanup. Every day at 04:30, Freedam automatically and permanently removes any asset that has been in the Trash for more than 30 days. The cleanup runs quietly in the background and each purge is recorded in the system log so administrators can audit what was removed.
- Restoring an asset puts the file back into the library with its original title, metadata, rights policy, collection memberships, and workflow state intact - it is not treated as a new upload.
- Permanent deletion removes the file from storage as well as from the database, along with its thumbnails and metadata. Because the original binary is gone, a permanently deleted asset cannot be recovered from inside Freedam.
- Emptying the Trash processes assets in batches so that even a very full Trash can be cleared without overloading the server, and the page returns with a confirmation of how many items were permanently removed.
Limits and guardrails
- The 30-day retention window is system-wide and applied per asset based on its deletion timestamp.
- The Empty Trash action is an administrator-only shortcut and always asks for explicit confirmation before running.
- Restore and permanent-delete permissions are evaluated asset by asset, so even a bulk action will skip items that your role isn't allowed to touch.
Tips and Best Practices
- Check the "Deleted By" column: If you aren't sure why something was deleted, use the "Deleted" column to see the timestamp and the user responsible.
- 30-Day Window: Remember that assets are automatically purged after 30 days. If you need to keep something, restore it before this window expires.
- Thumbnail Preview: Hover over or look at the asset thumbnail to visually verify the file before performing a permanent deletion.
Troubleshooting
Issue: Cannot find a recently deleted asset
- Symptoms: The search returns "No assets match your search" even though you know the file was deleted.
- Cause: The asset may have been deleted more than 30 days ago, or filters (like Asset Type) are still active.
- Fix: Click Clear filters to reset the view. If the asset still doesn't appear, it has likely been permanently purged by the system.
Issue: "Delete Permanently" button is missing or disabled
- Symptoms: You can see the trash but cannot permanently delete items.
- Cause: Your user role lets you view and restore assets but does not include the system administrator privilege required to permanently destroy assets or empty the Trash.
- Fix: Contact your system administrator to request elevated permissions or ask them to perform the purge.