
Studio
Studio is Freedam's AI-powered image editing suite. It lets content teams create custom versions of an asset - social crops, background swaps, branded composites, people edits - without exporting to Photoshop or a separate tool. Everything stays attached to the original asset, the whole edit history is recorded, and the final rendition can be pushed straight into the approvals pipeline.
Studio is designed for marketers and brand managers: the complex stuff (outpainting, super-resolution, seamless object removal, person detection, brand-rule enforcement) happens automatically behind a small set of friendly controls.
Who can use Studio
- Studio is gated by a permission that most content roles have by default and that is included on every paid plan.
- If you cannot see the Open in Studio button on an asset, ask your workspace administrator to grant you the Studio permission.
- Each asset also carries a rights policy. If the asset's policy forbids AI modification, Studio refuses to open it and shows a clear message explaining why, so you never start work that can't be completed.
- Administrators with the Studio audit permission can see every session that has been run in the workspace, including which tools were used, which prompts were sent, and the cost incurred.
Opening Studio
There are two main entry points:
- From the asset detail page, click Open in Studio in the action bar, or use the Studio icon in the secondary toolbar.
- From any page that deep-links into Studio (for example a Task or a Request reviewer note), follow the provided link.
Studio opens full-screen and takes over the browser window. Closing Studio with Exit Studio (top-right) returns you to the asset detail page. Your session, including every unsaved version, is preserved - if you re-open Studio on the same asset later, your last session is restored so you can continue where you left off.
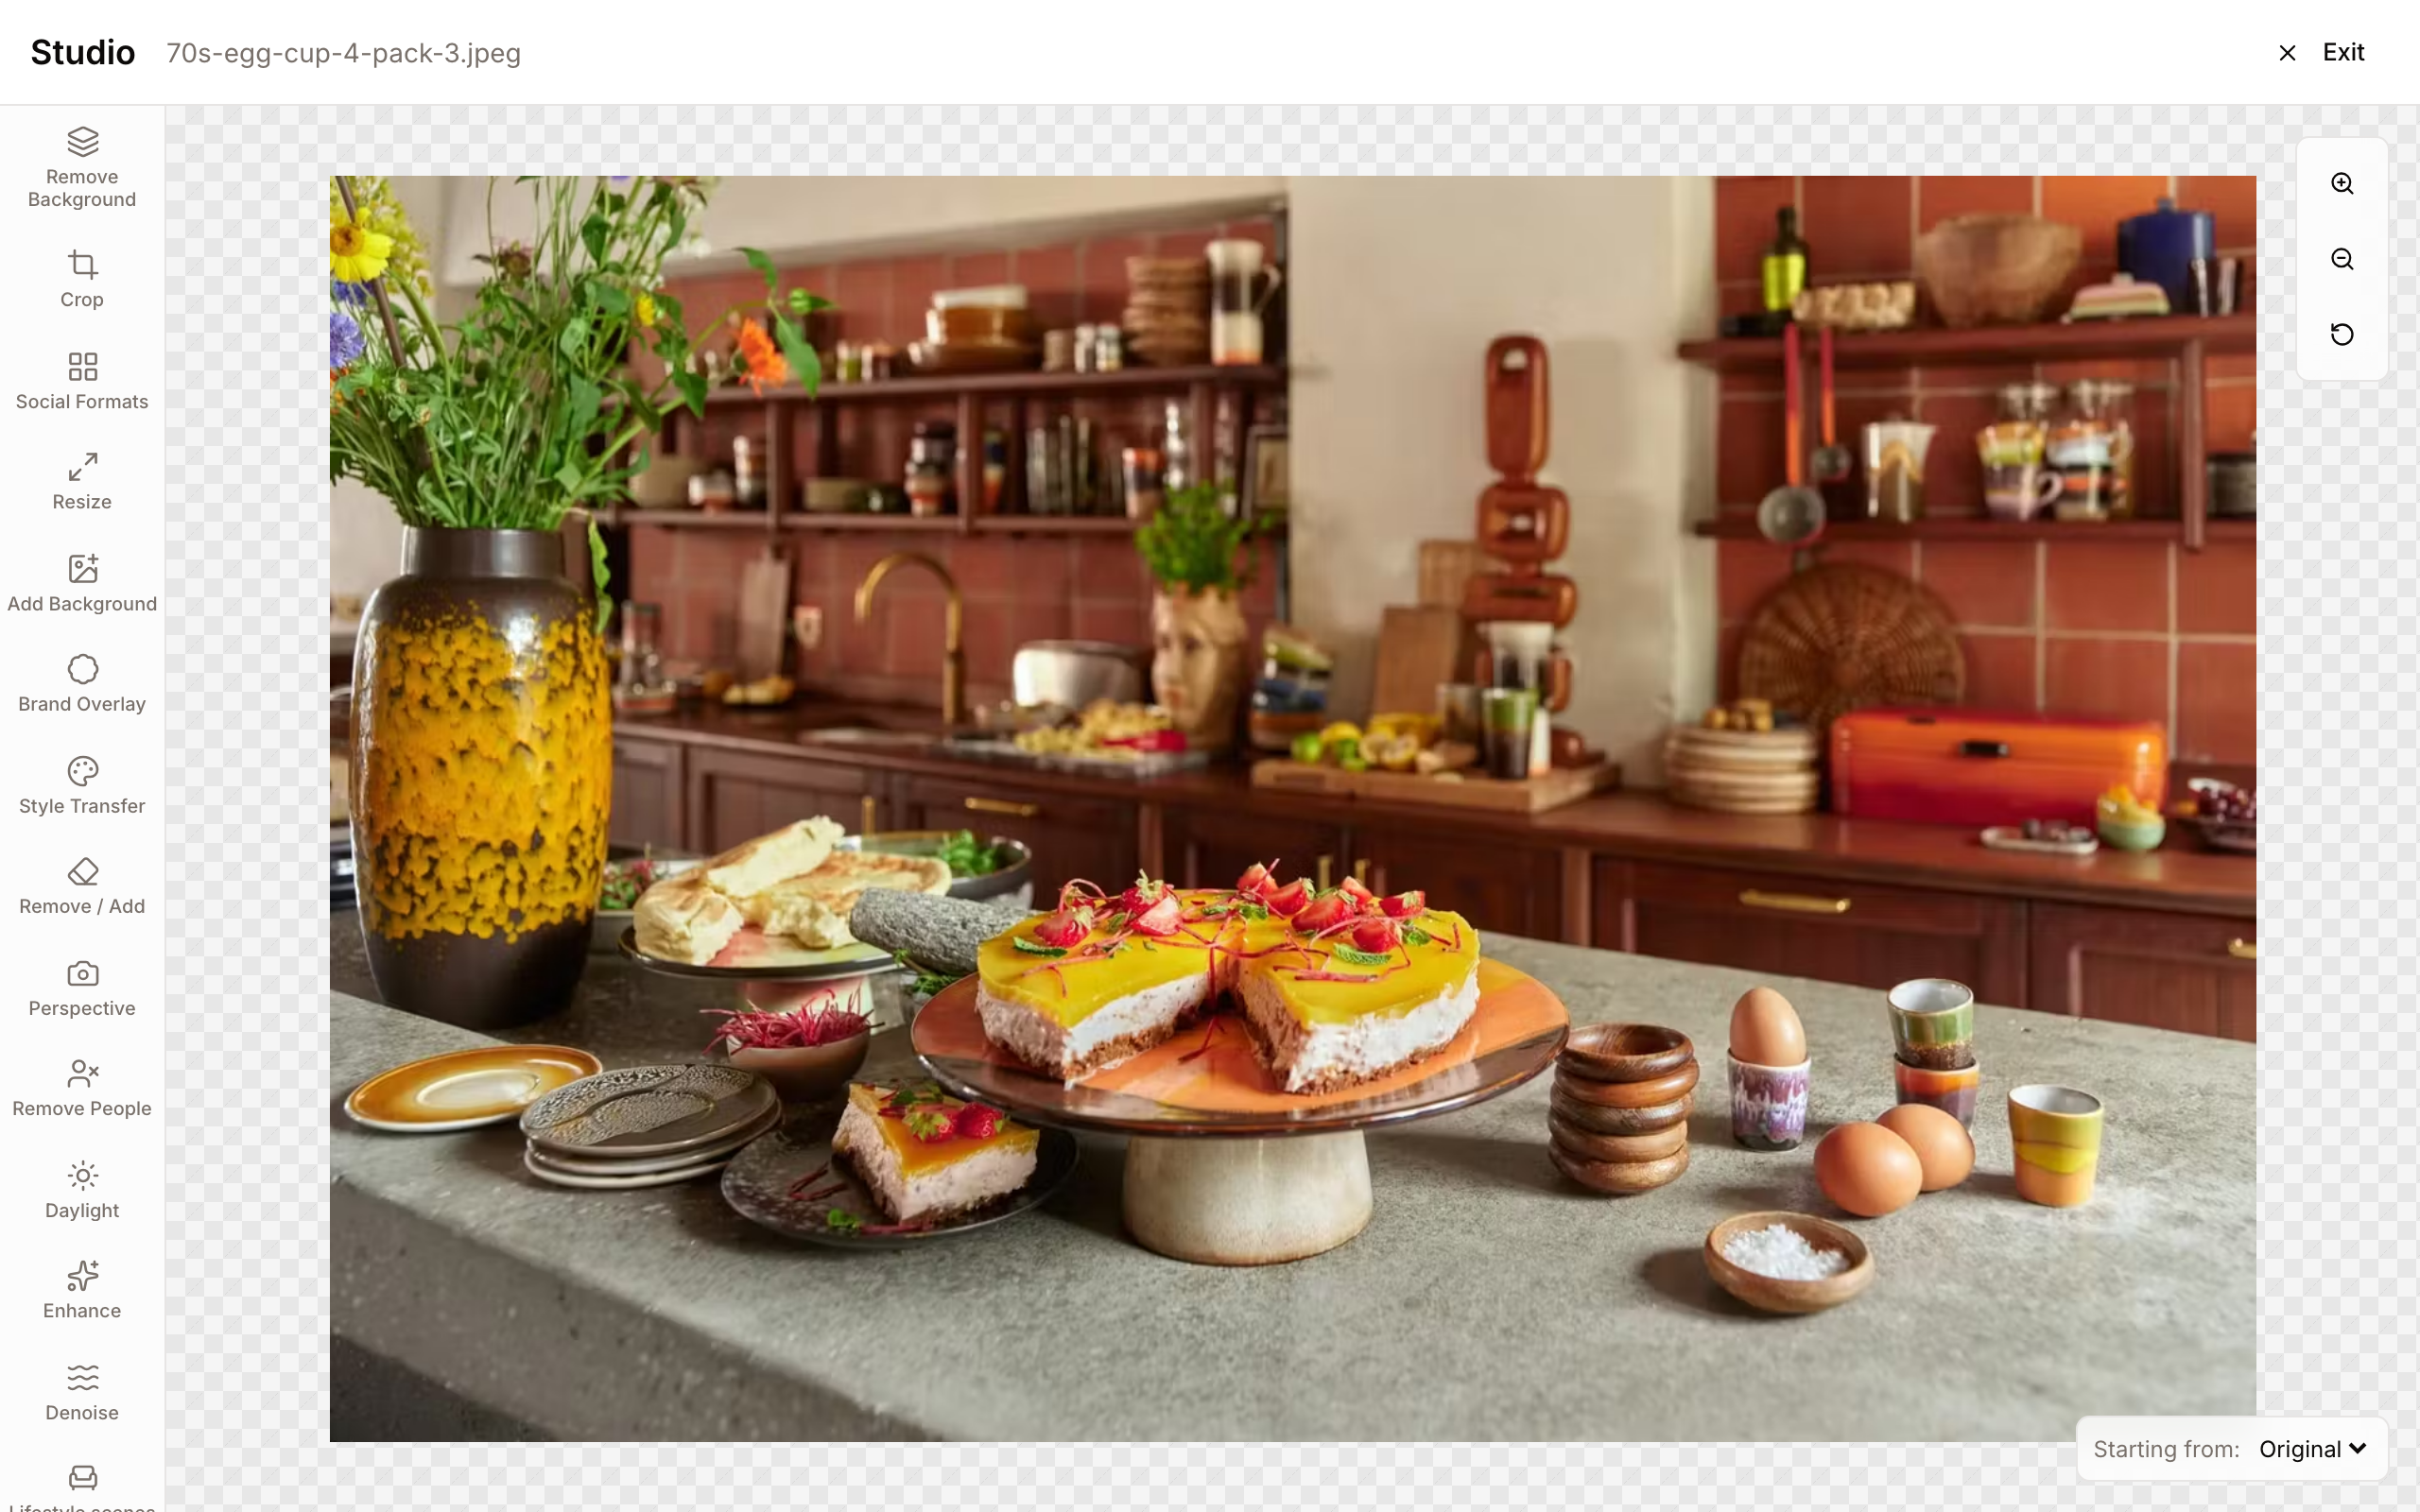
Page layout
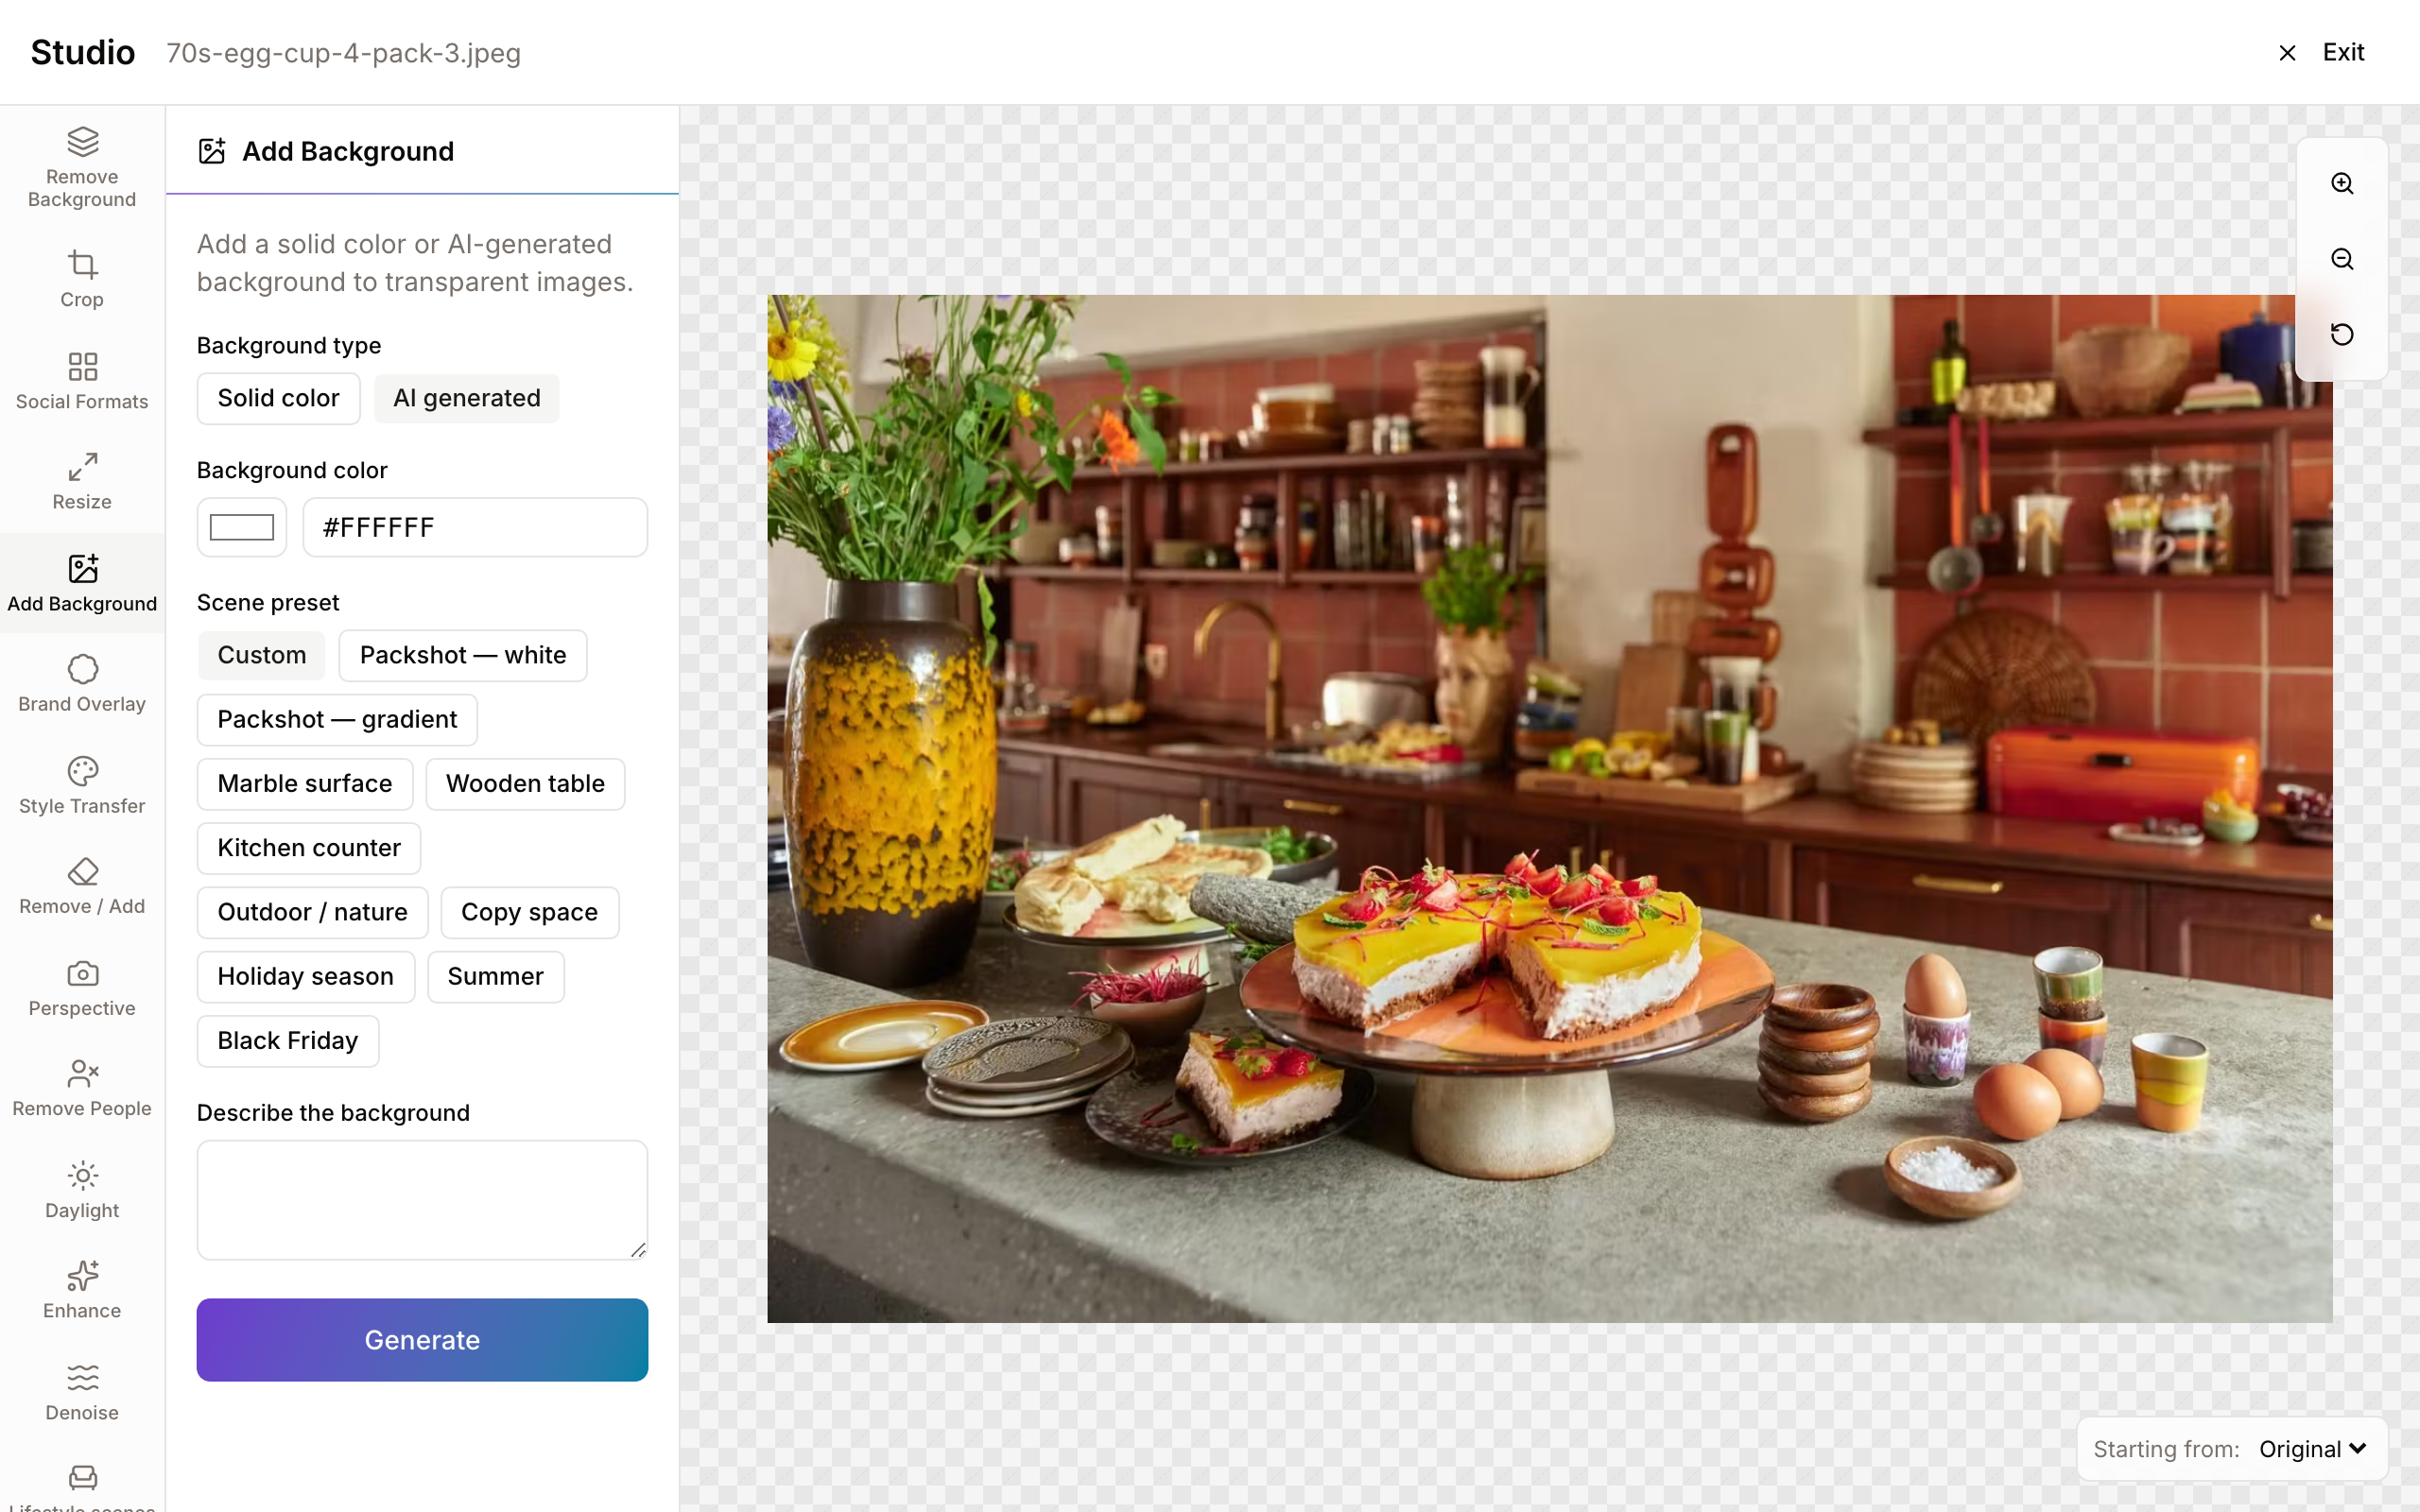
- Top bar - The Studio label, the original filename, and the Exit Studio button.
- Left rail (desktop) - A compact icon rail listing every tool (hover an icon for its name), with a full-height configuration panel opening next to it for whichever tool is active.
- Top canvas toolbar - Context-sensitive controls that only appear for the active tool (focus point toggles when cropping, brush controls when editing elements, the Add Asset / Add Text toolbar when building a brand overlay, and so on).
- Canvas (main area) - The live preview with zoom in, zoom out and reset-zoom buttons. This is also where you drag crop handles, draw masks, click on detected people, and reposition overlay layers.
- Bottom strip - Versions - Every generation made during this session, in the order it was produced. Click any thumbnail to preview it in the canvas, hover for a larger preview, and use the per-thumbnail buttons to promote it, save it, or discard it.
- Mobile layout - On phones and narrow tablets the left rail is replaced by a bottom tool bar. Tap a tool to open a slide-up panel with its settings; tap the same tool again to close it.
The thirteen generation tools
Studio offers thirteen tools, selected in the left rail. Each one takes the current base version on the canvas, applies a transformation, and adds a new version to the bottom strip. Plain-English summary:
| Tool | What it expects | What you get back |
|---|---|---|
| Crop | A preset aspect ratio (or a freehand box you drag on the canvas) | A clean pixel-perfect crop. If you drag the box past the edge of the image, Studio automatically extends the picture with AI-generated content (outpainting) to fill the new area. |
| Resize | A new width and height, or a quick scale percentage | A proportionally scaled image. Downscales and small upscales use a fast, lossless path; anything larger than 125% is routed to an AI super-resolution model for better quality. |
| Social Formats | One or more social-platform formats ticked in a list | One rendition per selected format: the full image centered on a larger canvas of the target ratio, with the missing areas filled in by AI outpainting, at the platform's exact pixel size. |
| Remove / Add | One or more brush-drawn regions, plus "Remove" or "Add" | The selected areas erased and filled in from surrounding context, or replaced with something you describe in plain English. |
| Remove People | Automatic detection of every person in the shot; you pick which to act on | The selected people either removed and the background filled back in, or modified according to instructions you type ("make them smile", "change hair colour to blonde"). |
| Perspective | A perspective preset: Bird's Eye, Low Angle, Center Subject, or Depth of Field | The same scene re-rendered from the chosen camera angle. An optional instructions box lets you steer the result further. |
| Remove Background | Just a click | The subject cut out on a transparent canvas. |
| Add Background | A solid colour (brand palette or free picker) or a short prompt describing a new scene | The subject placed over the chosen background. Requires the image to already be transparent. |
| Brand Overlay | Logos, emblems, and text layers from your Brand Guide, dragged into position | A branded composite that respects your Brand Guide rules on minimum size, clear-space and placement. |
| Daylight | Just a click | The same scene relit with soft, natural daylight - harsh artificial lighting, colour casts, and uneven exposure are corrected. Composition and content stay identical. |
| Enhance | Just a click | A sharper, clearer version of the image with improved fine detail, and minor exposure or colour issues corrected. |
| Denoise | Just a click | Grain and sensor noise reduced while natural texture is preserved - no plastic-looking over-smoothing. |
| Style Transfer | A short description of the artistic style you want | Your image reinterpreted in that style (colour, texture, rendering) while the subject stays clearly recognizable. |
Each click of Generate records a new version at the bottom of the page. Every version is non-destructive - the original asset is never touched.
Your rail may show more than these thirteen: administrators can add custom skills built for your workspace, and can also hide or reorder any tool - so the rail you see is exactly what your workspace curates.
Custom skills
Alongside the built-in tools, your workspace administrators can create custom skills - AI edits designed specifically for your brand and products. A furniture brand might have a "Showroom scenes" tool; an accessory brand a "Lifestyle scenes" tool that places a product on a café table or a designer desk.
- Where they come from - An administrator authors them in the admin area (Studio Skills), writing a reusable AI prompt once and attaching a curated list of options to it. When the skill is enabled it appears in your tool rail like any other tool, in the position the administrator chose.
- What you see - A short helper sentence, the skill's options presented as labeled cards (with thumbnails when the administrator added them), and optionally a free-text field or two. Pick an option, press Generate, and a new version lands in the bottom strip exactly like a built-in tool.
- What you don't see - The AI prompt behind each option. That text is the workspace's own recipe and never leaves the server; you only ever pick by label or picture.
- Sessions, saving, and history work identically to every other tool: versions are non-destructive, and administrators can audit which skill, which option, and which prompt produced any rendition.
If a custom skill disappears from your rail, an administrator has disabled or removed it. A run that was still in flight when that happened fails politely with a message rather than producing a result.
Session history and the non-destructive workflow
Studio treats everything between opening the tool and saving as a session. Inside a session you can iterate freely:
- The canvas always shows a base version - either the original asset, or a version you chose from the bottom strip.
- Each Generate adds a version, and the new version automatically becomes the base so your next edit stacks on top of it.
- You can jump around. Clicking any thumbnail in the bottom strip previews it. Clicking the small layers icon on a thumbnail makes that version the base for your next edit - the other versions stay in the strip, untouched.
- You can delete any version from the strip with the X button - a confirmation dialog protects against accidents.
- Nothing in the library changes until you explicitly click Save as Rendition on a version.
Worked example
Imagine you start with a 4000×3000 landscape hero shot:
- V1 - Crop to 1:1 Instagram Post. Becomes base.
- V2 - From V1, run Remove People to remove the passer-by in the corner. Becomes base.
- V3 - From V2, add a Brand Overlay with the company logo and a tagline. Becomes base.
- Decide V3 is too busy. Click the layers icon on V2 to promote it back to base.
- V4 - From V2, add a simpler overlay with just the logo. Becomes base.
- Click the download icon on V4 to save it as a rendition.
V1 and V3 are still in your strip. You can delete them, or leave them - they only exist inside your session and will be cleaned up automatically if you never come back.
Canvas interactions and shortcuts
- Drag - On the crop tool, drag inside the box to reposition it, drag a handle to resize. On Brand Overlay, drag a layer to move it. On Remove / Add, drag to paint a mask region.
- Click - On Remove People, click anywhere on a detected person on the canvas to toggle their selection (just like ticking them in the sidebar list).
- Hover - Hover a thumbnail in the versions strip to see a larger preview before clicking.
- Zoom buttons - On the canvas, the + and – buttons step zoom by 25%, from 50% to 300%. The circular-arrow button resets to fit.
- Layer reordering - In the Brand Overlay elements list, drag the grip handle on the left of any row to change its stacking order. The top of the list renders last (on top).
Tool-by-tool reference
Crop
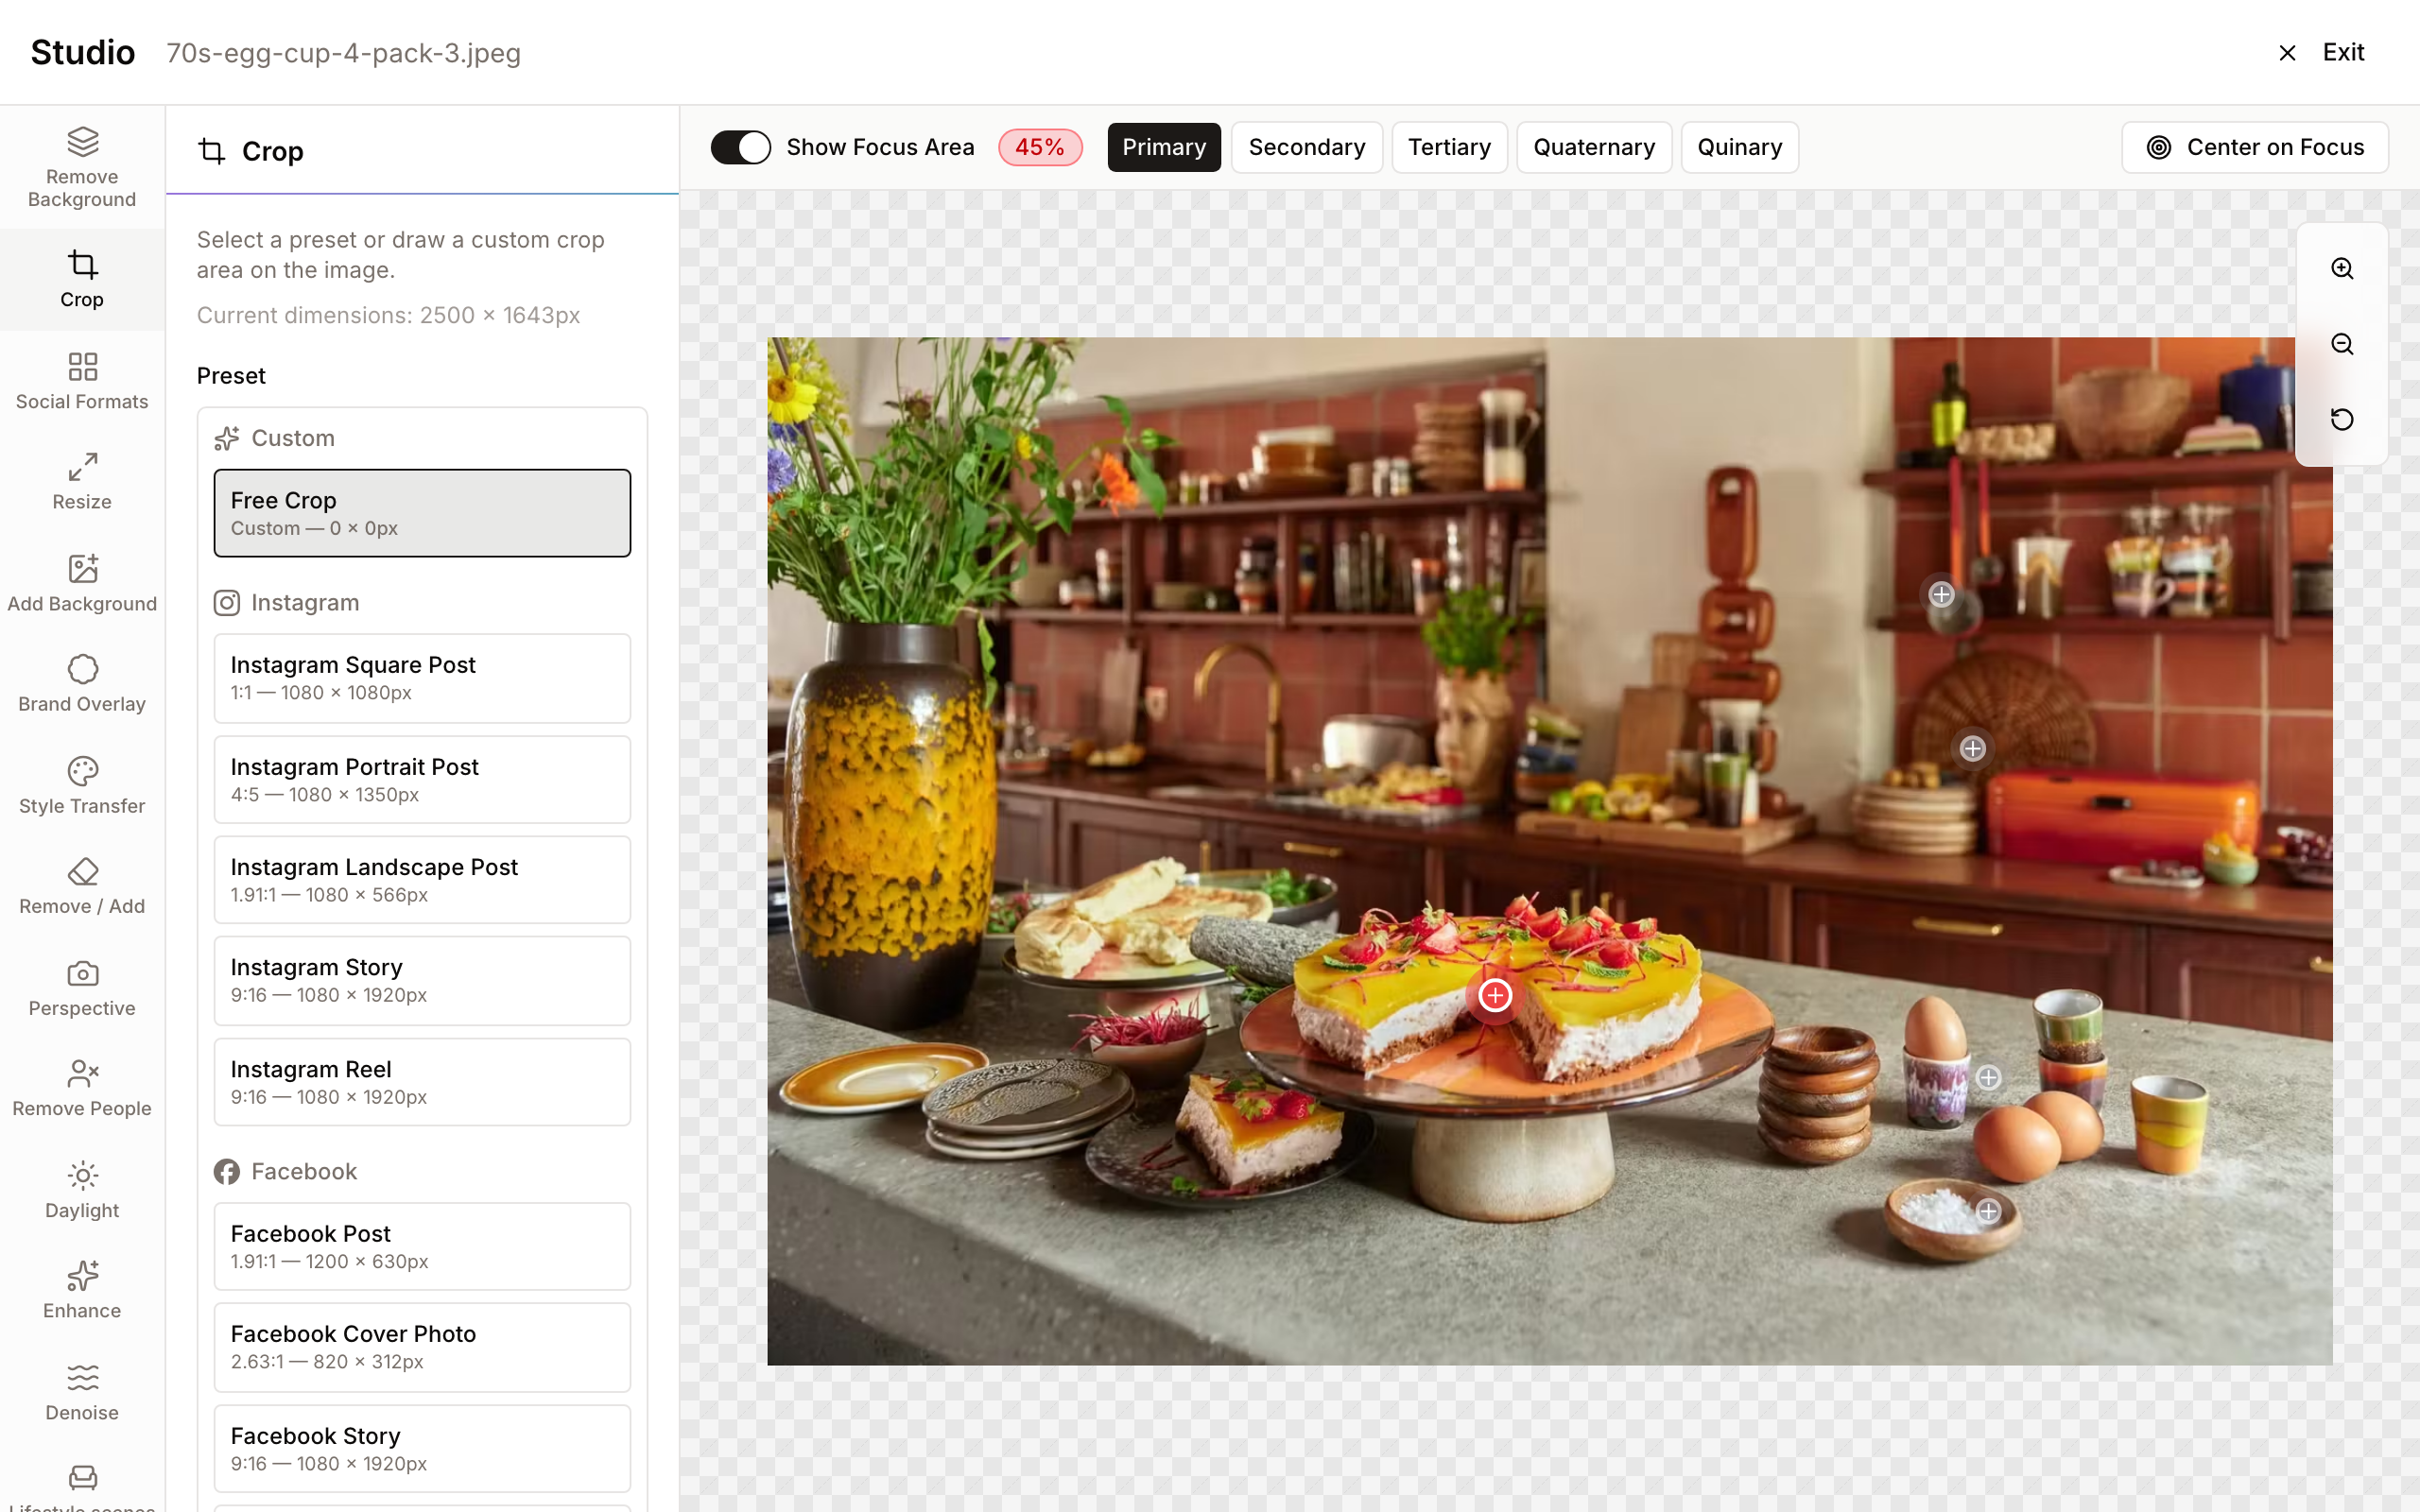
- Select a category in the preset list (Instagram, Facebook, Twitter/X, LinkedIn, YouTube, TikTok, Pinterest, or Common Ratios).
- Click a specific preset. The crop overlay snaps to the correct aspect ratio - for example Instagram Square Post locks to 1:1, YouTube Thumbnail locks to 16:9.
- Or pick Free Crop and drag the handles to any shape you want. The current dimensions are shown next to the preset so you can see exactly what will come out.
- Center on Focus (top toolbar) automatically keeps the crop box aligned with the image's primary subject, as detected by Freedam's focus-point analysis.
- Show Focus Points toggles the overlay that marks what the AI considers the most important part of the image. If the asset has multiple focus points, numbered buttons let you cycle between them.
- Drag the crop box beyond the image edge to trigger outpainting - Studio will generate believable new pixels to fill the gap. This is how you turn a portrait into a landscape (or vice versa) without stretching or adding bars.
Under the hood, in-bounds crops are a pure, lossless pixel cut; out-of-bounds crops automatically switch to AI outpainting. You don't need to choose - it happens for you.
Output size matches the preset. Instagram Square is 1080×1080, YouTube Thumbnail 1280×720, TikTok Video 1080×1920, and so on.
Crop preset reference
Every preset locks the crop overlay to the right aspect ratio and produces an output at the platform's recommended pixel size:
| Category | Preset | Output size | Aspect ratio |
|---|---|---|---|
| Custom | Free Crop | As drawn | Custom |
| Instagram Square Post | 1080×1080 | 1:1 | |
| Instagram Portrait Post | 1080×1350 | 4:5 | |
| Instagram Landscape Post | 1080×566 | 1.91:1 | |
| Instagram Story | 1080×1920 | 9:16 | |
| Instagram Reel | 1080×1920 | 9:16 | |
| Facebook Post | 1200×630 | 1.91:1 | |
| Facebook Cover Photo | 820×312 | 2.63:1 | |
| Facebook Story | 1080×1920 | 9:16 | |
| Facebook Ad (Square) | 1080×1080 | 1:1 | |
| Facebook Ad (Landscape) | 1200×628 | 1.91:1 | |
| Twitter/X | Twitter/X Post | 1200×675 | 16:9 |
| Twitter/X Header | 1500×500 | 3:1 | |
| Twitter/X Card | 1200×628 | 1.91:1 | |
| LinkedIn Post | 1200×627 | 1.91:1 | |
| LinkedIn Cover | 1128×191 | 5.9:1 | |
| LinkedIn Article | 1200×627 | 1.91:1 | |
| YouTube | YouTube Thumbnail | 1280×720 | 16:9 |
| YouTube Channel Cover | 2560×1440 | 16:9 | |
| YouTube Short | 1080×1920 | 9:16 | |
| TikTok | TikTok Video | 1080×1920 | 9:16 |
| Pinterest Pin | 1000×1500 | 2:3 | |
| Pinterest Board Cover | 800×450 | 16:9 | |
| Common Ratios | Square (1:1) | 1080×1080 | 1:1 |
| Portrait (4:5) | 1080×1350 | 4:5 | |
| Landscape (16:9) | 1920×1080 | 16:9 | |
| Ultrawide (21:9) | 2560×1097 | 21:9 | |
| Vertical (9:16) | 1080×1920 | 9:16 |
The same preset list powers the Social Media Export dialog on the asset detail page, so a crop produced in Studio and an export produced from the asset page always agree on dimensions.
Resize
- Shows the current dimensions in pixels.
- Quick Scale - 25%, 50%, 75%, 125%, 150%, 200% buttons apply a proportional scale in one click.
- Dimensions - Type a target width or height. The other field auto-updates to preserve aspect ratio (you can tell by the "Linked" icon between the two inputs).
- When you resize above 125%, Studio tells you "AI upscaling will be used for best quality" - the job is routed to a super-resolution model instead of a simple stretch, so edges stay crisp.
- Generate is disabled until the requested size differs from the current one.
Social Formats
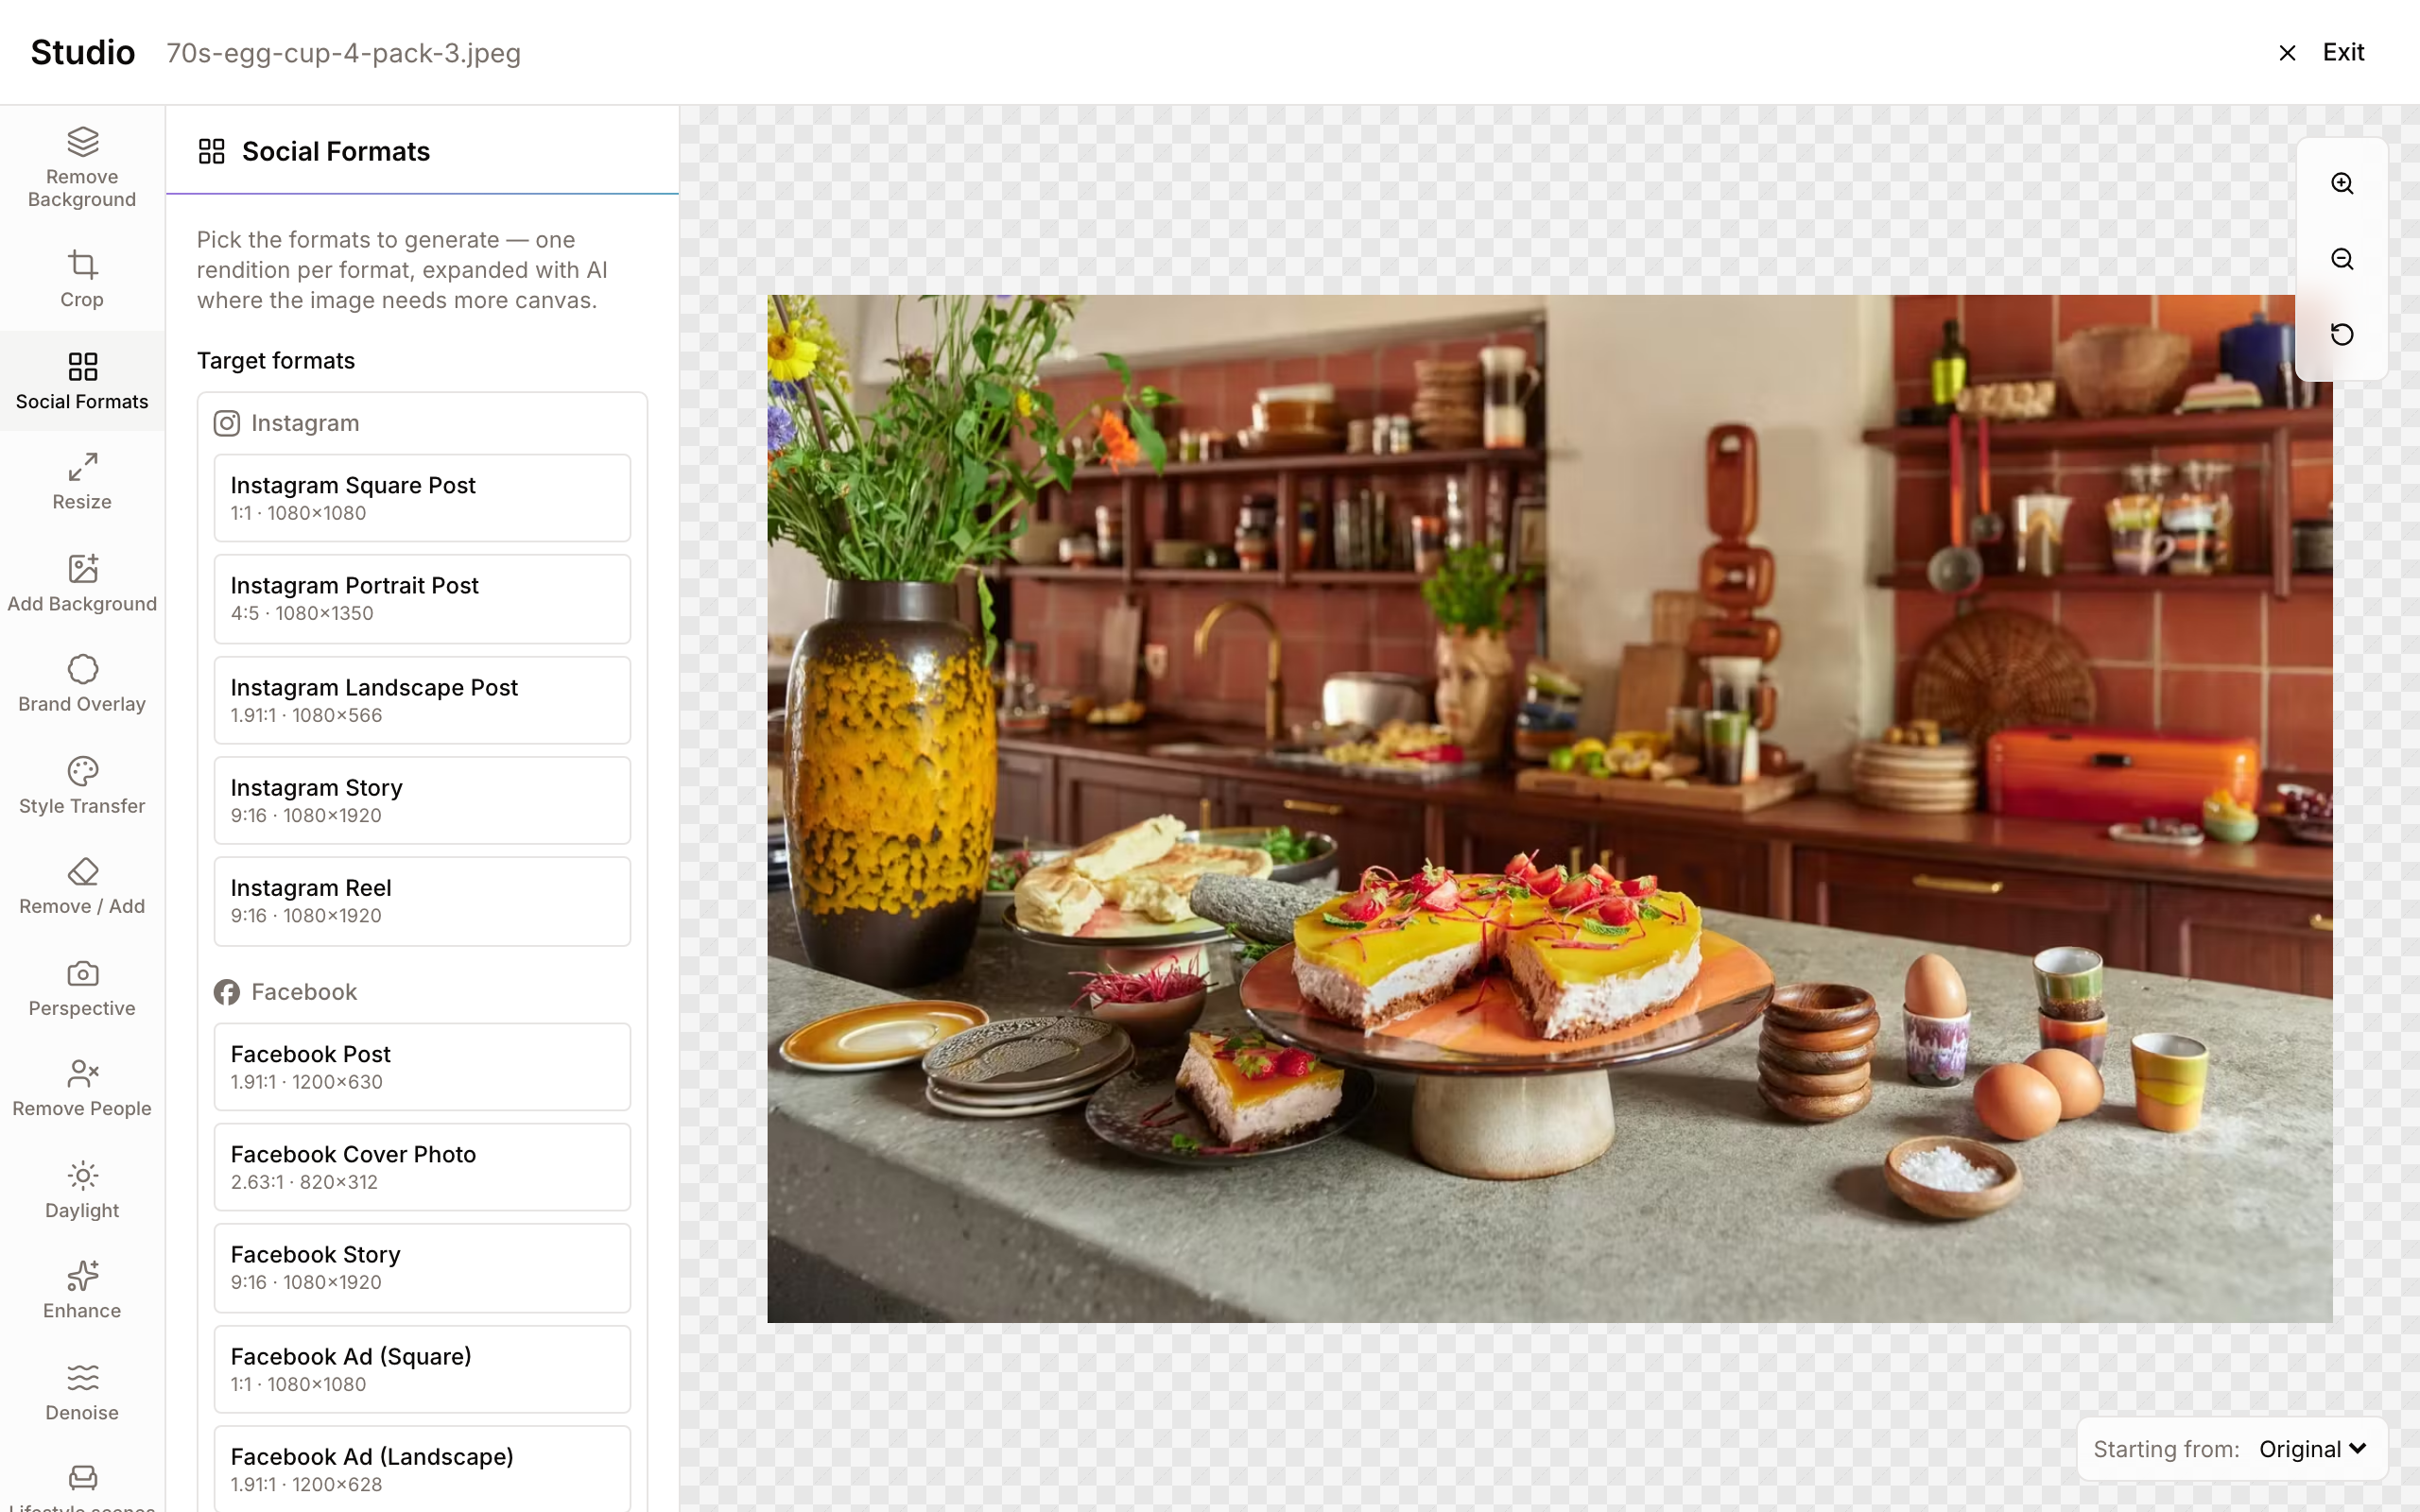
- Tick any number of target formats in the platform-grouped list - Instagram, Facebook, Twitter/X, LinkedIn, YouTube, TikTok, Pinterest, plus common ratios like 1:1, 9:16, 16:9 and 21:9.
- One click of Generate dispatches a separate run for every ticked format. Each run centers your full image on a larger canvas of the target ratio, fills the new area with AI outpainting, and delivers the rendition at the platform's exact pixel dimensions (an Instagram Story comes back at 1080×1920, a YouTube thumbnail at 1280×720).
- Nothing is ever cropped away - the whole picture is preserved and the canvas grows around it. If you want to cut into the image instead, use Crop.
- Formats that match the image's current aspect ratio are greyed out with a hint to use Resize - there would be nothing for the AI to fill.
- Renditions appear in the bottom strip one by one as each format finishes; a slow format never blocks the others.
Remove / Add (elements)
- Use the brush on the canvas to paint one or more green regions over whatever you want to change.
- Each region appears in a list in the left rail, colour-coded so you can match swatch to area. Click the X next to a region to remove it.
- Choose Remove (eraser icon) or Add (plus icon):
- Remove - the AI fills each painted region from the surrounding texture so the removed object vanishes cleanly.
- Add - type what you want in the "What should be added?" box (for example "a red sale badge" or "a potted plant") and the AI paints it into the painted region.
- The Clear All button in the top toolbar wipes every region so you can start over.
- The Generate button stays disabled until you have both (1) at least one painted region and (2) an instruction, for Add.
Remove People
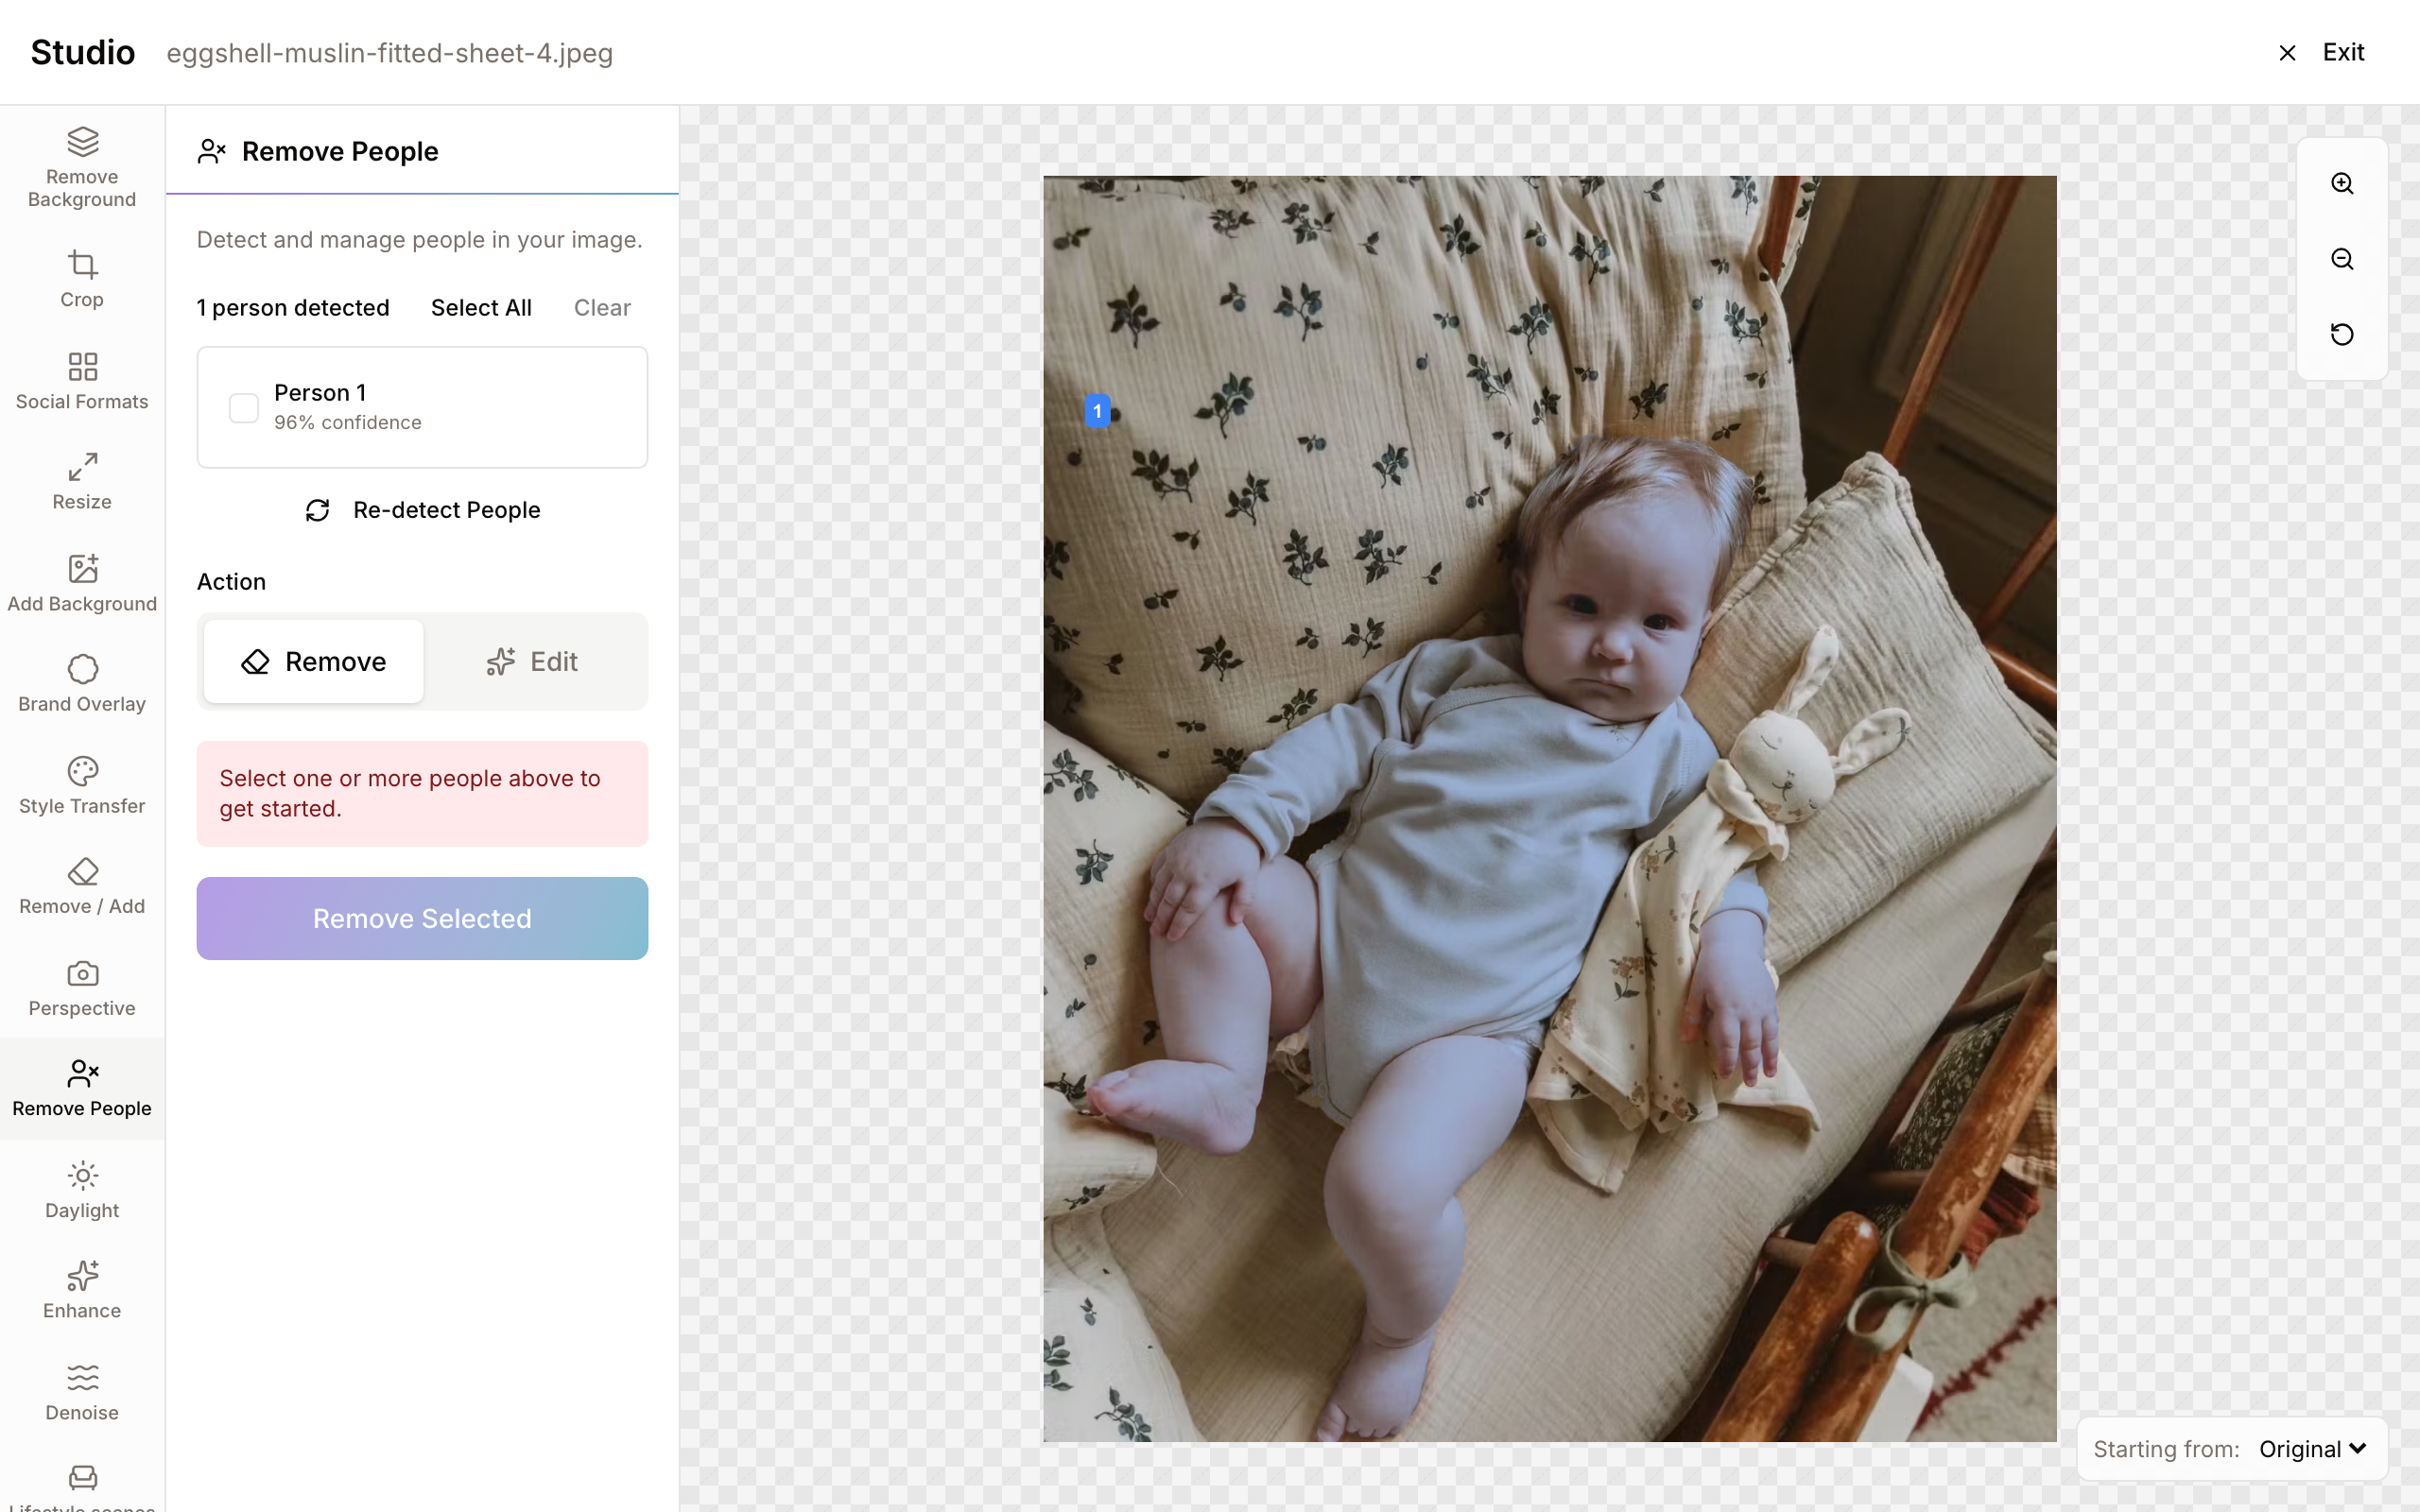
- Automatic on open: the moment you switch to this tool, Studio detects everyone in the image and outlines them in green on the canvas, with a confidence score next to each.
- Pick people by clicking their row in the list or by clicking them directly on the canvas. Select All and Clear live in the header of the list.
- Choose Remove or Edit:
- Remove - the selected people are removed, with instructions to the AI to preserve background textures and patterns.
- Edit - type what to change (e.g. "change hair colour to blonde", "make them look younger", "make them smile"); only the selected people are modified, everything else stays untouched.
- Re-detect People runs detection again. This is useful after you edit the image and want fresh outlines.
- If detection fails (for example on a heavily stylised illustration) you see an inline "Detection failed" panel with a Retry button. You can still use Remove / Add to draw around people by hand.
Perspective
- Pick one of four camera-angle presets, shown as illustrated option cards:
- Bird's Eye View - re-renders the scene from above.
- Low Angle - re-renders from below, looking up.
- Center Subject - recomposes the shot with the main subject centred.
- Depth of Field - applies a shallow-focus effect with a natural-looking blurred background.
- Optionally add Additional instructions to steer the result ("keep the product label facing the camera").
- No prompt required - click Generate and Studio handles the rest.
Remove Background
- One click, no options. Studio returns the subject on a transparent canvas (checkered pattern in the preview).
- Always use this before Add Background - the two are designed as a pair.
Add Background
- Studio checks whether the base image has transparent areas before showing the panel. If it doesn't, the tool politely refuses and suggests using Remove Background first.
- Two modes:
- Solid Color - pick a colour from your Brand Colors palette (from the Brand Guide), or open the custom picker. Hex values are editable. A live preview shows the chosen colour.
- AI Background - type a short description ("tropical beach at sunset", "modern office interior", "soft studio gradient") and let the AI paint a new scene behind the subject.
- Scene presets - for AI backgrounds, a preset picker offers curated marketing scenes so you don't have to write the prompt yourself: white or gradient packshots with soft product shadows, lifestyle surfaces (marble, wooden table, kitchen counter), an outdoor/nature setting, a copy space layout that leaves clean negative space for headline text, and campaign themes (holiday season, summer, Black Friday). Pick a preset and optionally add your own details in the description box - they're combined. Custom keeps the classic free-text behaviour.
- Solid-colour backgrounds are applied instantly with no AI cost; AI backgrounds use a generative image model.
Brand Overlay
- Only the Brand Overlay tool uses the top canvas toolbar as its primary input.
- Add Asset opens a popover of the Logos and Emblems defined in your Brand Guide. Click any one to drop it onto the canvas.
- Add text... - type in the small input and click the plus button, or press Enter. The new text layer uses your primary brand typeface and default colour.
- Select any element (click it on the canvas or in the element list) to reveal controls for:
- Font - any typeface in the Brand Guide.
- Weight - any weight file uploaded for that typeface.
- Size - in points.
- Colour - pick a Brand Colour swatch or open the full colour picker.
- Drag elements on the canvas to reposition them. Drag the grip handle in the element list to change their stacking order.
- Use the trash icon on a selected element to delete it. Use the trash icon in the element row to delete that row.
Brand rules and blocked renders
Every logo or emblem you add is checked in real time against the rules defined in your Brand Guide. Rules can include:
- Minimum size - the mark cannot be rendered smaller than X pixels on canvas.
- Maximum size - the mark should not be rendered larger than X pixels.
- Clear-space - the mark must keep a minimum distance from the canvas edges.
Violations are shown in two severity levels:
- Warnings (yellow) - shown inline on the element list and summarised at the bottom of the tool. They do not stop you from generating; they are a nudge that the rendering is slightly off-brand (e.g. a logo scaled above its preferred maximum, or sitting a little too close to the edge).
- Errors (red) - they block the Generate button. The element list highlights the offending layer, and a summary at the bottom lists each broken rule in plain English, for example "Minimum width is 80px (current: 42px)". Resize or move the element until the error clears, then click Generate.
When a blocked render is attempted anyway, the server returns the violation list so the Studio shows "Brand rule violations: ..." in the tool panel with the specific infractions - the generation is never started, so you are never charged for a blocked render.
Daylight
- One click, no options. Studio relights the scene with soft, natural daylight - harsh artificial lighting, colour casts, and uneven exposure are corrected.
- Composition, content, subject, and dimensions stay identical; only the lighting changes.
- Great for interior shots taken under mixed fluorescent/tungsten light, or product photos with an unwanted colour tint.
Enhance
- One click, no options. Studio boosts sharpness, clarity, and fine detail, and corrects minor exposure and colour issues where they detract from the image.
- Composition, content, subject, and dimensions stay identical.
- Use it as a finishing pass on slightly soft images, or before a large Resize so the upscaler starts from the cleanest possible source.
Denoise
- One click, no options. Studio reduces grain and sensor noise while preserving fine detail and natural texture - it is explicitly instructed not to over-smooth the image into a plastic-looking result.
- Composition, content, subject, and dimensions stay identical.
- Ideal for high-ISO low-light shots and older scanned material.
Style Transfer
- Type a short description of the target style - "watercolour painting", "1950s travel poster", "black-and-white film noir", "flat vector illustration" - and click Generate.
- Studio reinterprets colour, texture, and rendering to match the style while keeping the subject clearly recognizable; composition and dimensions stay identical.
- Because the whole image is repainted, run Style Transfer on a finished composition - crops, people edits, and background changes are best done first.
Saving as a rendition
When you're happy with a version, hover it in the bottom strip and click the download icon. The Save as Rendition dialog opens.
- Type a Reason with at least 20 characters explaining why this version is being created (e.g. "Square crop with logo for Q3 back-to-school campaign"). This becomes part of the rendition's audit trail.
- Click Save as Rendition.
What happens next depends on your workspace settings:
- Auto-approve - you see a green "Rendition Saved Successfully" confirmation and the rendition is immediately available on the asset, with a Return to Asset button.
- Review required - you see an amber "Rendition Saved – Review Required" confirmation. The rendition is created but locked, a review request is opened automatically, and reviewers are notified. You'll be notified once it's approved or rejected. The unapproved rendition cannot be used anywhere in Freedam until review is complete.
Saved renditions appear in the Renditions tab of the asset's detail page, alongside any original uploads, conversions, and previous Studio outputs.
Power-user workflows
Generating a full set of social formats from a single hero image
- Open the hero shot in Studio.
- Click Social Formats and tick everything the campaign needs - Instagram Square Post, Instagram Story, Facebook Cover Photo, LinkedIn Cover, YouTube Thumbnail, Pinterest Pin.
- Click Generate once. Studio dispatches one run per format; renditions land in the bottom strip as each finishes, every one at its platform's exact pixel size with the full hero preserved and AI-extended edges.
- Prefer a tight crop over an extended canvas for some channels? Use Crop with the same platform presets instead - Crop cuts into the image, Social Formats grows the canvas around it.
- For each version, click the download icon and save with a clear reason. You end up with a full channel pack saved back against one original asset, fully traceable.
Refining an AI generation with brand rules applied
- Run Remove Background on the product shot.
- Switch to Add Background → AI Background and describe the scene you want (e.g. "minimal matte concrete studio floor with soft side light"). Click Generate.
- If the composition is close but not quite right, use Remove / Add → Remove to paint over any distracting artefacts from the generated background, then Generate again.
- When the background is clean, switch to Brand Overlay. Add your primary logo from the brand asset picker.
- If the layer shows a red error saying the logo is below minimum size, drag it larger on the canvas until the error clears.
- Add a text layer with the campaign tagline. Pick your brand typeface, weight, colour.
- Reorder elements by dragging in the element list so the logo sits above the tagline.
- Click Generate, review, and Save as Rendition with a descriptive reason.
Removing a background distraction without a brush
- Open Remove People - detection runs automatically.
- If Studio finds the distraction, tick just the unwanted person in the list (everyone else stays unchecked) and click Remove Selected.
- If the detection missed them (it happens with people in heavy shadow or at distance), switch to Remove / Add, brush over the distraction, and click Generate with Remove selected.
Rescuing a noisy low-light shot
- Run Denoise to clean up the grain while keeping texture intact.
- From the denoised version, run Daylight to correct the murky artificial lighting.
- Run Enhance as a finishing pass to bring back sharpness and fine detail.
- If you need a bigger output, run Resize last - the upscaler now starts from the cleanest possible source.
- Save the final version as a rendition. Each intermediate version stays in the strip, so you can compare before/after at every step.
Extending a landscape shot into a square for Instagram without cropping content
The one-click way: open Social Formats, tick Instagram Square Post, and click Generate - the full landscape is centered on a square canvas and the missing top/bottom bands are outpainted automatically.
When you want manual control over where the extension happens:
- Click Crop → Instagram Square Post.
- The crop box will try to fit a 1:1 area inside the landscape - drag it upwards or sideways so that it extends off the top and bottom of the image.
- Click Generate. Studio detects the out-of-bounds box and outpaints the missing top/bottom bands to match the rest of the scene.
- Review the result. If the outpainting is unconvincing, switch back to the original base and try Perspective → Center Subject to recompose instead.
How Studio connects to the rest of Freedam
- Asset detail page - The Open in Studio entry point in the action bar. Any rendition you save through Studio shows up in the Renditions tab on the same asset.
- Brand Guide - The Brand Overlay tool and the Add Background colour swatches pull their logos, emblems, typefaces and colours live from the Brand Guide. Update a logo in the Brand Guide and the next time you open Studio it uses the new version. Brand rules (minimum size, clear-space, etc.) are read from the Brand Guide and enforced inside Studio automatically.
- Requests / Approvals - If your workspace requires renditions to be reviewed, saving creates a review request and notifies the right reviewers. The reviewer experience is identical to any other asset submission, with the added context that the rendition was produced in Studio.
- Collections and Campaigns - Approved renditions inherit the collections and tags of the source asset, so a rendition created from an asset already in a campaign is searchable alongside the rest of the campaign's material.
- Focus points - Studio reads the per-asset focus points that Freedam has already computed and uses them to guide cropping and to power the Center on Focus toggle. Disable the toggle and the crop box becomes fully manual.
Output formats, resolution and cost
- Crop (in-bounds) - Lossless direct crop. Output size exactly matches the chosen preset (e.g. 1080×1080 for Instagram Square, 1280×720 for YouTube Thumbnail). No AI cost.
- Crop (out-of-bounds / outpaint) - AI-generated fill. Output resampled to exact target dimensions. Incurs an AI image-edit cost.
- Resize under 125% - Lossless proportional scale. No AI cost.
- Resize above 125% - AI super-resolution. Output resampled to exact target dimensions. Incurs an AI upscale cost.
- Remove / Add, Remove People, Perspective, Remove Background, AI Background, Daylight, Enhance, Denoise, Style Transfer - AI image-edit operation. Incurs an AI cost.
- Solid-colour Add Background - Pure composite. No AI cost.
- Brand Overlay - Pure composite. No AI cost.
AI costs are tracked per generation and are visible to administrators in the Studio audit view. The Save step never retriggers AI - it just promotes an existing session version to a real rendition.
Source images are picked automatically at the highest available quality the tool needs. Resize deliberately reaches for the true original file so large upscales don't introduce thumbnail artefacts; crop uses a high-resolution thumbnail where coordinate alignment matters more than pixel-perfect source quality.
Tips and best practices
- Use as Base - liking a version? Click the layers icon on its thumbnail to make it the base for your next edit, then keep stacking tools. You can always jump back to the original or any earlier version.
- Focus Points - when cropping, the Show Focus Points toggle lets you see what the AI considers important, which is a great sanity-check before trusting Center on Focus.
- Reason text - the save dialog enforces a 20-character minimum precisely because the reason becomes the rendition's story in the approval flow. Writing "Square for IG" is worse than writing "Square crop for back-to-school campaign launch 28 Aug".
- Iterate cheap, save expensive - experiment freely with the session workflow. Unwanted versions can be deleted with the X button in the strip at no cost; the saved rendition is only created at the Save step.
- Back to start - on any tool, to reset the canvas to the original asset, click its thumbnail in the bottom strip (the left-most one).
Common pitfalls
- "No transparency detected" on Add Background - you skipped Remove Background. Run Remove Background first, then come back.
- Brand Overlay won't generate - you have a red error. Check the error summary under the element list; fix each item and the Generate button re-enables.
- Outpainting looks implausible - the further beyond the image bounds the crop extends, the harder the job. If the output is unsatisfying, reduce how far the crop goes outside the image, or start from a larger base version (use Resize first to make the image bigger, then crop).
- People detection missed someone - click Re-detect People after any edit that changed the scene; if it still fails, switch to Remove / Add and brush them by hand.
- Generate button disabled - the panel is telling you something is missing. For Add/Remove you usually need a painted region and/or an instruction. For Resize, your target has to differ from the current size.
Troubleshooting
Studio refuses to open an asset
- Likely cause: the asset's rights policy blocks AI modification, or your role doesn't include the Studio permission.
- Fix: ask the rights holder to revise the policy if appropriate, or request the Studio permission from a workspace admin. The block is deliberate and protects you from doing work you can't actually save.
A generation fails with "Generation failed" or "Could not start generation"
- Likely cause: a temporary problem reaching the AI provider, or a very unusual source image (for example a non-raster original like a PSD or PDF).
- Fix: try again after a few seconds. If it keeps failing, try starting from a different base version (the original, or a previous session version). If the source asset is a PSD/PDF/EPS, Studio will fall back to a high-resolution thumbnail - if no thumbnail is available yet, wait for ingestion to finish on the asset detail page.
A generation is blocked by brand rules
- What you see: a red message at the bottom of the Brand Overlay panel saying "Brand rule violations:" followed by specifics.
- Fix: each violation identifies the offending element and the rule. Resize or reposition as instructed (e.g. make the logo larger until the minimum-size rule is satisfied, or pull it further from the edge to clear a clear-space rule). Yellow warnings don't need fixing; they just inform you.
Saving fails with "Save failed"
- Likely cause: the session version has expired or the rendition file couldn't be retrieved from cloud storage.
- Fix: re-run the same generation to produce a fresh version, then save that one.
The session doesn't seem to be saving my versions
- Versions live in the bottom strip and persist as long as the session exists. Exiting and re-opening Studio on the same asset restores the session. If versions are missing when you return, an administrator may have cleaned up inactive sessions.
- The original asset is never modified by Studio - only explicitly saved renditions are added to the library.
A "Review Required" rendition isn't showing up
- Check your notifications. The review has been routed to the workspace reviewers, not to you. You'll see the rendition on the asset only once the reviewer approves it.
- Pending renditions are visible to you in the Renditions tab of the asset with a "Pending approval" state.