
Collections
Collections provide a flexible way to organize your digital assets into logical groups. Whether you are managing a small set of files or a complex hierarchy of project folders, the Collections feature allows you to categorize, search, and perform bulk operations on your assets efficiently.
With Collections, you can create nested structures, filter by collection types, manage permissions, share work with teammates or external guests, and let Freedam route newly uploaded assets into the right place automatically.
Freedam supports several kinds of collections. "Shared" collections are organization-wide and can be published, browsed and shared with teammates or external guests. "My Collections" are a protected personal workspace: anything you file here is automatically private, owned only by you, and cannot be made public or moved underneath another user's personal collection - even by an administrator. New rows created by bulk actions under "My Collections" stay locked to the original creator.
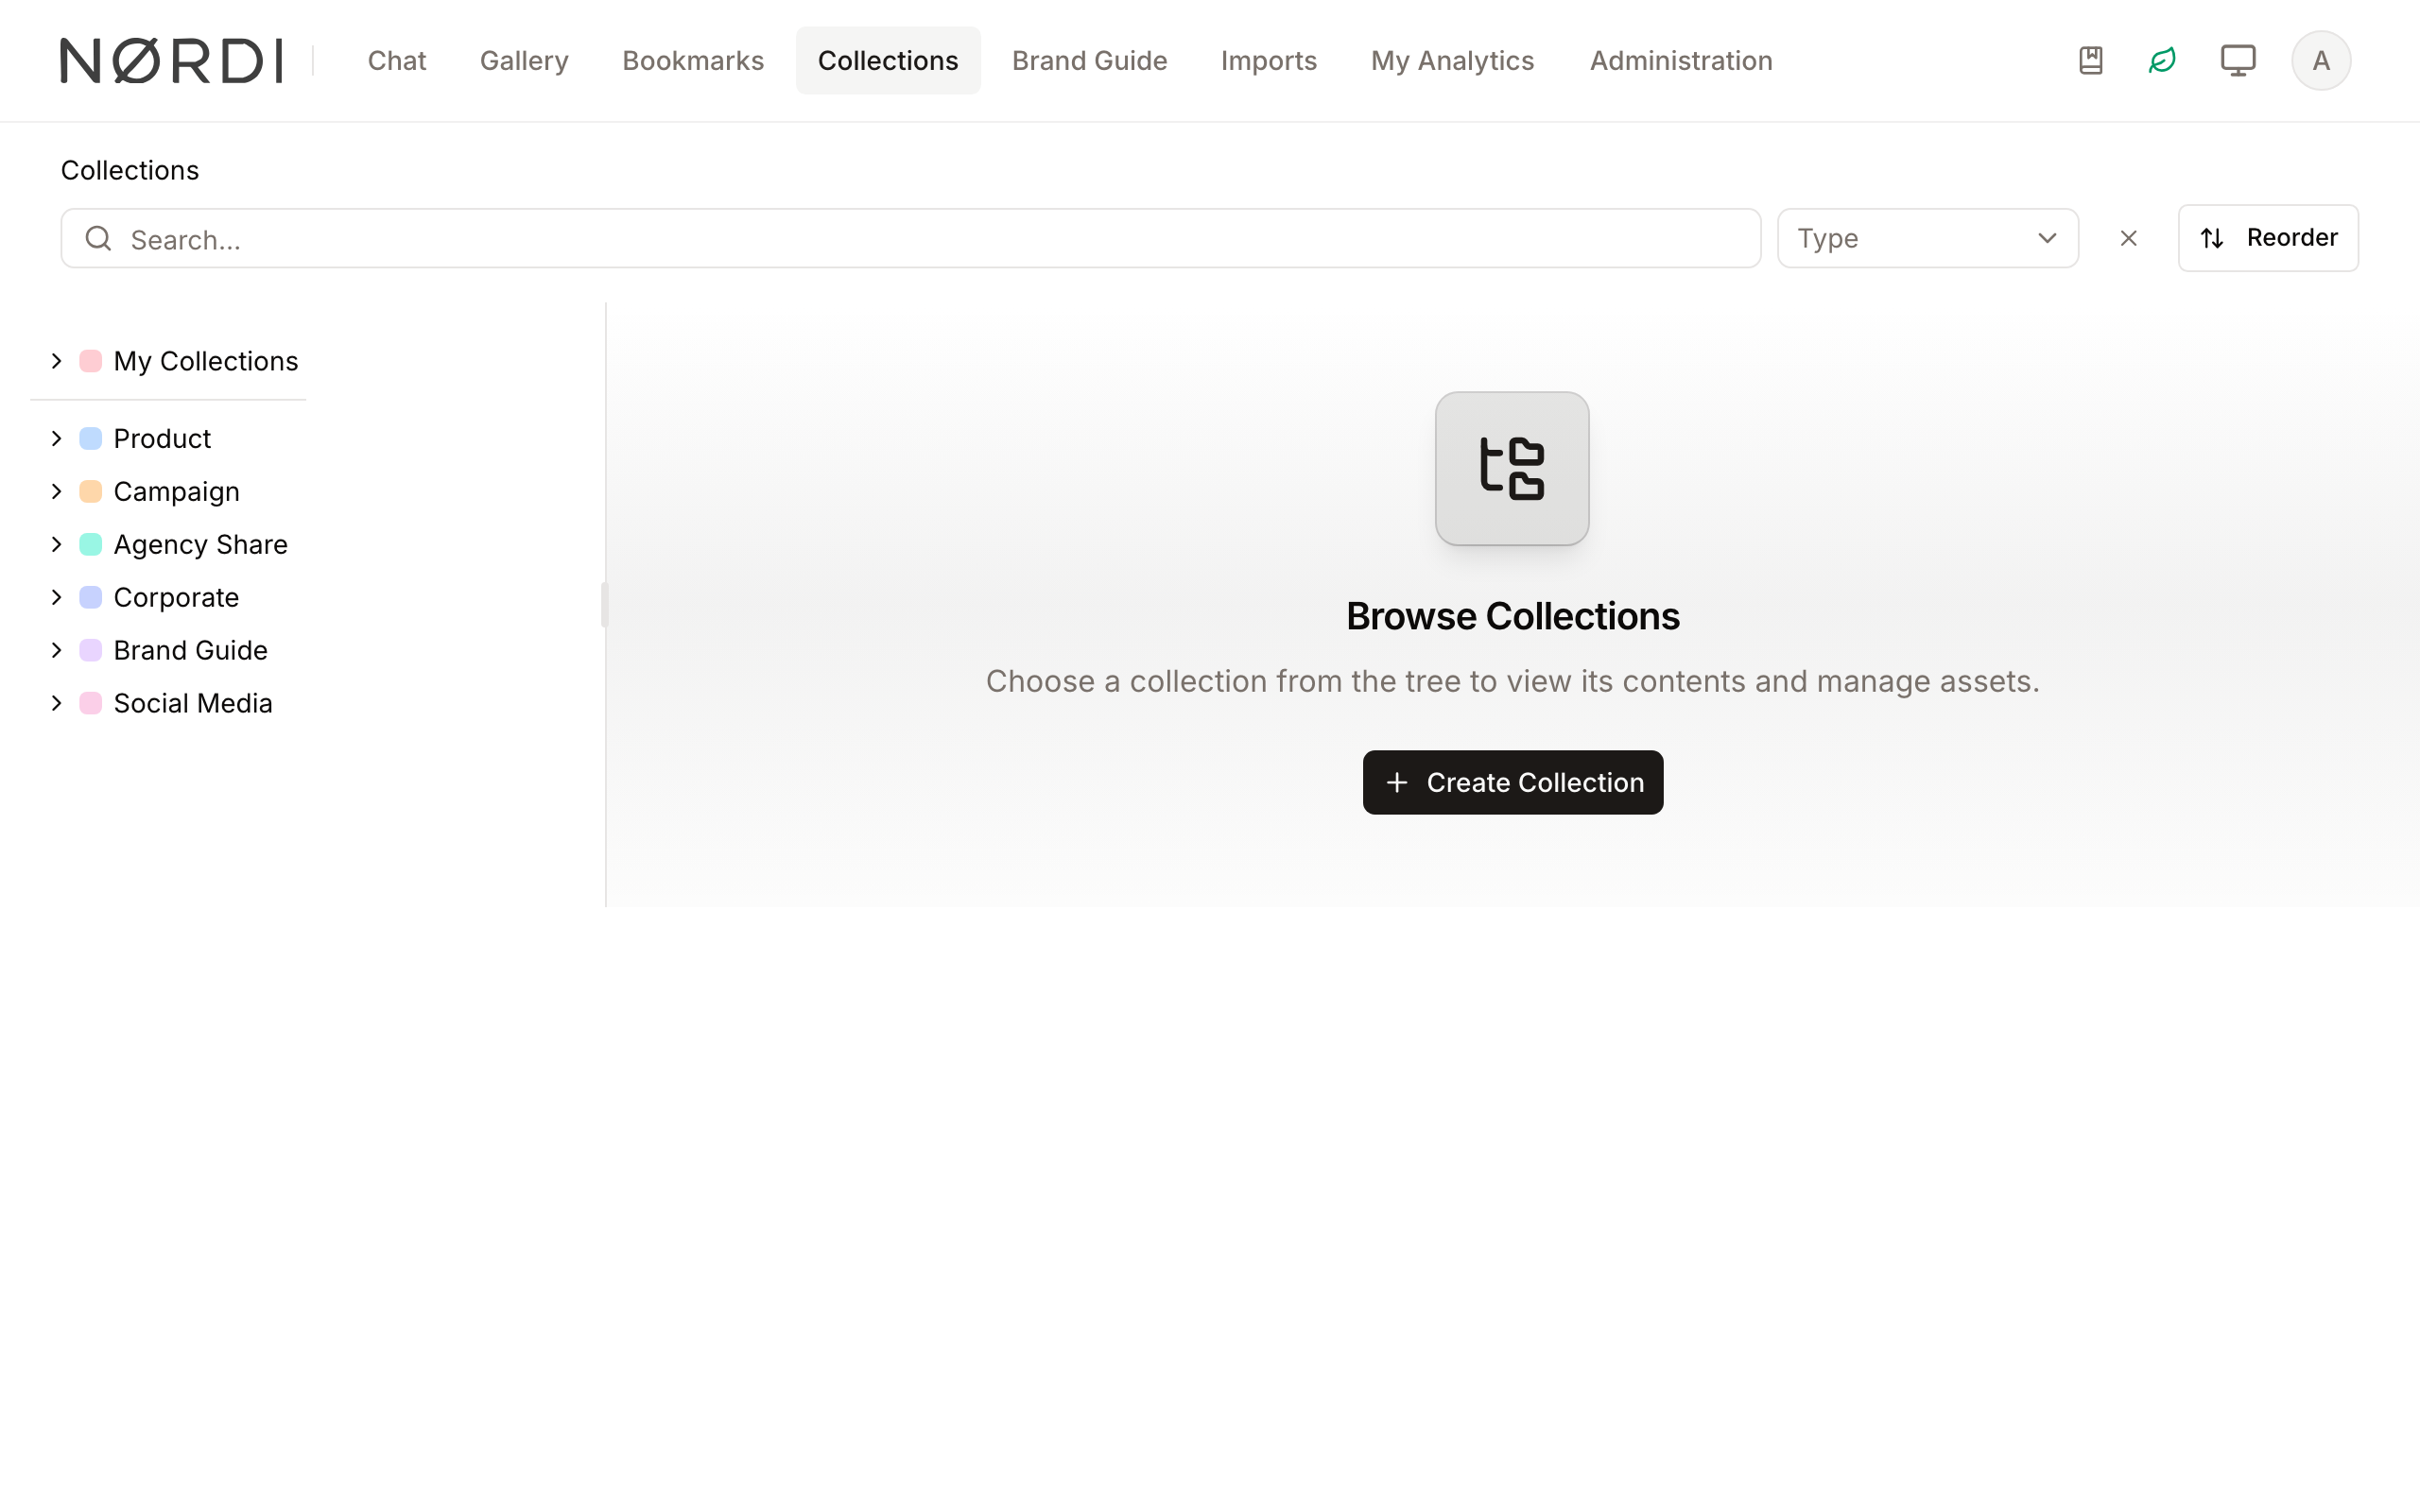
Page Overview
- Purpose: To provide a central hub for viewing and organizing asset groups.
- When to use it: Use this page when you need to browse your folder structure, move assets between groups, or perform administrative tasks like archiving or deleting multiple collections at once.
- What you can do here:
- Search for specific collections using smart suggestions.
- Filter collections by their assigned Type.
- Enable Management Mode to perform bulk updates.
- Reorder collections and move them between parents via drag-and-drop.
- Archive, publish, or delete multiple collections simultaneously.
- Open a selected collection to work with its assets, metadata, attachments, shares, subscribers and custom page.
Page Layout
- Top bar: Contains the search field, collection type filters, and the "Manage" toggle. This area also displays breadcrumbs to help you navigate through nested collection levels.
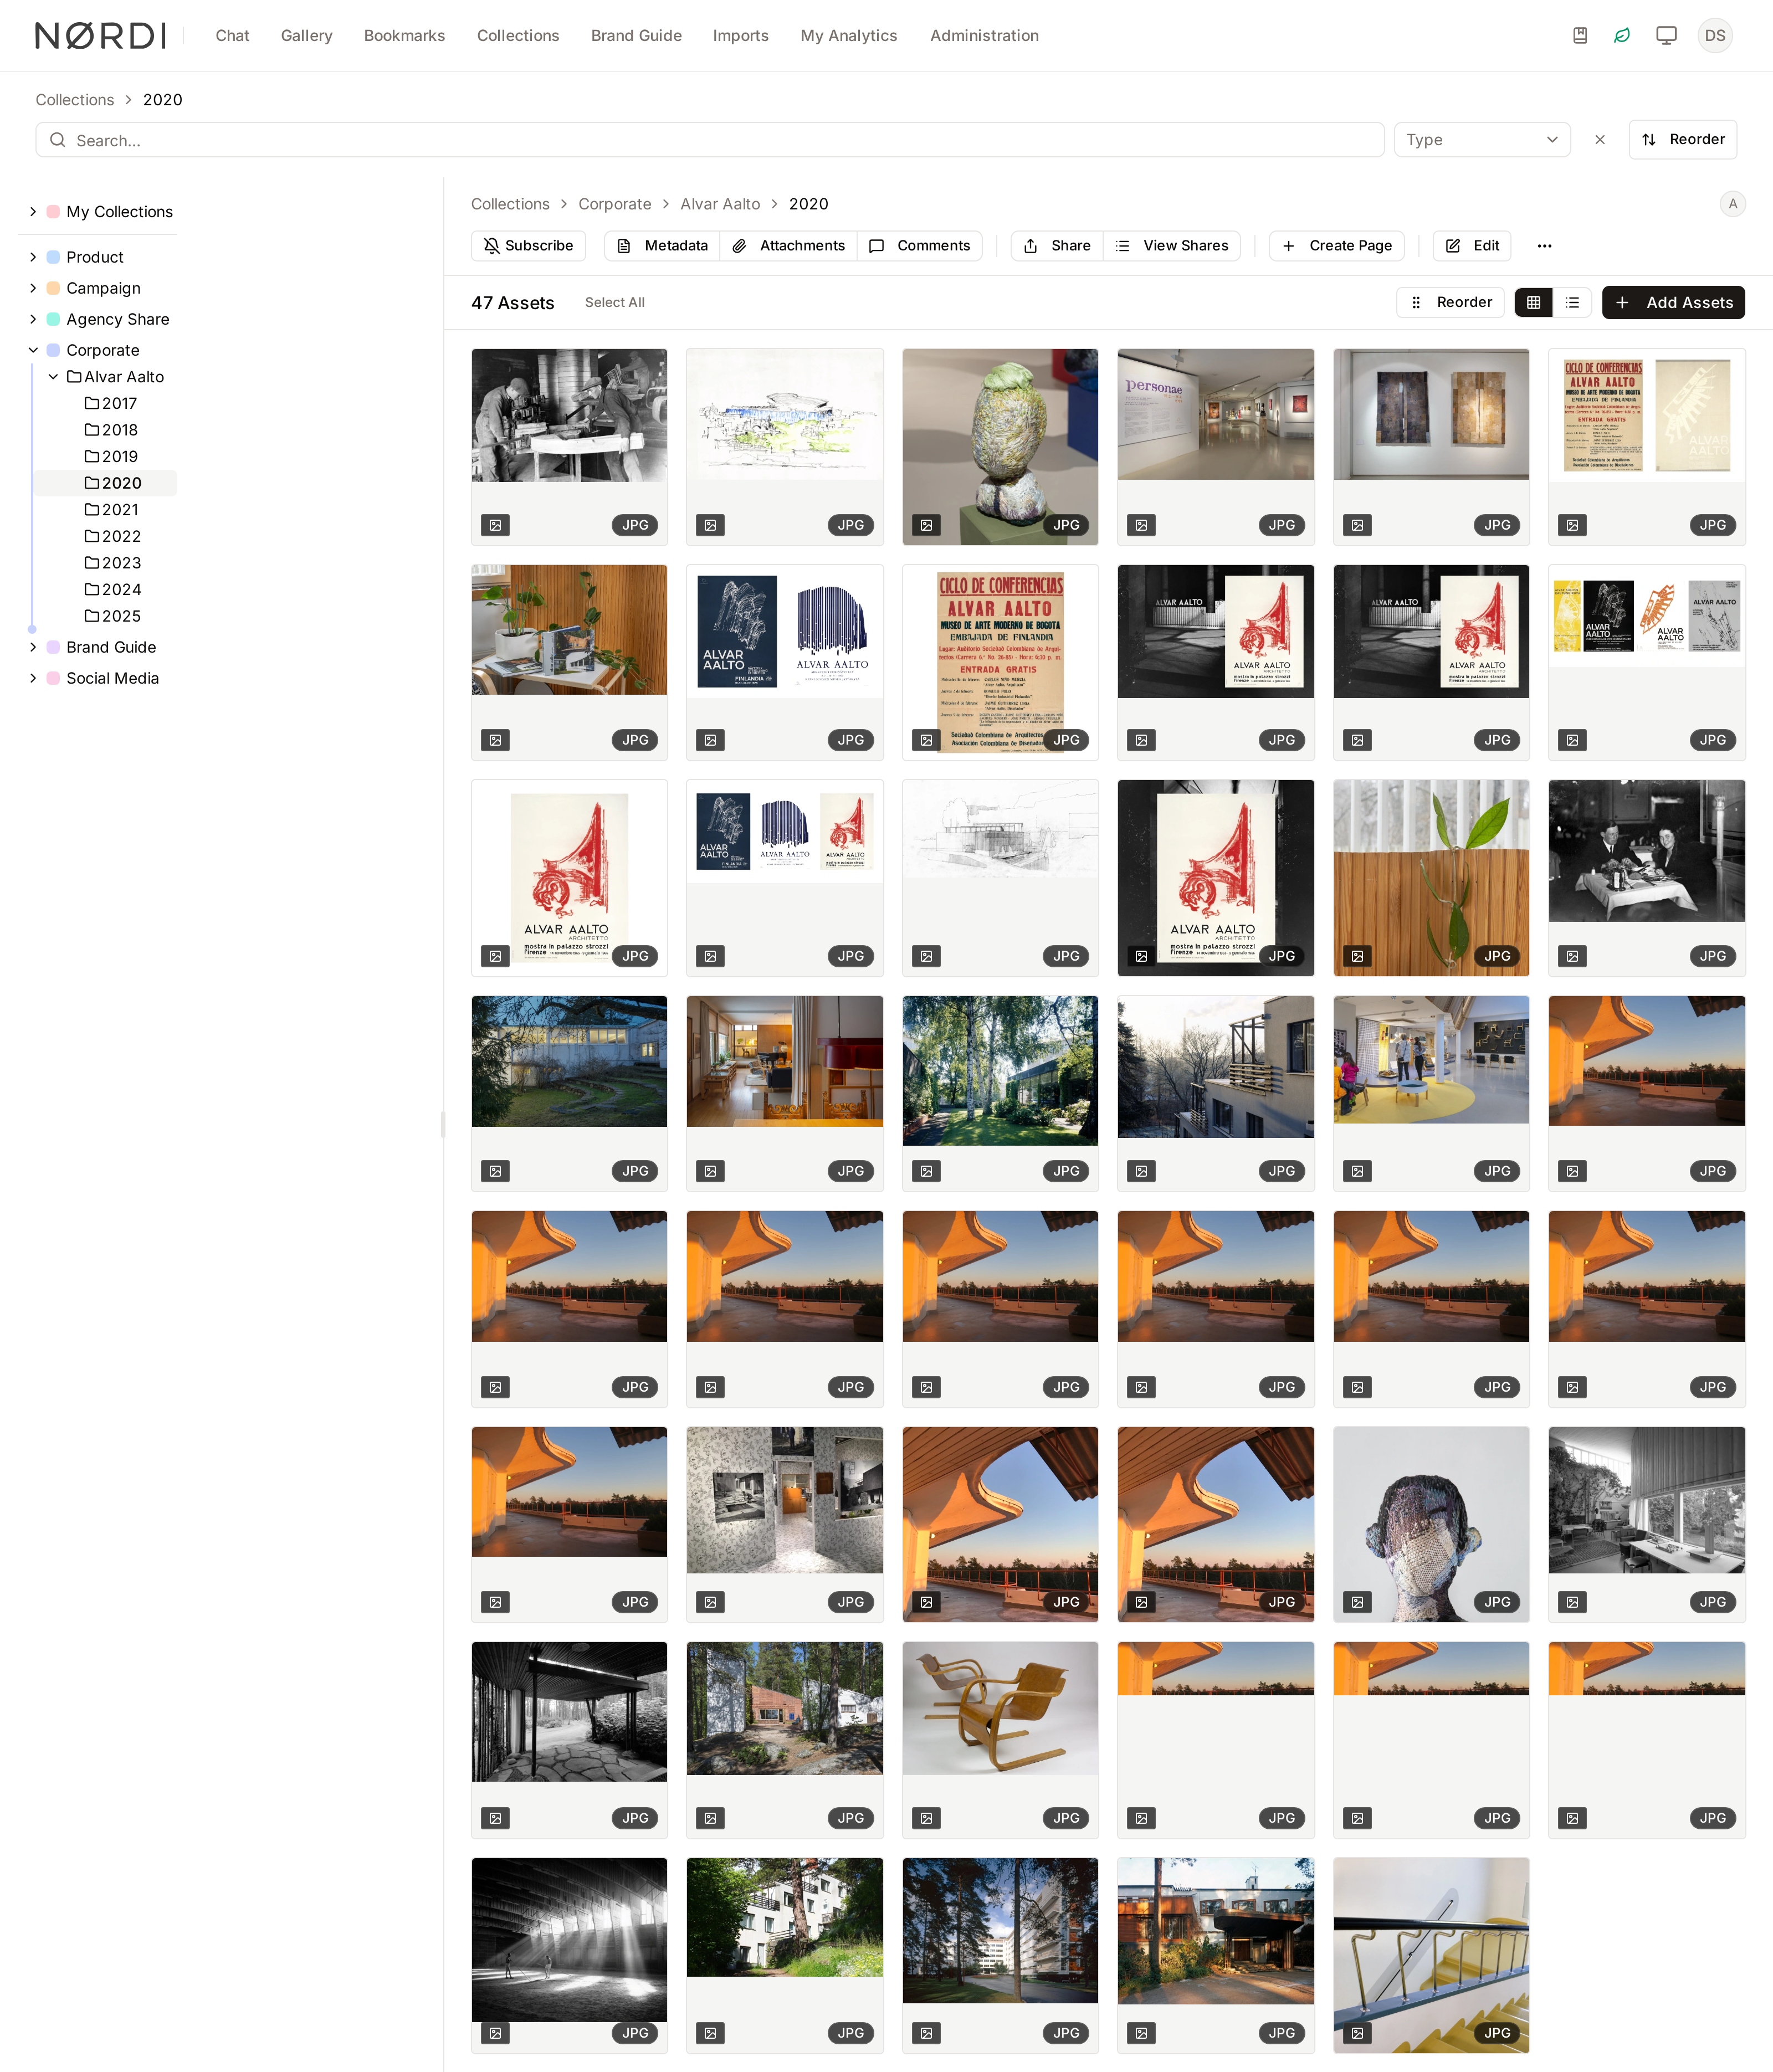
- Tree sidebar: A grouped tree of every collection you can see, organized by type. Nodes expand and collapse on click. A ring around the icon marks the collection currently selected, and a small badge highlights anything that has been "shared with me".
- Main area: Displays the contents of the selected collection - its cover, description, asset grid or list, and the toolbar of collection-level actions. When nothing is selected, you get an empty-state landing panel.
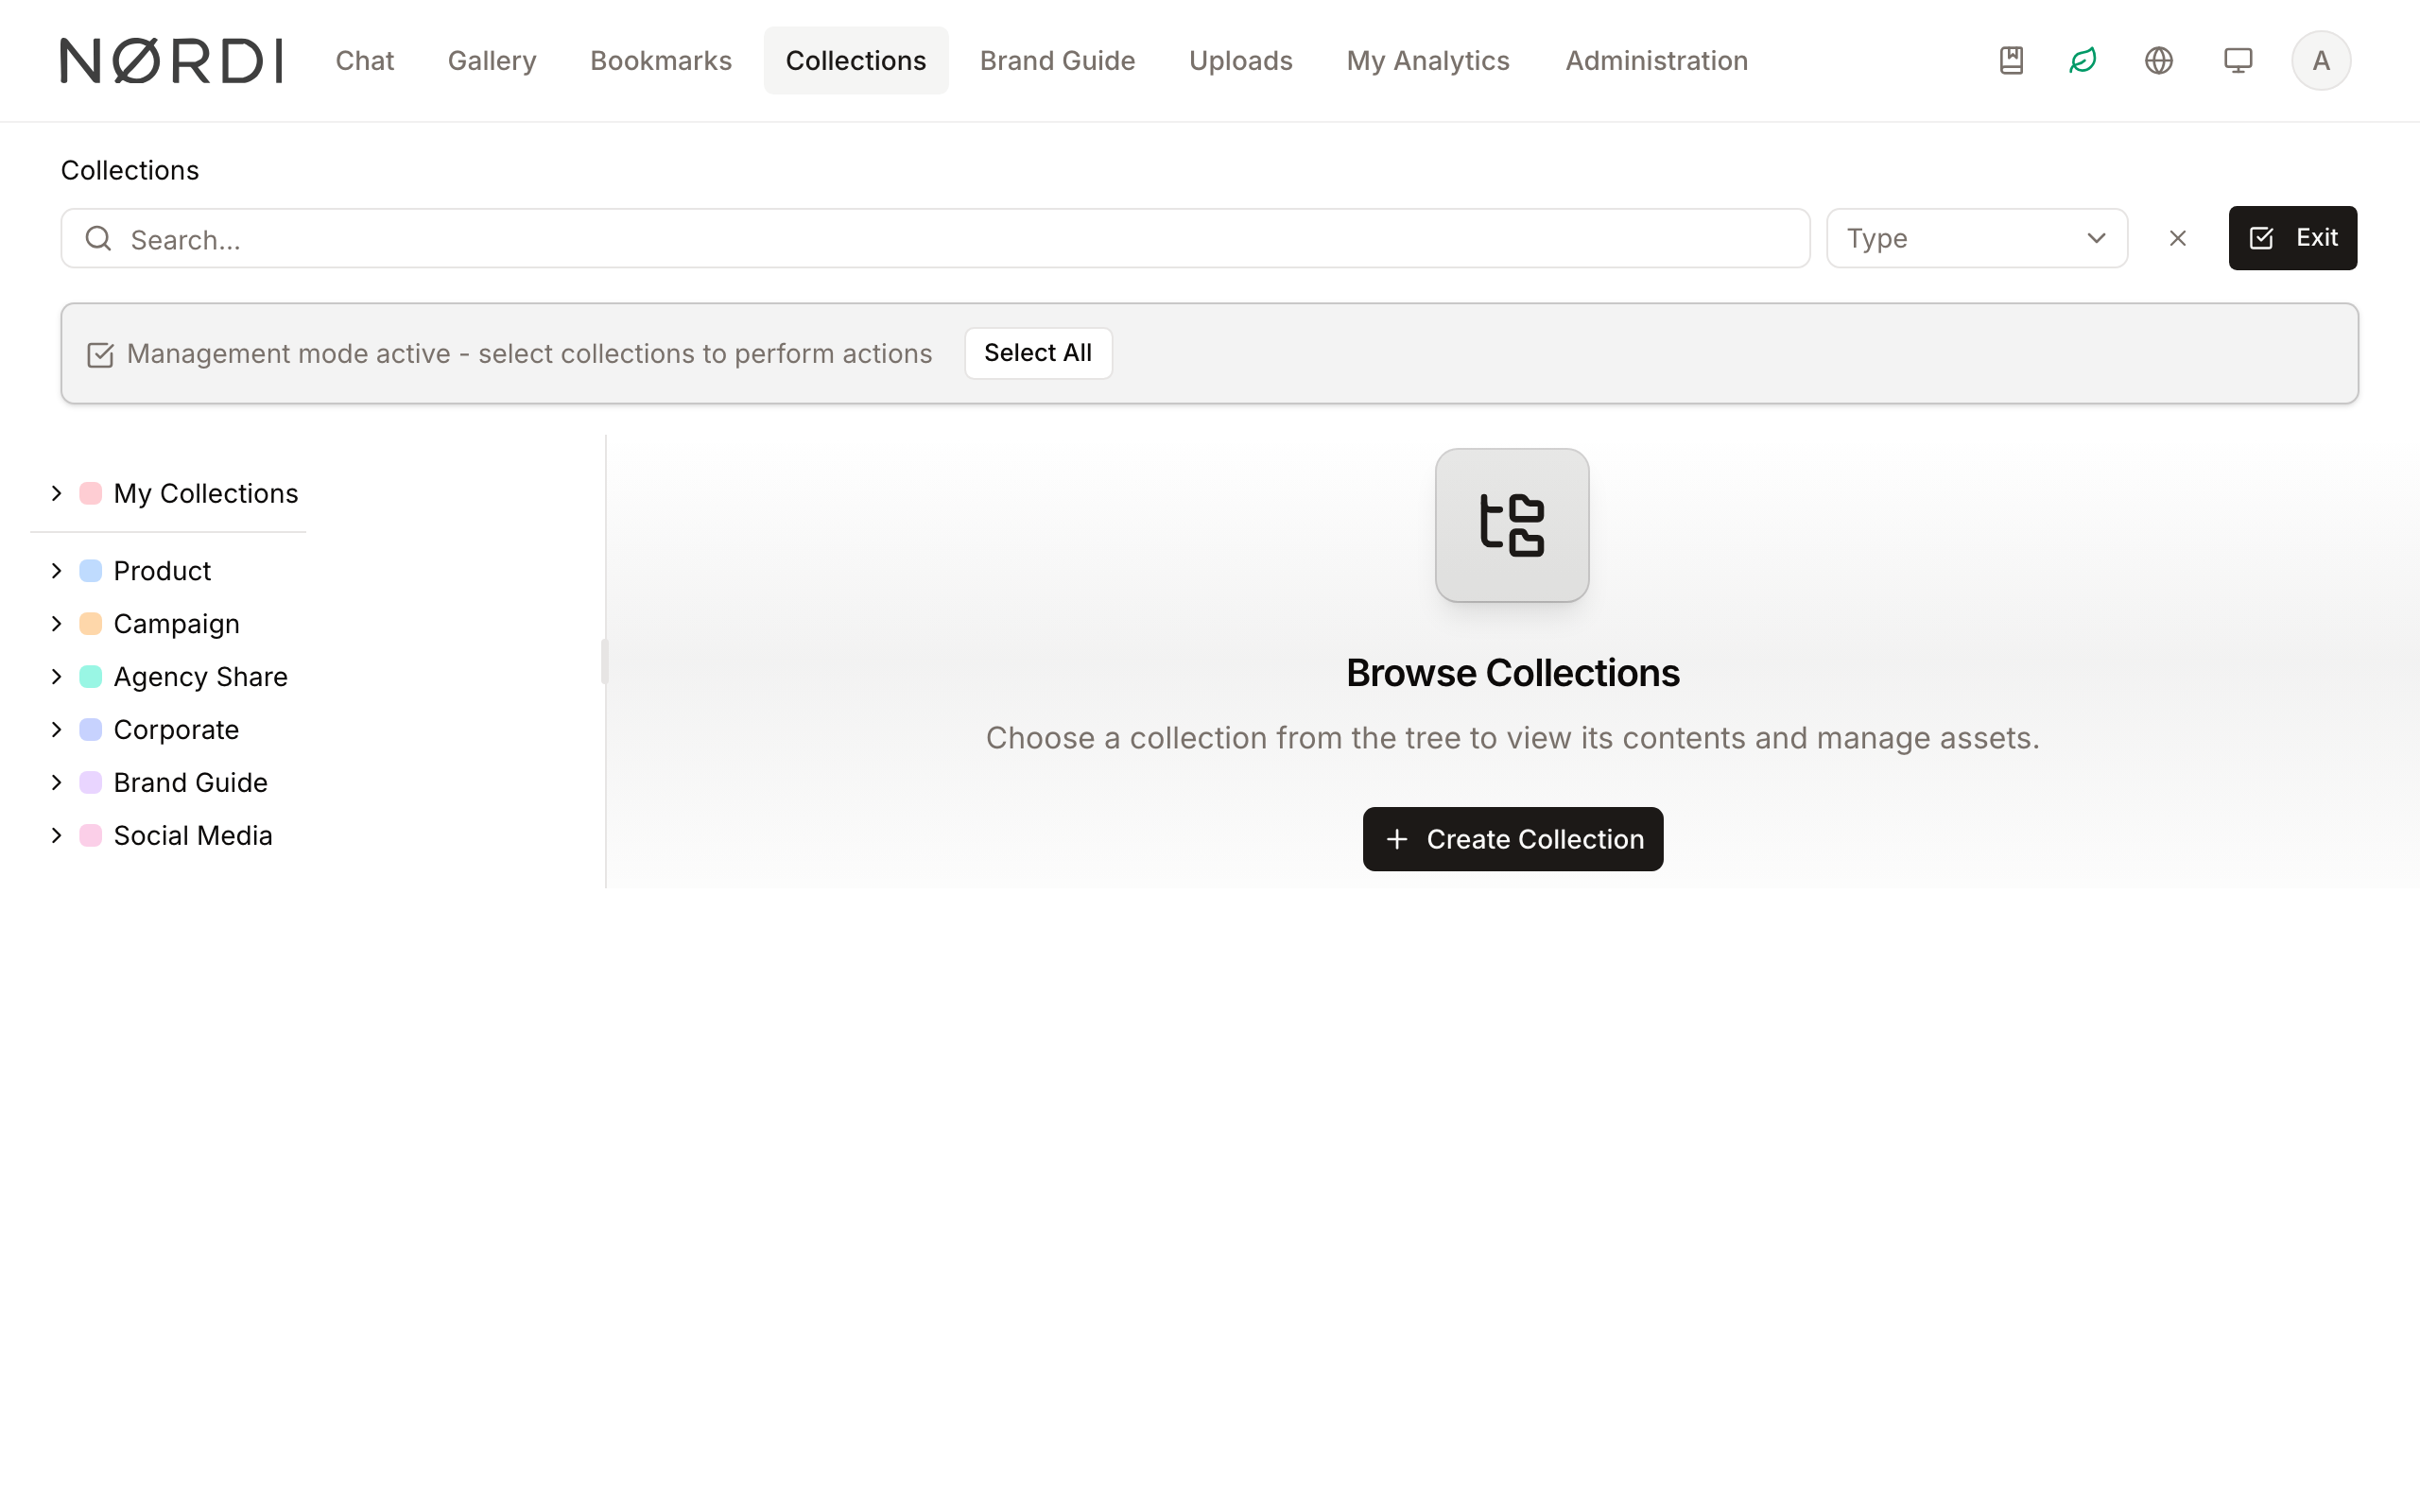
- Bulk Actions bar: Appears below the top bar only when "Management Mode" is active. It contains selection tools (Select All/Clear) and the "Actions" dropdown menu.
Collection Types
Collection Types are pre-configured by an administrator and decide how each collection behaves: which custom metadata fields it shows, how deep it can nest, what the sub-levels are called, and whether assets can live at every level. Once types exist, everyone picks from the same menu when creating a new collection, so your workspace stays consistent across teams.
Common marketing-oriented examples:
- Campaign - top level is the campaign name, second level splits by channel (social, web, print), third level by deliverable. Includes metadata like launch date, market and brand.
- Shoot - date, location, talent and photographer fields. Usually one or two levels deep (shoot > day).
- Project / Client Work - client > project > phase hierarchy with budget, project lead and delivery date fields.
- Release / Asset Drop - flat, one level, used to stage a public drop with a release date and an embargo flag.
- My Collections - a special personal type (see below) available to every user.
The "Type" dropdown in the top bar filters the view to a single type. Clearing the filter returns the full, grouped tree.
My Collections
"My Collections" is a built-in type that everyone gets automatically. Think of it as your personal scratchpad:
- It is always present - you cannot delete it.
- Everything you create under it is private to you. Other users, including admins, never see it in their tree.
- It cannot be shared publicly, added to internal shares, or moved under someone else's tree. The Share and "Make Public" actions are hidden for anything under My Collections.
- Every collection you create here stays owned by you, even when administrators run bulk operations that would otherwise reassign ownership.
- You can freely nest sub-collections under My Collections and drag assets between them.
Use My Collections for work in progress, a shortlist you're pulling together for review, or a personal bookmark folder of assets you reference often.
Hierarchy
Collections are hierarchical. Each type declares how many levels it supports and what each level is called (for example: Campaign > Channel > Deliverable). Within those levels:
- A collection can contain any number of sub-collections.
- Each sub-collection can contain its own sub-collections, up to the depth the type allows.
- Every level can independently allow or disallow direct assets and further children, so a type can require assets to live only at the leaf level, for example.
- Metadata fields can be scoped to specific levels - a "launch date" might appear on a Campaign but not on an individual Deliverable.
The tree sidebar shows the full structure, grouped by type at the top. Expand arrows reveal sub-collections; children load lazily the first time you open a parent. A node's badge shows the number of direct children. When a collection lives inside a hierarchy, the main view shows breadcrumbs along the top so you always know where you are and can jump back up.
Main Features
Search and Suggestions
- What it's for: Quickly finding a collection by name without browsing the entire tree.
- Typical use: Type the first few letters of a project name to see a list of matching collections.
- Result: The main area updates to show only collections matching your search terms.
Management Mode
- What it's for: Switching from a "view-only" mode to an "administrative" mode.
- Typical use: Click "Manage" when you need to select multiple folders for moving or deleting.
- Result: Selection checkboxes appear on collections, and the Bulk Actions bar becomes visible.
Collection Reordering
- What it's for: Changing the display order or hierarchy of your collections.
- Typical use: Dragging a sub-collection into a different parent collection or moving a high-priority folder to the top of the list.
- Result: A "Save Order" button appears to commit your changes to the system.
Detailed Feature Documentation
Smart Search
- Purpose: To locate collections instantly using real-time suggestions.
- Where to find it: In the Top bar, look for the "Search..." input field with the magnifying glass icon.
- What you'll see: As you type, a "Suggestions" dropdown appears below the input. Selecting a suggestion will immediately filter the page.
How to use it:
- Click into the Search... field.
- Type the name of the collection you are looking for.
- Use the Arrow Keys to highlight a suggestion and press Enter, or click a suggestion with your mouse.
- Click the X icon inside the search bar to clear your search and return to the full list.

Bulk Actions
- Purpose: To modify multiple collections at the same time.
- Where to find it: Click the Manage button in the top bar to reveal the selection tools.
- What you'll see: Checkboxes appear on each collection. A floating bar appears with a count of "selected collections" and an Actions menu.
How to use it:
- Click Manage.
- Select individual collections by clicking them, or click Select All.
- Click the Actions button.
- Choose Archive Selected, Publish Selected, or Delete Selected.
Freedam processes bulk create, update, move, reorder and delete operations one collection at a time. If a few items in your selection fail (for example, one of them still contains assets, has child collections, or has an active share link) the remaining ones still go through, and you'll see a message like "5 collections updated, 2 failed". Collections must be emptied of assets, child folders and active shares before they can be deleted. Reordering only works across collections that share the same parent and that you own - administrators with user-management rights can reorder on behalf of other owners.
Bulk Actions On Assets Inside A Collection
When you open a collection and tick one or more of its assets, a second action bar appears at the bottom of the main area. From it you can:
- Add to Collection - push the selected assets into another collection (handy for copy-style moves across the tree).
- Remove from Collection - take them out of the current collection without deleting the underlying files.
- Create Collection - build a brand new collection that already contains the selected assets. In the dialog, the wand button (Generate name using AI) suggests a name from the selected assets' AI captions; you can edit it before clicking Create Collection. If none of the selected assets has a caption yet, or the AI returns nothing usable, you are told so and can type a name yourself. Suggesting a name requires the right to create collections.
- Download - bundle the selected assets into a ZIP for download.
- Share - create a share link for the selected assets. See Share Links.
- Rights - attach or detach a rights policy on the selected assets. See Asset Detail.
- Attachments - attach supporting files (briefs, contracts) to the selected assets.
- Link / Unlink - connect two or more assets as related items, or remove links. See Linked and Related Assets.
- Export - export the selected assets as a ZIP, PDF or CSV. See Export.
- Template - generate branded images from a template. See Template Generation.
- Edit Metadata - apply bulk metadata changes or open the spreadsheet view. See Bulk Metadata Edit.
Actions that aren't relevant to your current selection or permission set are hidden, so the bar stays short.
Manual Reordering
- Purpose: To customize the sequence in which collections appear.
- Where to find it: Enable Manage mode. If you have the correct permissions, reordering is activated automatically.
- What you'll see: Drag handles appear on collections. Moving a collection creates "Pending Changes" indicated by the appearance of Save/Cancel buttons.
How to use it:
- Click Manage.
- Click and hold a collection, then drag it to its new position or into a new parent folder.
- Review your changes.
- Click Save Order to apply the changes or Cancel to revert to the original order.
Dragging a card onto another collection's name nests it as a child of that target; dragging it into empty space between siblings only changes its order. You can move several branches before saving - all pending moves are committed together when you press Save.
Reorder Assets and Group Them in Sections
Inside a collection, you can put assets in a custom order and, when the collection's type defines them, group them into named sections such as "Hero shots", "Packshots" and "Lifestyle".
- Open the collection and click Reorder. The grid view is used, and a banner says "Reorder Mode: Drag assets to reorder them. Changes are saved automatically."
- Drag an asset to its new position. To move it to another section, drop it among that section's assets, or on the section's drop area ("Drop assets here" when the section is empty).
- Click Done.
Every drop is saved immediately, and the collection switches to its custom order. Outside reorder mode, each section shows as a heading with its number of assets; assets not in any section appear under Ungrouped. Share links of the collection show the same sections.
- You need permission to edit collections, and you must own the collection or have user-management rights. The Reorder button is hidden on collections shared with you.
- Sections are defined per collection type by an administrator, under Asset sections in Collection Types. Deleting a section moves its assets to Ungrouped; no asset is deleted.
- In reorder mode, Ungrouped is always shown, even when it is empty, so you can drag an asset back out of every section. Outside reorder mode an empty Ungrouped is hidden.
- If a move cannot be saved, an error message appears and the previous arrangement is reloaded.
- A collection shows 100 assets per page. Arranging the assets of one page puts them first in their sections; the assets on other pages keep their existing order after them.
Cover Image, Description, and Custom Metadata
Every collection carries a handful of presentation fields that make it easier to recognise and browse:
- Name and Description - a short label and an optional descriptive paragraph. The description shows as a tooltip on the breadcrumb and as rich text in any public page you create from the collection.
- Cover image - a thumbnail that represents the collection in tiles, share previews and public pages. You can pick any asset already inside the collection as the cover.
- Creator avatar - a small avatar in the header shows who created the collection, with a tooltip giving their full name.
- Custom metadata fields - the fields defined by the collection's Type (see above). They appear in the Metadata panel on the right and are scoped to the level of the collection you are viewing, so a campaign-level field won't appear on a deliverable.
Open the Metadata button in the header to review or edit these custom fields. Required fields are marked with an asterisk and block saving until filled in. Vocabulary-backed fields (country, brand, market) render as tags pulled from your managed vocabularies.
Attachments
Use the Attachments button in the header to attach supporting files to a collection itself - typical examples are a campaign brief, a creative deck, or a shot list. Attachments sit next to the collection rather than inside its asset grid, so they won't be returned by an asset search or included when someone downloads the collection's assets. Only the person who created the collection can upload attachments, and each attachment can be public or private. See Attachments.
Comments
Use the Comments button in the header to discuss the collection with your team. Mention a colleague with @ to email them; the collection's creator is notified of every new comment. See Comments.
Custom Pages
Collections can have a published landing page attached to them, used to present the collection as a narrative (a campaign hub, a brand guide section, a press kit). From the header you'll see one of:
- Create Page - opens the page builder with the collection pre-wired as the source.
- Open Page - reopens the existing page for editing.
- View Page - available once the page is published; opens the public-facing URL.
Creating a custom page requires the Custom Pages feature to be enabled on your workspace; if it isn't, clicking the button surfaces an upgrade prompt.
Sharing
Collections support two distinct sharing flows. Both are reached from the Share button in the header of a shared collection. Personal ("My Collections") entries do not show any sharing options.
Internal Sharing
Internal sharing gives named workspace members and user groups access to a collection they wouldn't otherwise see. This is the right choice when you're collaborating with colleagues or people already set up in Freedam.
When you create an internal share you can:
- Pick any number of individual users, any number of user groups, or a mix of both. Group membership is evaluated at access time, so adding someone to a group later still gives them access.
- Add an optional personal note that goes into the invitation email.
- Set an optional expiry date and time. Without one, access is open-ended.
Once created, an internal share can be:
- Paused - recipients keep seeing it in their "Shared with me" list but temporarily lose access. Great for a short holiday freeze without dropping everyone and re-inviting them.
- Activated - re-enables a paused share.
- Extended - push the expiry date out without creating a new share.
- Edited - add or remove users and groups, or change the note.
- Revoked - permanently ends the share. The row is kept for the audit log but no one can open it.
Freedam emails recipients when they are added, when a share is extended or edited, when it is paused or resumed, and when access is revoked or expires. An Audit Log attached to each share records every change and every access event - who opened the collection, when, and from where - so you always have a history of who has seen the material.
External Share Links
An external share link lets people outside your workspace open the collection, and all its sub-collections, in a browser without an account. Choose Public View, External Restricted Access or Custom Settings in the share dialog to set who can open the link (anyone, listed email addresses, or a password), whether recipients can download and at which quality, a watermark, and optional start and expiry dates.
External links are only available for shared collections, never for My Collections. The full set of options is described in Share Links, and what recipients see in Receiving a Share.
Viewing And Managing Shares
Click View Shares in the header to open the Collection Shares panel. Only the person who created the collection can open it.
- The Internal tab lists shares with Freedam users and groups, with Edit, Pause, Activate and Revoke actions.
- The External tab lists share links with their access type, status, views and downloads. Use Change Expiry or Extend Expiry to move the expiry date, Revoke to stop a link, and Activate to turn a revoked link back on.
Subscriptions
Anyone with access to a collection can subscribe to it to stay in the loop. Use the Subscribe toggle in the collection header; the icon fills in once you are subscribed, and a small number next to it shows the total subscriber count on that collection (visible only to the creator and people who can manage it).
What subscribers receive:
- An in-app notification, and an email, when new assets are added to the collection - whether by a person uploading manually or by an automation rule routing assets in.
- The email lists up to five of the newly added assets by title or filename, and links back to the collection.
- When an automation rule is the source of the new assets, the email says so explicitly, so subscribers can tell curated additions apart from automated ones.
Managing your subscriptions:
- The Subscribe toggle on any collection turns the subscription on or off for that one collection.
- Every subscription email carries two one-click links: Unsubscribe from this collection and Unsubscribe from all collection notifications. Both are signed, so they work even if you aren't logged in when you click them - handy for unsubscribing straight from your inbox on a phone.
- After using an unsubscribe link you land on a confirmation page listing the collections you are still subscribed to, with a one-click option to resubscribe if you changed your mind.
For collection creators: the subscriber count shown on your own collections lets you gauge interest. There's no subscriber list exposed to regular users - we only show numbers - to protect people's privacy.
Automatic Assignment by Path
Freedam can file newly uploaded assets into the right collection automatically, without manual sorting.
An administrator sets up rules that turn asset metadata (dates, file names, categories, custom fields) into a folder path. As each asset is ingested, Freedam walks the path, creates any missing sub-collections along the way, and files the asset at the leaf.
A marketer-friendly example: an administrator configures a rule for a Campaigns type that routes assets to Campaigns / {year from creation date} / {campaign name from metadata}. When the creative team uploads a photo tagged with campaign name "Spring Launch" in April 2026, Freedam:
- Finds or creates the top-level "Campaigns" collection.
- Finds or creates "2026" under it.
- Finds or creates "Spring Launch" under that.
- Drops the photo into "Spring Launch".
A single asset can match more than one rule and be filed into several collections at once. If one rule fails (missing metadata, a path it isn't allowed to create), the other rules still run and the failure is logged for administrators to review. Subscribers to the destination collection receive a notification that marks the addition as "automatically added by a rule", so they can tell curated drops apart from hand-picked ones.
Paths are built from asset properties using a simple placeholder syntax - for example, typing Shoots / {year:created_at} / {brand} produces Shoots / 2026 / Acme - but you never need to write those yourself unless you're the administrator setting up the rules.
Permissions At A Glance
Who can do what depends on the permissions an administrator has granted. Broadly:
- View collections - default for any signed-in user with gallery access. Required to see the Collections section at all.
- Create a collection - create new top-level or nested collections in a type you have access to. Self-service in My Collections is always allowed.
- Edit a collection - rename, change description, cover and metadata on collections you own. Editing collections owned by others additionally requires the "Manage Collections" right.
- Delete a collection - remove empty collections you own. Deleting collections owned by others requires "Manage Collections". Collections with assets, child collections or active shares must be emptied first.
- Share a collection - available on shared collections you can edit. Never available on My Collections.
- Manage Collections - a collective right that lets administrators and power users act on collections created by other people (edit, move, reorder, delete, share). Without it, the Manage button is disabled when your selection contains collections you don't own, with a tooltip explaining why.
Administrators also manage the Collection Types themselves (their metadata schema, hierarchy levels and colour) - that screen lives under the Admin area and is outside a regular user's view.
Complete Workflows
Workflow: Archiving Multiple Collections
- Goal: Clean up the workspace by moving old collections to the archive.
- Prerequisites: You must have "Manage" permissions for the collections you wish to archive.
Steps:
- Click Manage in the top bar.
- Click the collections you wish to archive.
- Click the Actions button in the bulk actions bar.
- Select Archive Selected.
- Expected result: The selected collections disappear from the active view and a success message "Collections updated successfully" (or similar) appears.
- If it doesn't work: Ensure you are not in "Reorder" mode with unsaved changes, as this may block other actions.
Workflow: Filtering by Collection Type
- Goal: View only specific types of collections (e.g., only "Project" folders).
- Prerequisites: Collection types must be defined by an administrator.
Steps:
- Locate the Type dropdown (labeled "Type" by default) in the top bar.
- Click the dropdown to see available categories.
- Select a specific type (e.g., "Marketing" or "Archive").
- To reset, click the X icon next to the filters.
- Expected result: The list updates to show only collections assigned to that specific type.
Workflow: Reorganizing Folder Hierarchy
- Goal: Move a sub-collection into a different parent collection.
- Prerequisites: Ownership or management permissions for both the collection being moved and the destination.
Steps:
- Click Manage.
- Drag the desired collection over the name of the new parent collection.
- Release the mouse button.
- Click Save Order in the bulk actions bar.
- Expected result: The collection is now nested under the new parent, and the "Saving..." loader appears briefly.
Workflow: Inviting A Colleague To A Campaign
- Goal: Let a teammate work inside a campaign collection without giving them a public link.
- Prerequisites: The collection is a shared collection (not My Collections) and you can edit it.
Steps:
- Select the collection in the tree.
- Click Share in the header.
- Type a name or email into the Users field and pick from the suggestions. Repeat for groups if needed.
- Optionally set an expiry and add a personal note.
- Click Share Collection.
- Expected result: A confirmation toast appears, the invited people receive an email, and the share shows up in View Shares with an active status.
Workflow: Publishing A Public Review Link
- Goal: Send an external reviewer a time-limited link to browse the collection.
- Prerequisites: You created the collection, and it is a shared collection, not under My Collections.
Steps:
- Open the collection and click Share.
- Choose External Restricted Access to limit the link to your reviewer's email address, or Public View for an open link.
- Set an Expiration Date, add the reviewer's address under Allowed Email Addresses, and choose whether downloads are allowed.
- Click Create share, then Copy to copy the link.
- Expected result: The reviewer receives an invitation email and can open the collection in a browser. The link appears on the External tab of View Shares, with its views and downloads.
Integration Points
Collections are a hub that ties into several other parts of Freedam:
- Gallery search - any collection appears as a filter facet in the main asset gallery. Selecting a collection facet narrows the gallery to just the assets inside it (and, optionally, its children).
- Automation Rules - the rule builder can use "add to collection" and "route via path" as actions, so collections become targets for any workflow you define.
- Imports and bulk uploads - when you start a large upload you can pick a destination collection up-front; Freedam shows a banner inside that collection while the import is running and refreshes the grid as new assets land.
- Brand Guide and Studio - Brand Guide pages, Studio templates and public share pages can all pull their content directly from a collection, so curating one folder updates every surface at once.
- Custom Pages - any shared collection can be promoted into a published landing page, inheriting the collection's cover, description and asset grid.
Tips and Best Practices
- Use Suggestions: Instead of typing the full name and pressing enter, use the arrow keys to pick from the search suggestions for faster navigation.
- Exit Management Mode: Always click Exit (the Manage button) once you are done with bulk changes to prevent accidental deletions or moves.
- Check Permissions: If the Manage button is disabled, hover over it. A tooltip will explain if you lack the necessary permissions to modify the current set of collections.
- Prefer My Collections for work in progress: Things that aren't ready for the team yet belong in your personal space. Promote them to a shared collection only when you want others to see them.
- Pause, don't revoke: If a review window slips by a week, pause an internal share, or extend the expiry of an external link, instead of revoking it. Recipients don't have to be re-invited, and the audit log stays intact.
- Lean on types: Creating a consistent set of Collection Types for your team is the single biggest quality-of-life improvement - metadata stays consistent, filters become useful, and automations can target types reliably.
Common Pitfalls
"I deleted a collection - did my assets vanish?"
No. Deleting a collection only removes the grouping, it does not delete the underlying assets. The assets remain in the gallery and in any other collection they belong to. You have to explicitly delete assets from the gallery to remove them from Freedam.
"I can't share my personal collection"
My Collections is private by design. The Share button is hidden there. If you need to collaborate, either create the collection under a shared type instead, or use the "Add to Collection" bulk action inside the collection to copy its assets into a shared destination.
"The Delete button is greyed out"
Collections have to be emptied before they can be deleted. Move or remove any assets, delete or re-parent any sub-collections, and revoke any active shares, then try again. Bulk delete reports which rows succeeded and which blocked so you can clean up progressively.
"I moved a sub-collection but nothing saved"
Reordering and nesting go into a pending state until you click Save Order. Leaving the page or clicking Cancel reverts every pending move. Check for the blue Save banner at the top of the list.
Keyboard And Pointer Shortcuts
- Click a tree node - selects it and loads its contents in the main area.
- Click the expand arrow - opens a branch without changing the selection.
- Drag a card onto a node name - nests that collection under the target (Manage mode).
- Drag a card between two siblings - reorders at the same level (Manage mode).
- Drop files on the grid - uploads them into the currently selected collection.
- Arrow keys in the search box - navigate suggestions; Enter opens the highlighted one; Escape closes the dropdown.
- Shift-click assets in the grid - range-selects a run of assets for bulk actions.
Troubleshooting
Issue: Cannot see the "Manage" button
- Symptoms: The "Manage" button is missing or greyed out.
- Cause: You do not have administrative permissions for the current collection level, or the collections are owned by another user who hasn't shared management rights.
- Fix: Contact your administrator to request "Manage" or "Edit" permissions for the specific collection.
Issue: "Save Order" button is disabled
- Symptoms: You have moved collections, but you cannot click Save.
- Cause: A bulk action (like deleting or archiving) is currently processing in the background.
- Fix: Wait for the "Processing..." indicator to disappear before saving the new order.
Issue: Search returns no results
- Symptoms: You type a known collection name, but the list is empty.
- Cause: You may have an active "Type" filter that is excluding the collection you are searching for.
- Fix: Click the X icon in the top bar to clear all filters and search queries.
Issue: Subscribers say they aren't getting emails
- Symptoms: A subscriber reports no notifications after new assets were added.
- Cause: The user may have clicked "Unsubscribe from all" in a previous email, or their email provider has filtered the notification as promotional.
- Fix: Ask them to resubscribe from the collection header, and to check their spam folder. The in-app bell icon still shows the notification even when email delivery is blocked.
Issue: "Share" button is missing
- Symptoms: No Share option in the header.
- Cause: You're viewing a My Collections entry (which can never be shared), or you do not have edit rights on the current collection.
- Fix: Move or recreate the content inside a shared-type collection, or request edit rights from the owner.