
User Groups
User Groups allow administrators to organize users into hierarchical structures, such as departments, teams, or regions. This organization simplifies user management and enables targeted communication across your digital asset management platform.
By grouping users, you can efficiently manage large numbers of accounts, assign members to specific subgroups, and send broadcast emails to entire teams simultaneously.
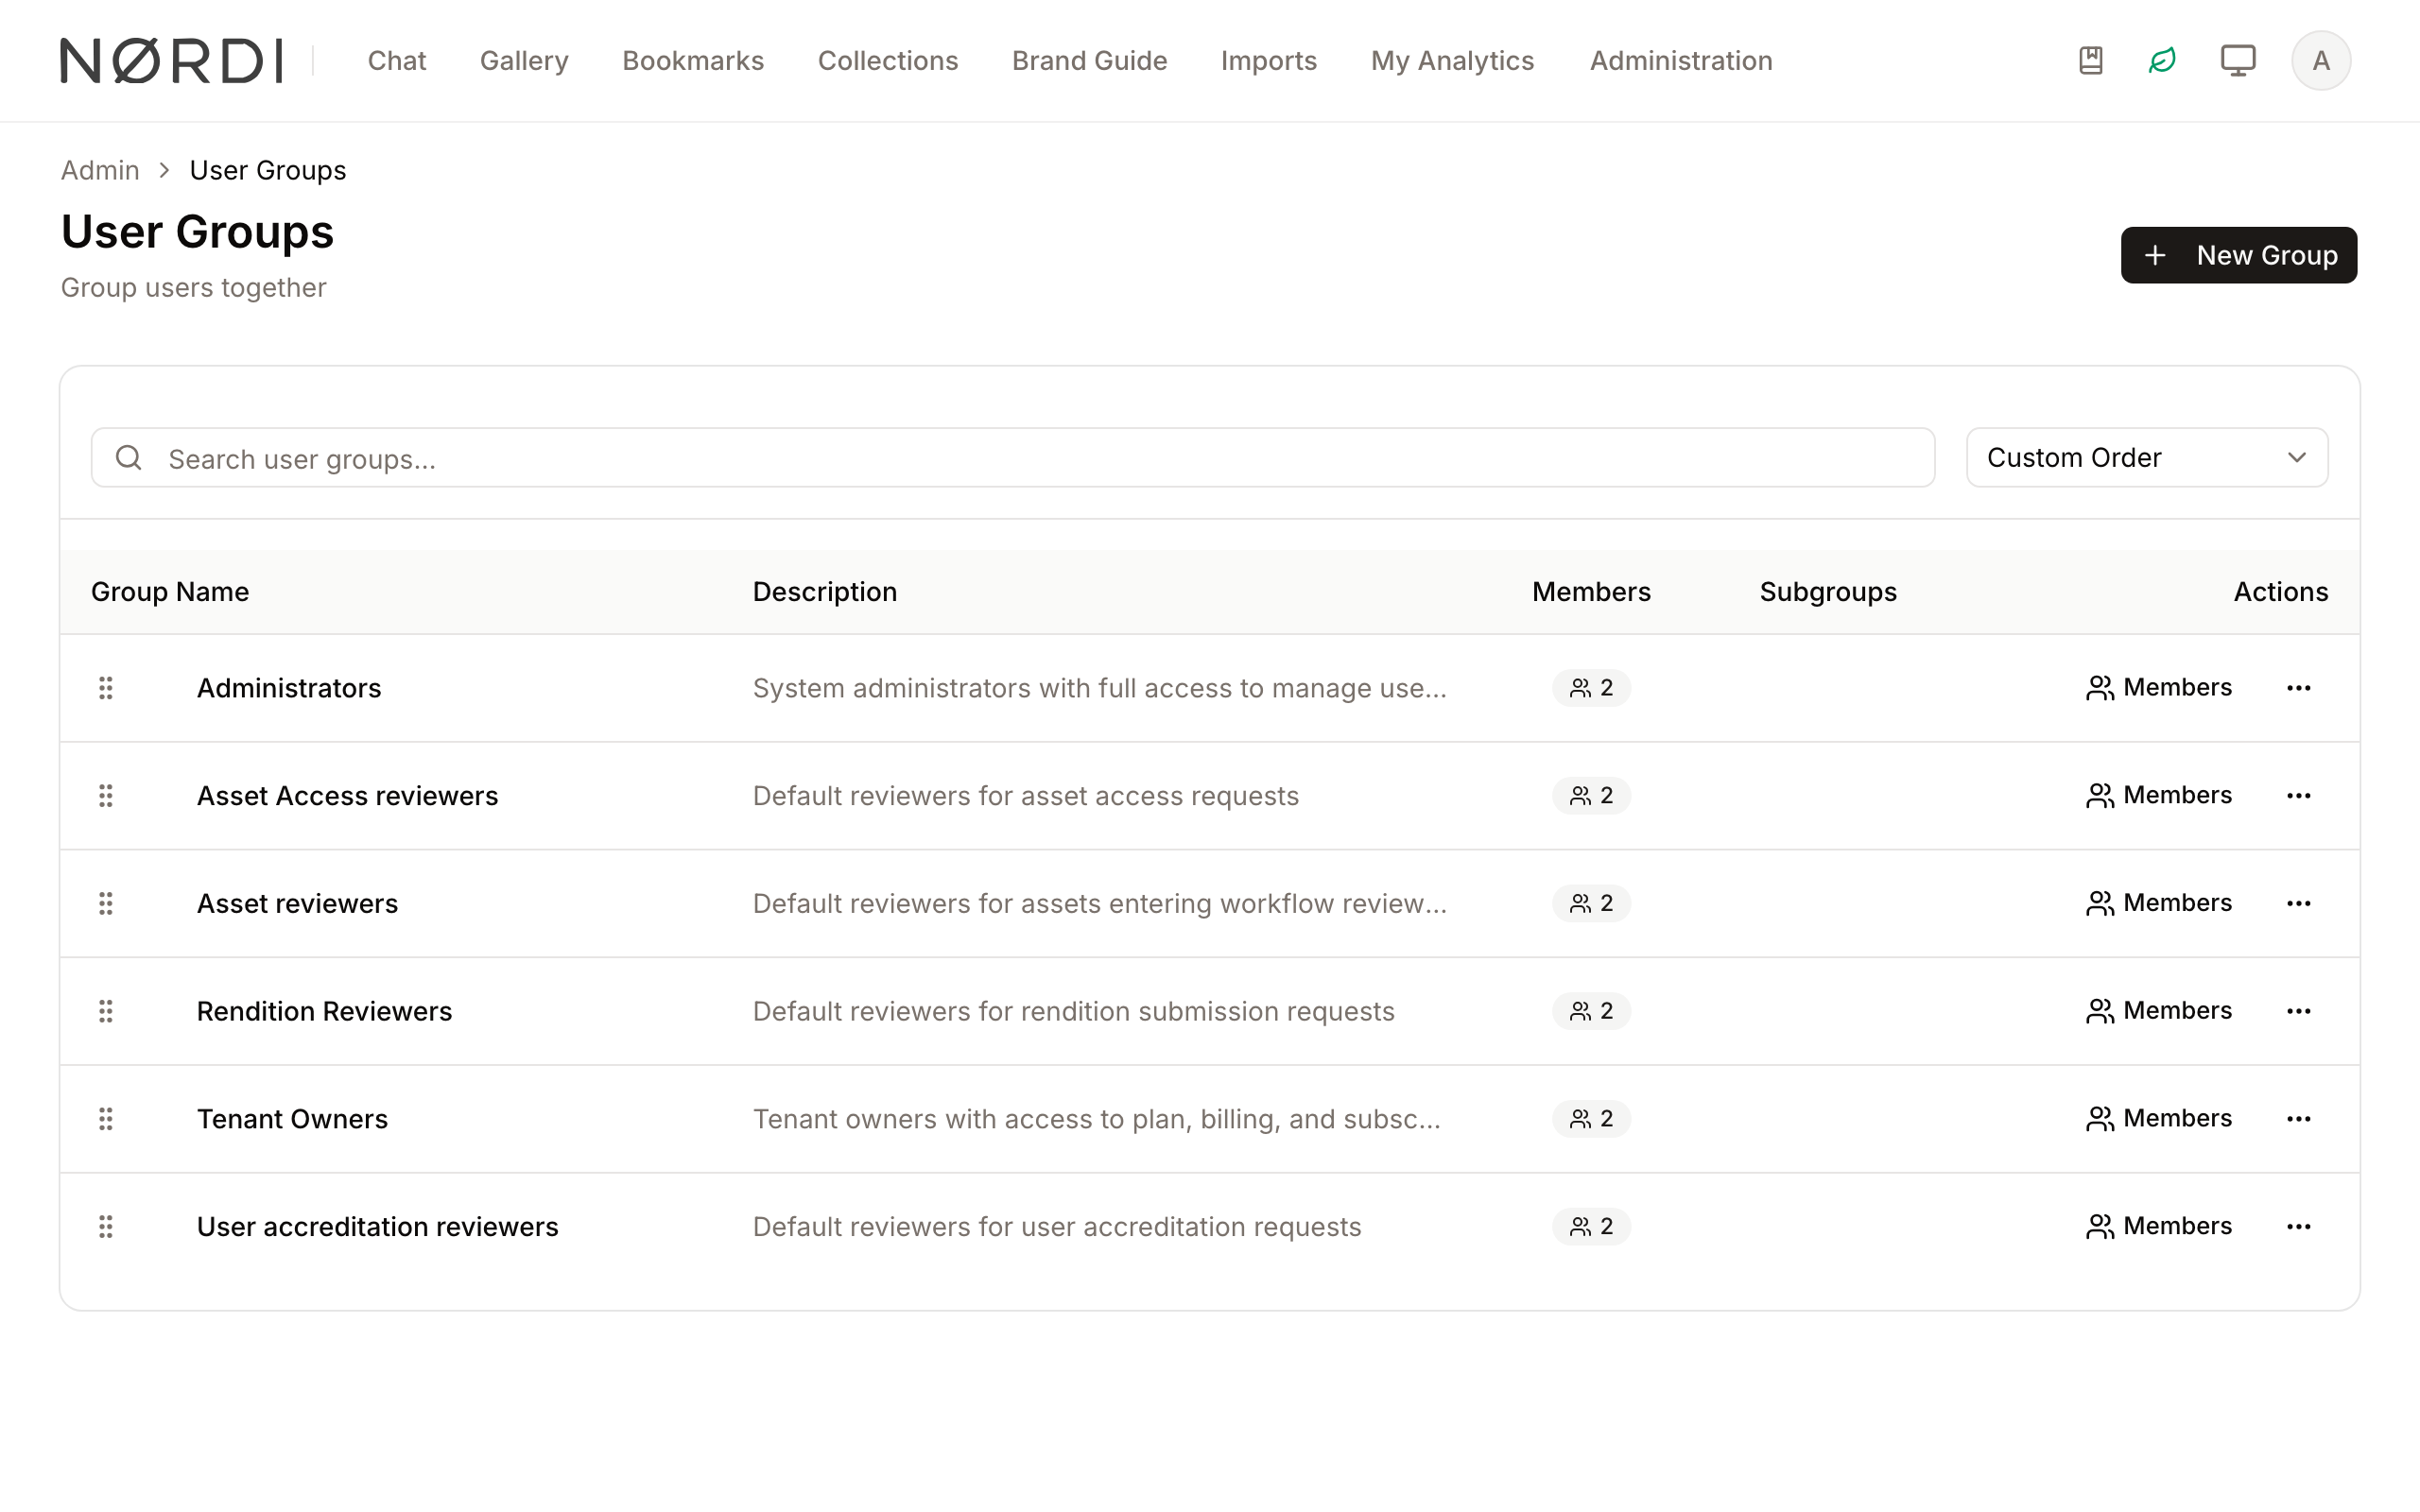
Page Overview
- Purpose: To create and maintain a structured hierarchy of users.
- When to use it: Use this page when you need to create new teams, move users between departments, or communicate with specific segments of your user base.
- What you can do here:
- Create top-level groups and nested subgroups.
- Add or remove members from groups individually or in bulk.
- Reorder groups using a drag-and-drop interface.
- Send personalized emails to all members of a group.
- Search and filter the group hierarchy.
Page Layout
- Top bar: Contains the page title, a brief description, and the Create Group button for starting new top-level organizations.
- Main area: Features a search and sort bar at the top, followed by a hierarchical list showing Group Name, Description, Member counts, and Subgroup counts.
- Action Menus: Each group row contains a Members button for quick access and a "More" (three dots) menu for advanced management options.
Main Features
Hierarchical Organization
- What it's for: Creating a "tree" structure where groups can contain other groups.
- Typical use: Creating a "Marketing" group that contains "Social Media" and "Design" subgroups.
- Result: Subgroups appear nested under their parent group in the list, which can be expanded or collapsed.
Member Management
- What it's for: Controlling which users belong to which group.
- Typical use: Adding new hires to their respective department groups or removing users who have changed roles.
- Result: The member count updates in the group list, and users gain or lose group-based associations.
Group Communications
- What it's for: Sending email notifications directly to every member of a specific group.
- Typical use: Announcing new asset guidelines to the "Creative Team" group.
- Result: All users currently assigned to the group receive a personalized email.
Detailed Feature Documentation
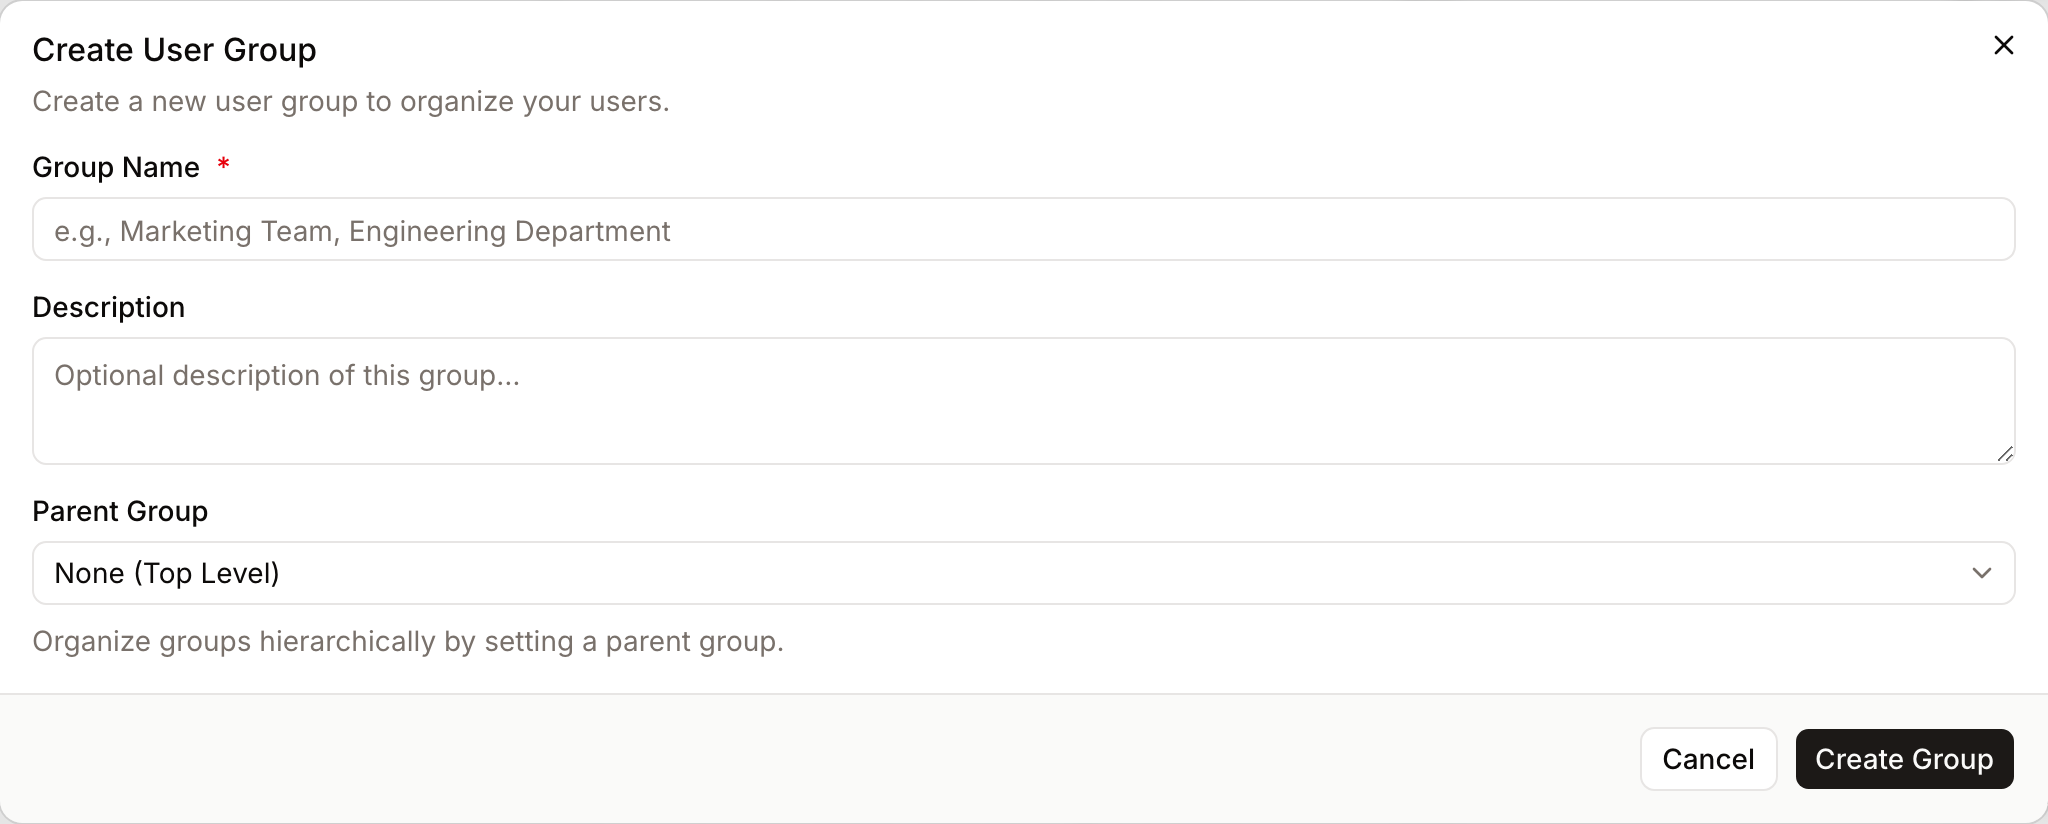
Create or Edit Group
- Purpose: To define the name, description, and position of a group within the hierarchy.
- Where to find it: Click Create Group in the top bar, or select Edit Group from a group's "More" menu.
- What you'll see: A dialog window with fields for group details and a parent group selector.
How to use it:
- Enter a unique name in the Group Name field.
- (Optional) Provide a summary in the Description field.
- Select a Parent Group from the dropdown to make this a subgroup, or choose "None (Top Level)".
- Click Create Group or Save Changes.
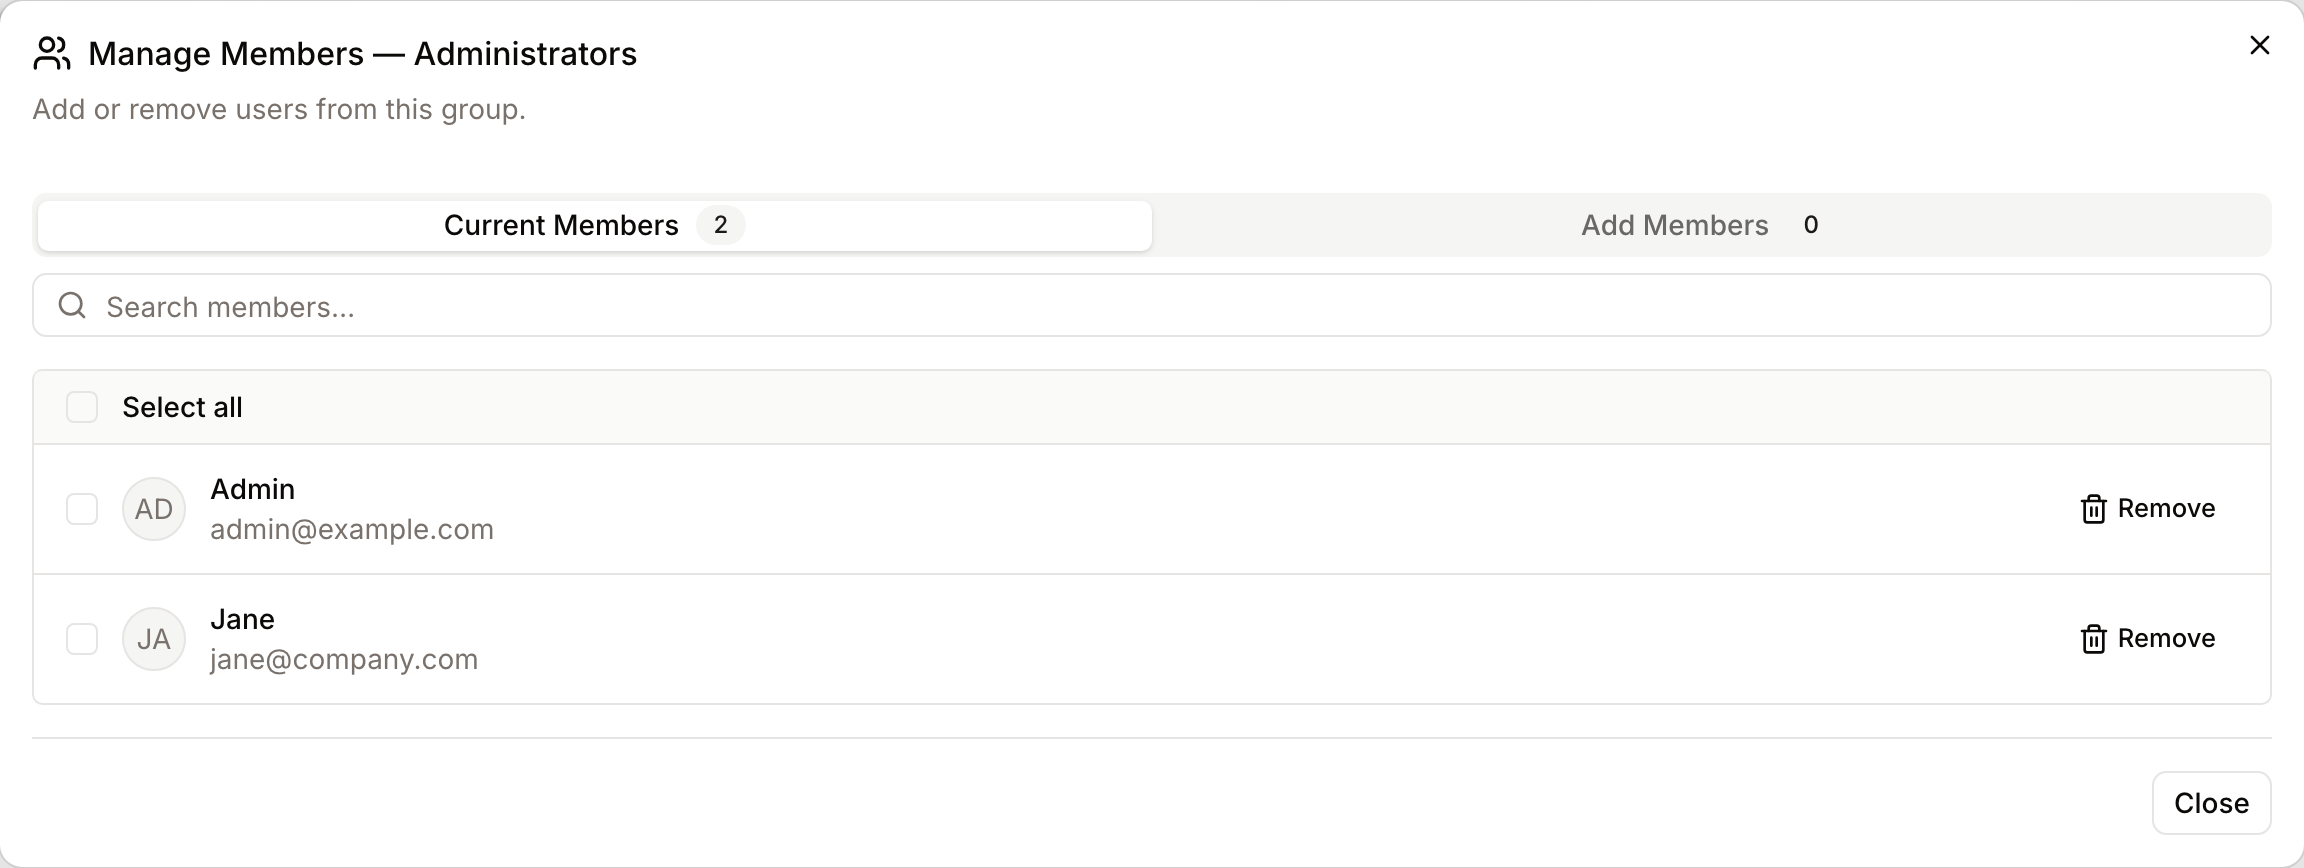
Manage Members
- Purpose: To add or remove users from a specific group.
- Where to find it: Click the Members button on any group row.
- What you'll see: A two-tabbed interface showing "Current Members" and "Add Members".
How to use it:
- To remove users: In the Current Members tab, click Remove next to a user, or select multiple users and click Remove (count).
- To add users: Switch to the Add Members tab.
- Use the Search available users... field to find specific people.
- Click Add next to a user, or select multiple and click Add (count).
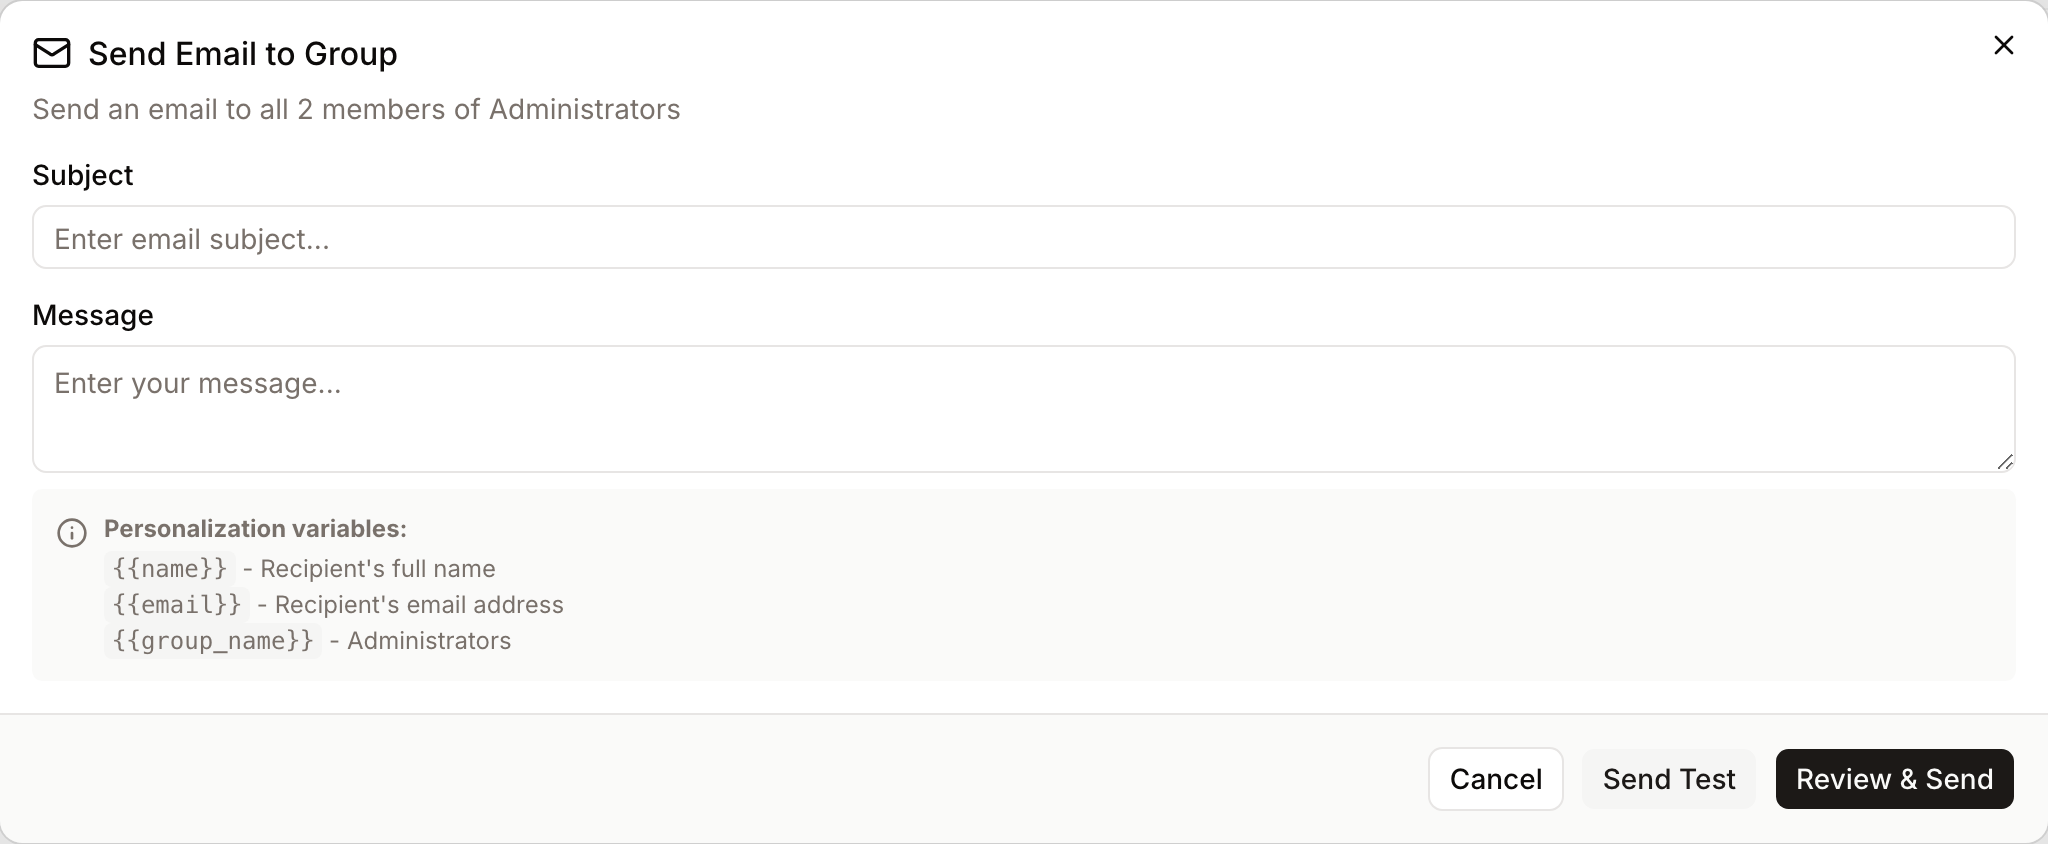
Email Group Members
- Purpose: To send a broadcast message to all users in a group.
- Where to find it: Select Email Members from the "More" menu on a group row.
- What you'll see: An email composer with support for personalization variables.
How to use it:
- Enter a Subject for the email.
- Type your message in the Message field.
- Use variables like
{{name}}or{{email}}to personalize the content for each recipient. - (Optional) Click Send Test to receive a preview in your own inbox.
- Click Review & Send to see a final confirmation of the recipients and content before sending.
Complete Workflows
Workflow: Creating a Sub-Department
- Goal: Create a new team nested under an existing department.
- Prerequisites: The parent department group must already exist.
Steps:
- Locate the parent group in the list.
- Click the "More" (three dots) icon and select Add Subgroup.
- In the Group Name field, type the name of the new team.
- Verify the Parent Group field shows the correct department.
- Click Create Group.
- Expected result: The list refreshes, and the new group appears indented under the parent group.
Workflow: Reordering Groups
- Goal: Change the display order of groups in the list.
- Prerequisites: The "Sort by" dropdown must be set to "Custom Order".
Steps:
- Select Custom Order from the Sort by dropdown filter.
- Locate the Grip icon (vertical dots) on the far left of a group row.
- Click and hold the Grip icon.
- Drag the row to the desired position and release.
- Expected result: A success message appears, and the new order is saved.
Who can use it
This page is reserved for people with the "Manage user groups" permission. The permission description is "create, edit, and manage user groups" - including hierarchical structure and membership.
Personalization variables
When composing a group email you can drop these variables directly into the subject or body, and each recipient will see their own values:
{{name}}- the recipient's full name.{{email}}- the recipient's email address.{{group_name}}- the name of the group you are writing to.
Clicking Send Test delivers a one-off copy to your own inbox with your own details substituted, so you can proof the message before it goes out.
Limits and guardrails
- Protected groups: The Tenant Admins group is locked by design. You cannot rename it, delete it, or remove its last remaining member - the system will always keep at least one administrator in place.
- System groups cannot be deleted: Any group flagged as "System" is required for product functionality and is protected from removal.
- No deleting parents with children: A group that still contains subgroups cannot be deleted. Delete or reassign the subgroups first.
- No circular nesting: You cannot make a group a child of itself or of one of its own descendants. The system checks this whenever you pick a new parent.
- Empty groups cannot be emailed: If a group has zero members, the Email Members option is disabled.
- Rate limits on outbound email: To prevent accidents and abuse, you can launch at most 10 group emails per minute and send up to 20 test-to-self previews per minute. If you hit the limit, wait a minute and try again.
What happens behind the scenes
- Background delivery: Group emails are not sent directly from the browser. When you click Send, the job is queued and the system confirms immediately with a message like "Email is being sent to 247 member(s)." Your browser is never left waiting.
- Chunked delivery for large groups: Members are processed in batches of 100 at a time. This means you can safely email groups with thousands of members without timeouts or duplicated messages - the variables are replaced per-recipient inside each batch.
- Per-person personalization: Every message is rendered individually for each recipient using the variables above, so the "to" field is never a bulk blast - each member receives a dedicated email.
- Retries on failure: Delivery automatically retries up to three times with a backoff, and any permanent failure is logged for troubleshooting.
Tips and Best Practices
- Use Personalization: When emailing groups, use
{{name}}to make the communication feel more direct and professional. - System Groups: Some groups may be marked as "System" groups. These are protected and cannot be deleted as they are required for app functionality.
- Empty Groups: You cannot send emails to groups with 0 members; the Email Members option will be disabled.
- Deleting Groups: You cannot delete a group that still contains subgroups. You must delete or move the subgroups first.
Troubleshooting
Issue: Cannot delete a group
- Symptoms: The "Delete Group" option is disabled or an error appears when clicking it.
- Cause: The group is either a protected System group or it currently contains subgroups.
- Fix: Check if the group has nested subgroups (indicated by the "Subgroups" count). Delete or reassign those subgroups first.
- Prevention: Always check the hierarchy before attempting to remove top-level groups.
Issue: Users not appearing in "Add Members" search
- Symptoms: Searching for a user returns "No users found".
- Cause: The user may already be a member of the group, or they do not exist in the system.
- Fix: Check the Current Members tab to see if the user is already listed.
- Prevention: Use the search bar in both tabs to verify a user's status before attempting to add them.