
Templates
The Templates feature allows administrators to design reusable image layouts that can be used to generate new assets. By defining placeholders for images and text, you can create standardized brand graphics, social media posts, or marketing banners that automatically adapt to different content.
This tool is designed for creative administrators who need to build flexible design systems. You can import existing Photoshop (PSD) files or build layouts from scratch using a full-featured visual editor that supports layers, typography, and AI-assisted responsive constraints.
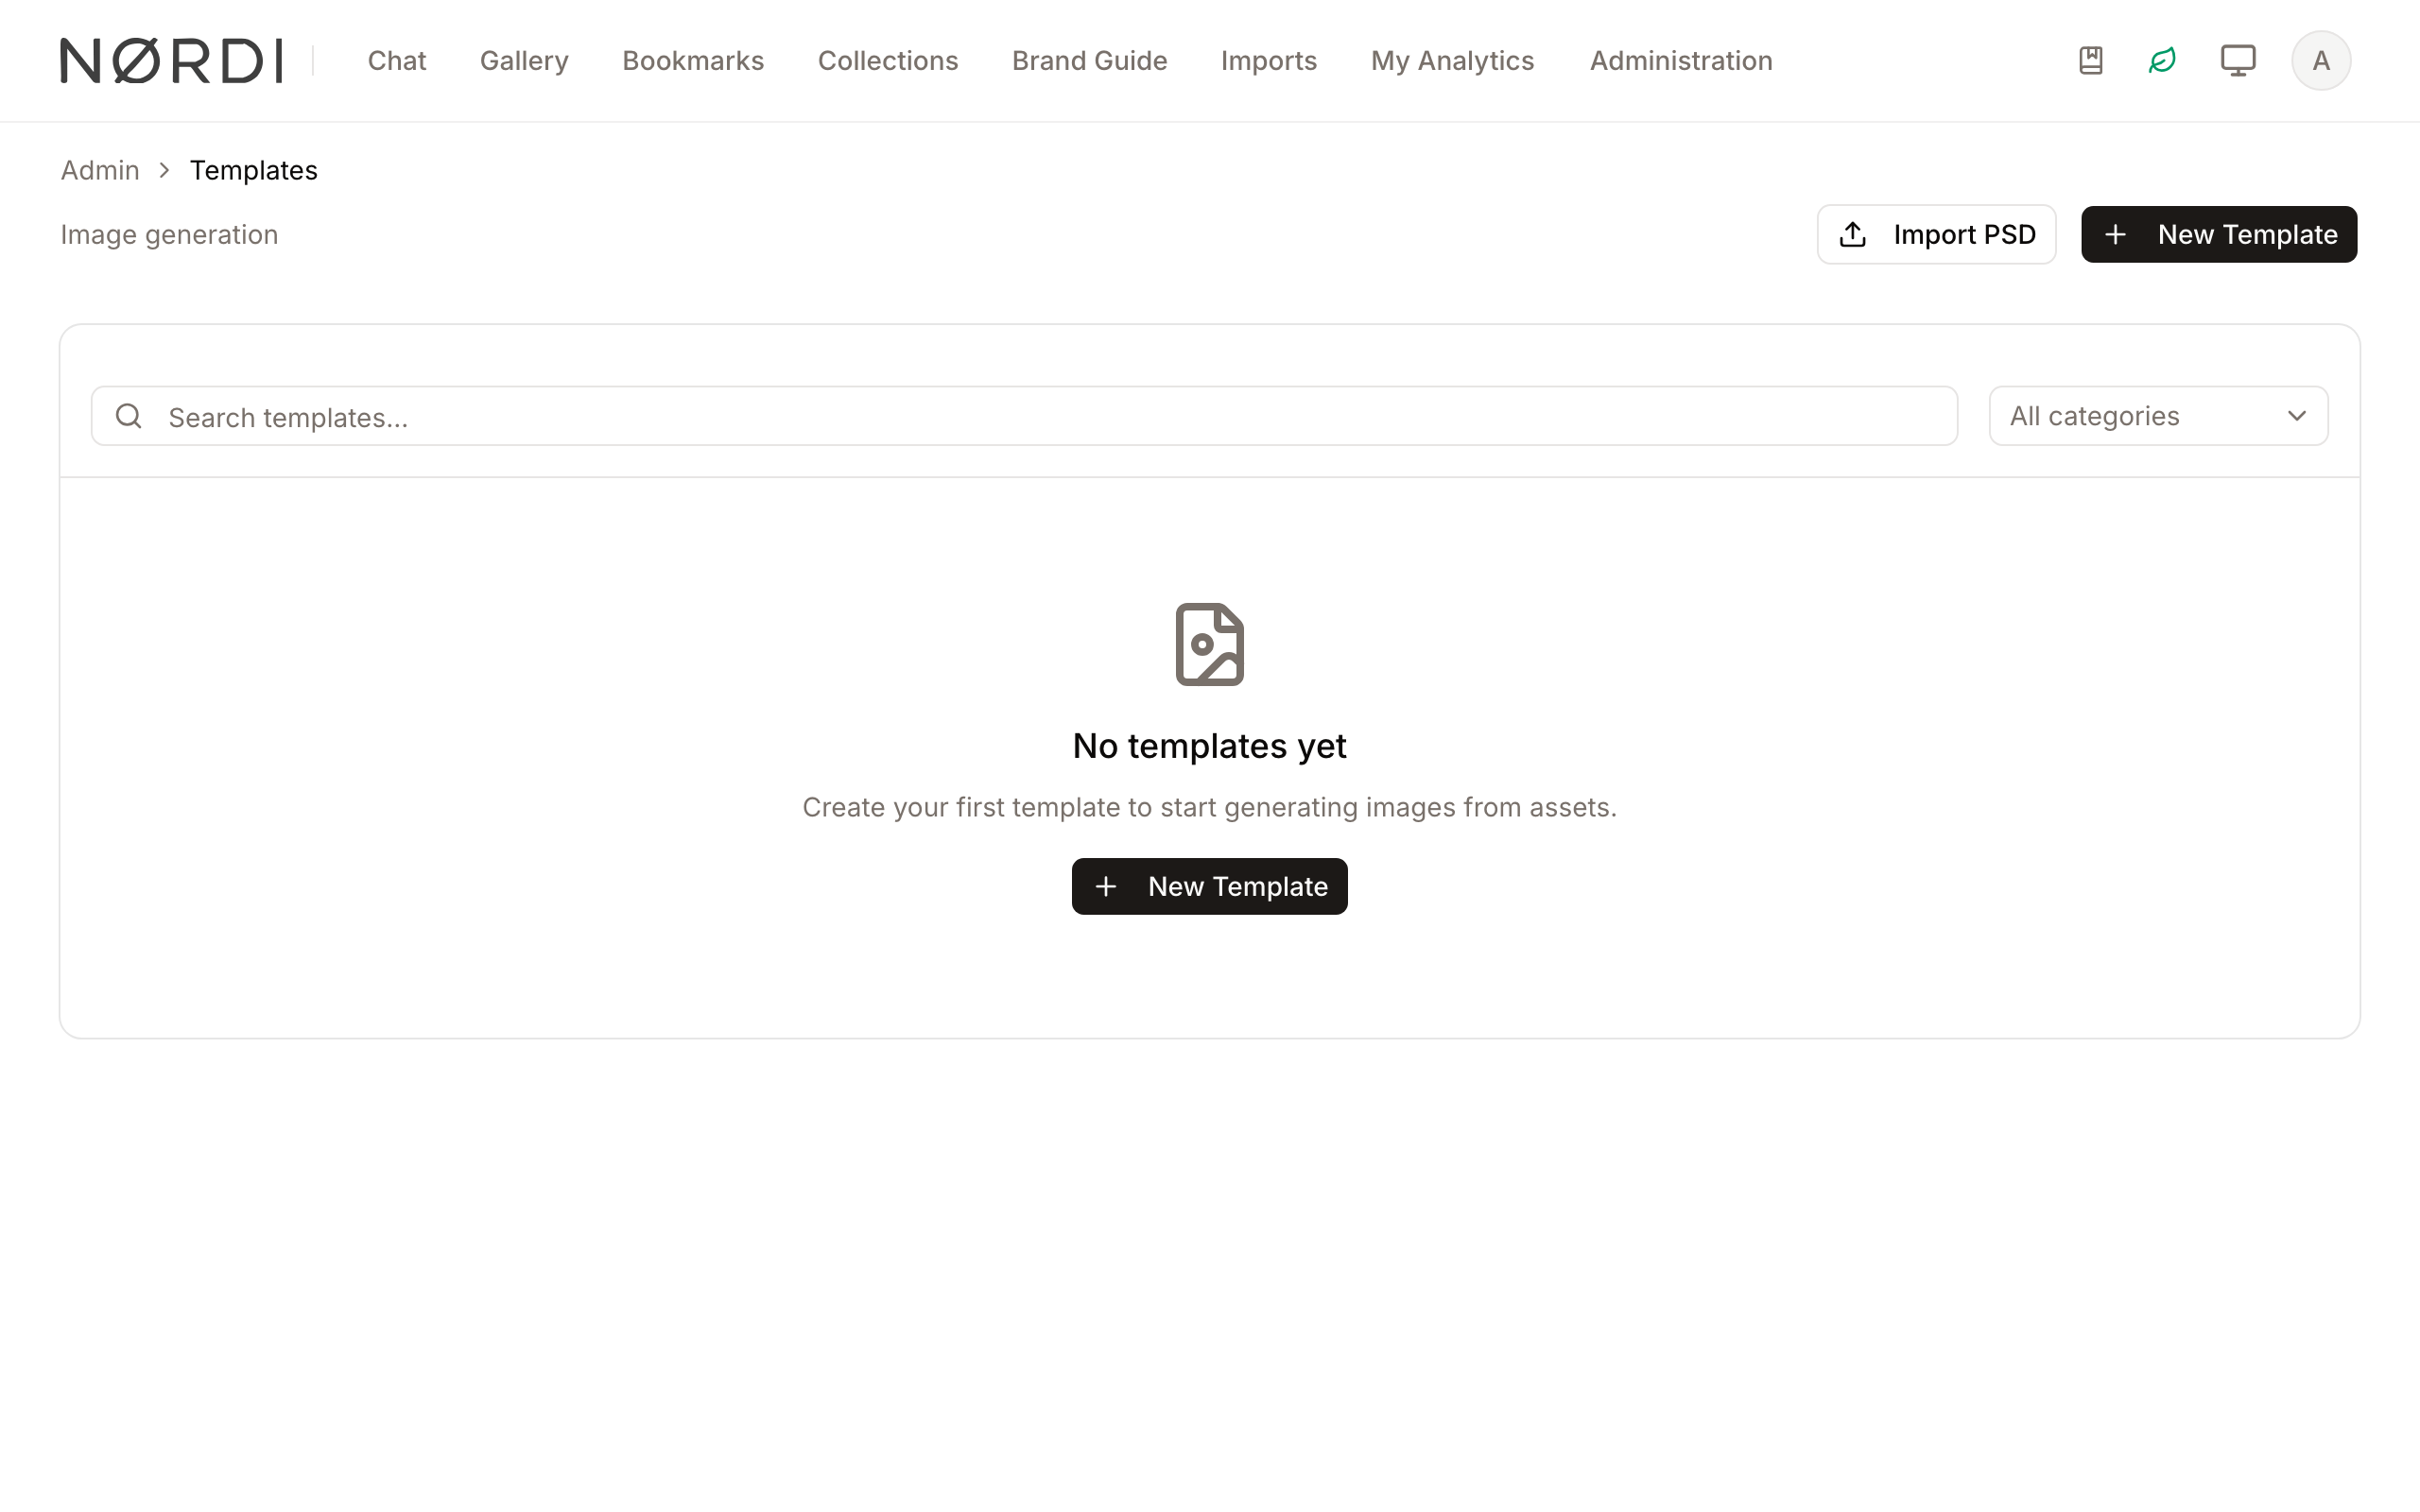
Page Overview
- Purpose: To manage the library of image generation templates and access the design environment.
- When to use it: Use this page when you need to create a new design, update an existing layout, or organize templates by category and tags.
- What you can do here:
- Search and filter the template library.
- Create new templates from scratch or via PSD import.
- Duplicate existing templates to create variations.
- Launch the visual Template Editor.
- Preview template designs in a full-screen lightbox.
Who can use it
Templates are reserved for administrators with the "Create, edit, and manage image templates for generation" permission. The same permission governs creating, duplicating, editing, and deleting individual templates, as well as bulk-deleting them from the list.
Page Layout
- Top bar: Contains the page title, a description of the feature, and primary actions like New Template and Import PSD.
- Main area: A searchable table listing all templates with their preview thumbnails, names, categories, and active status.
- Search and Filter bar: Located above the table, providing a search field and dropdowns for All categories and All tags.
- Editor (Dialog/Full-screen): When editing, the interface shifts to a three-panel layout:
- Left sidebar: Layer management and reordering.
- Center canvas: The visual design area with zoom and grid controls.
- Right panel: Settings for the template and properties for the selected layer.
Main Features
Visual Template Editor
- What it's for: A drag-and-drop interface for building layouts.
- Typical use: Adding text, shapes, and image placeholders to a canvas.
- Result: A saved template configuration that can be used for automated image generation.
Responsive Constraints
- What it's for: Defining how elements behave when the canvas size changes.
- Typical use: Pinning a logo to the top-right corner or making a background image stretch to fill the width.
- Result: A single template that works for multiple aspect ratios (e.g., Square, Story, and Landscape).
AI Constraint Suggestions
- What it's for: Automatically calculating the best layout rules for your layers.
- Typical use: Clicking the Sparkles icon to let the system analyze your design and suggest pinning and stretching rules.
- Result: Faster setup of responsive designs without manual configuration of every layer. Freedam reads each layer's position, size, and layer type, then applies a consistent set of guidelines: layers that span most of the canvas get pinned to both sides and set to stretch, full-canvas backgrounds are pinned to all four edges, corner elements are pinned to the nearest two edges at a fixed size, and small decorative pieces get visibility thresholds so they disappear cleanly at smaller canvas sizes. Headline text layers are suggested with proportional scaling, and body text layers are suggested with auto text-fit. Every suggestion is yours to accept, adjust, or ignore before saving.
PSD Import
- What it's for: Converting Photoshop files into editable templates.
- Typical use: Uploading a
.psdfile to automatically generate layers, text, and images. - Result: An instant starting point for a template based on an existing design file. Freedam keeps your text editable, converts simple rectangles into native shapes (so colors stay editable), and rasterises everything else into images. Layer names, layer order, opacity, blend modes, drop shadows, and layer masks carry over.
PSD import is a two-step flow: you first upload the file and Freedam analyses it to list every unique font family and weight it detected. You then review that list, choose how to resolve each font - pick a brand typeface already in your library, upload a new font file, select a Google Font, map it to a system font, or skip it - and only then confirm the import. This review step prevents silent font substitutions and makes sure the imported template renders the way your original PSD intended. Imported templates are created as inactive drafts so you can polish them before enabling them for end users. The previewed template canvas size is taken from your PSD canvas size; the background colour is reset to white (set it manually after import if you need a different background colour).
End-User Customization
- What it's for: Letting end users tweak specific parts of a template at generation time without redesigning it.
- Typical use: A "Holiday Sale" template where end users can change the headline copy and the call-to-action color per asset, but cannot move layers or change fonts.
- Result: One template covers many variants. The people generating images see a focused customization step in the generation dialog with only the controls you authorized. Generating images currently requires the same Create, edit, and manage image templates for generation permission as editing templates, so "end users" here means colleagues with that permission. See Template Generation.
Freedam exposes two complementary, non-overlapping authoring tools. Text content is exclusively controlled through {{input:NAME}} tokens you place inside a text layer's content. Everything else - colors, visibility, opacity, image effects, border radius, background removal - is controlled through a per-layer End-user customization sub-panel that lets you tick which properties end users can change. The two systems never overlap: position, size, rotation, font family/size/weight, line-height, letter-spacing, and padding are designer-only and are never exposable. Coordinates and typography decisions stay with you.
Detailed Feature Documentation
Template Editor Toolbar
- Purpose: Provides tools for adding elements and managing the editor state.
- Where to find it: At the very top of the Template Editor screen.
- What you'll see: A row of icons for adding elements, undo/redo, and previewing.
How to use it:
- Click Add Element to choose between Text Layer, Image Placeholder, Rectangle, Circle, or Static Image.
- Use the Grid and Magnet icons to toggle visual guides and snapping.
- Click Preview to see the design without editor handles.
- Click Save (or press
Ctrl+S) to commit your changes.
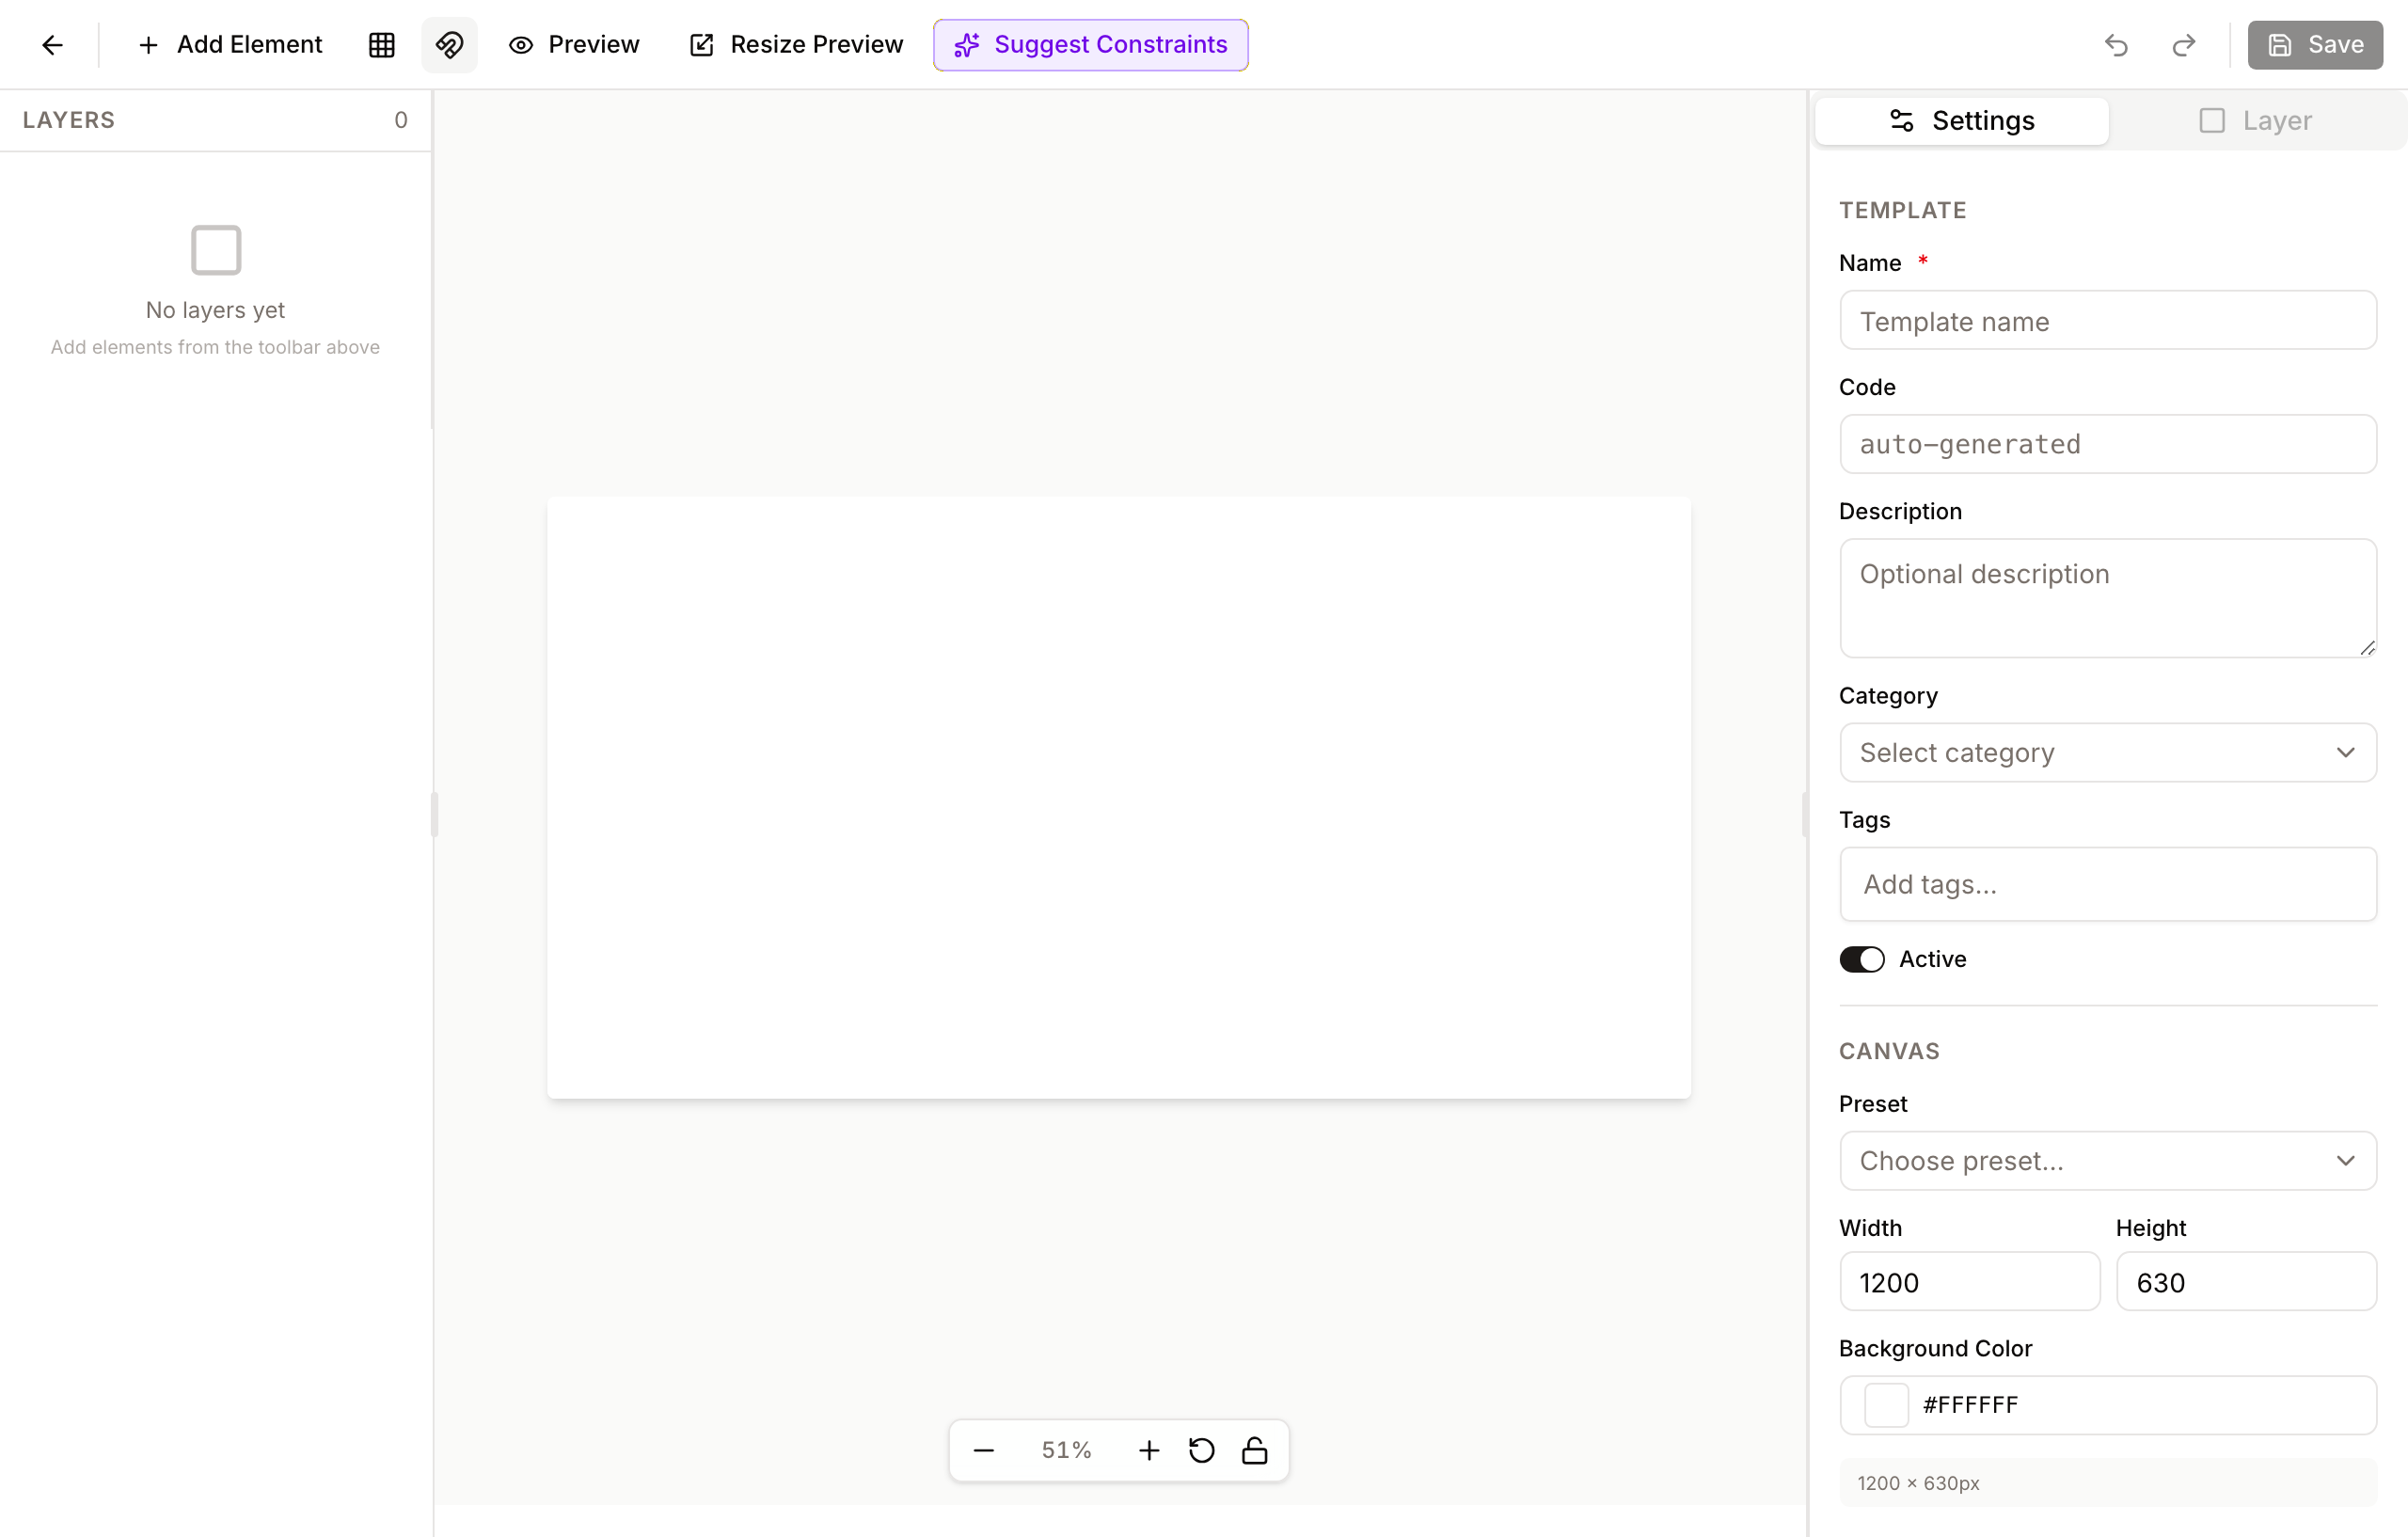
Layer Properties & Constraints
- Purpose: To fine-tune the appearance and behavior of individual elements.
- Where to find it: In the right-hand panel under the Layer tab.
- What you'll see: Fields for coordinates (X, Y), dimensions (W, H), and a Constraints section.
How to use it:
- Select a layer on the canvas or in the left-hand list.
- Toggle the Constraints switch to enable responsive rules.
- Use the Pin Edges box to select which sides of the canvas the element should follow.
- Toggle Stretch W or Stretch H if the element should resize with the canvas.
- Set Hide Below values if the element should disappear on small canvas sizes.
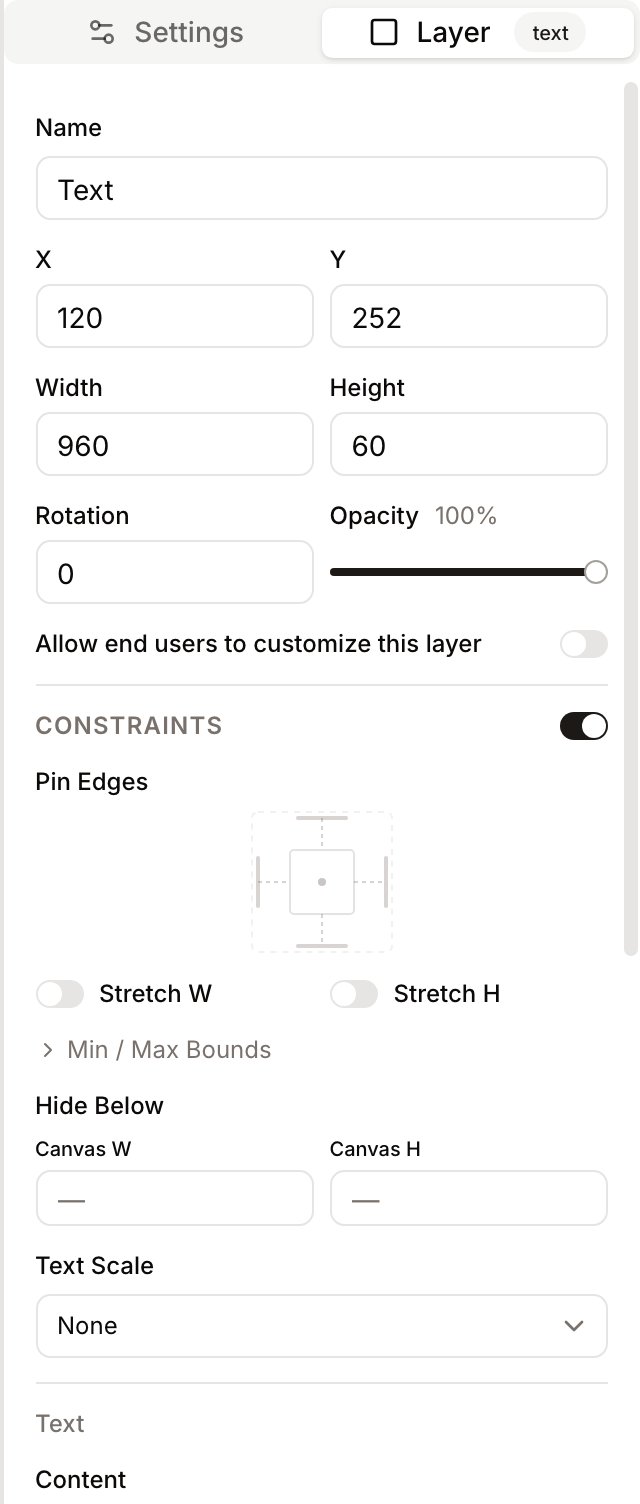
Text Styling & Auto-Fit
- Purpose: To manage typography and ensure text stays within its bounds.
- Where to find it: In the Layer tab when a Text Layer is selected.
- What you'll see: Font selection, size, alignment, and Text Fit options.
How to use it:
- Type your text into the Content box.
- Select a font from the Font dropdown (includes System, Google, and Brand fonts).
- Toggle Text Fit to automatically shrink the font size if the text exceeds the layer box.
- Set a Min Font Size to prevent the text from becoming unreadable.
Text Inputs ({{input:NAME}} tokens)
- Purpose: To expose specific spans of text content for end users to fill in at generation time, while keeping the surrounding copy fixed.
- Where to find it: Inside the Content box of any Text Layer.
- What you'll see: A help line under the Content box showing the expected
{{input:name}}syntax and a small example.
How to use it:
- Select the text layer whose content should be partially editable.
- In the Content box, wrap each variable span in
{{input:KEY}}. TheKEYmust be a single word (use underscores for multi-word keys). - Mix as many tokens with static copy as you like - for example:
Hello {{input:first_name}}, welcome!{{input:headline}}(the whole layer is one input)Buy {{input:product}} for {{input:price}}
- Save the template. Each unique
KEYbecomes one input field in the Text tab of the generation dialog. Field labels are humanized from the key (e.g.first_namebecomesFirst name).
End users only see the input fields - they never see the surrounding copy you authored. This is the right pattern for "fill-in-the-blank" content where the designed structure must stay intact.
End-User Customization Sub-Panel
- Purpose: To choose which non-text properties (color, visibility, opacity, effects, etc.) end users can change for each layer.
- Where to find it: In the right panel under the Layer tab, in the Allow end users to customize this layer section.
- What you'll see: A master switch and, when on, a tick list of the curated default properties (already checked) plus opt-in extras for that layer type. Each ticked row shows an optional label override input.
Available properties by layer type:
| Layer type | Defaults (when modifiable=on) | Opt-in extras |
|---|---|---|
| Text | Color | Background color, Visible, Opacity |
| Shape | Fill color | Stroke color, Visible, Opacity, Border radius |
| Image Placeholder | Visible | Effects (grayscale/sepia/blur/etc.), Opacity, Border radius, Remove background |
| Static Image | Visible | Opacity, Border radius |
Position, dimensions, rotation, font family, font size, font weight, line-height, letter-spacing, alignment, and padding are never exposable. End users cannot move, resize, or re-typeset your design - they can only change colors and a few binary toggles.
How to use it:
- Select a layer.
- Toggle Allow end users to customize this layer on. The curated defaults pre-fill (e.g. Color for a text layer, Fill color for a shape).
- Optionally tick extras from the catalog list. Each ticked row reveals a label override input - leave it blank to use the default label, or rename it (e.g. Visible → Show logo).
- Save the template.
- (Recommended) Give the layer a meaningful Name in the Settings panel - end users see the layer name as the header of each section in the generation dialog. The editor warns you if the name is still a factory default like "Text", "Rectangle", or "Layer 5".
To turn customization off again, flip the master switch off. If you have non-default ticks, the editor confirms before clearing them.
What end users see:
In the generation dialog, the customization step gains a Style tab when at least one layer is modifiable. Each modifiable layer becomes its own section, headed by the layer name, listing one control per exposed property. If the template also has {{input:...}} tokens, both Text and Style tabs are shown side by side. If only one of the two systems is in use, the dialog skips the tab strip and shows the relevant block flat.
Importing a PSD: What Carries Over
The importer is good at preserving structure, layout, and most styling - but Photoshop has many features that simply do not exist in a web-based template engine. Knowing what crosses the bridge cleanly (and what gets flattened or dropped) helps you prep a PSD that imports well.
File requirements
- Format:
.psdfiles only..psb(large-document format) is not supported. - Size: up to 200 MB per file. Above that the upload is rejected before parsing starts.
- Fonts: optional fonts you upload during the review step are limited to 20 files maximum, 50 MB each, in OTF, TTF, WOFF, or WOFF2 format.
- Time: very large PSDs may exceed the parser's processing window. If a parse appears to hang for a few minutes, cancel and try again - usually it's a transient issue. If it persists, try simplifying the PSD (flatten purely decorative groups, remove hidden non-essential layers).
What carries over as editable
| PSD element | Imported as | Editable after import |
|---|---|---|
| Type layer (text) | Text layer | Content, font, colour, size, alignment - everything in the Text layer panel |
| Vector shape with a solid fill that is an axis-aligned rectangle | Native Shape layer | Fill colour, stroke, border-radius, all shape properties |
| Drop shadow on a text or shape layer | Layer shadow | Yes (colour, blur, offset, opacity) |
| Layer mask | Layer mask image | The mask itself is read-only after import |
| Opacity, visibility (eye toggle), blend mode | Same fields on the Freedam layer | Yes |
| Layer name | Layer name | Yes |
| Layer order | Layer order (bottom-to-top) | Yes (drag to reorder) |
| Rotation (text and shapes) | Layer rotation | Yes |
What gets flattened to a static image
These import correctly visually but cannot be edited as native shapes/text afterwards:
- Vector shapes that are not axis-aligned rectangles (circles, polygons, custom paths, rotated rectangles with vector strokes) - preserved as a rasterised image.
- Vector shapes with strokes, gradients, or non-solid fills - same.
- Pixel layers - preserved as a static image.
- Smart Objects - embedded smart objects render at the resolution they were embedded; linked smart objects are rasterised at their last-saved state.
- Shape layers with layer effects (inner shadow, glow, bevel, gradient overlay, etc.) - the effects are baked into the rasterised image.
You can still position, resize, hide, recolour overlays, and apply Freedam image effects (grayscale, sepia, etc.) to flattened layers - you just can't restyle them as if they were vector elements anymore.
What does not carry over
These are silently dropped or simplified during import. Plan around them in your source PSD:
- Layer effects on text (inner glow, gradient overlay, bevel & emboss, stroke, etc.) other than drop shadow. Drop shadow is preserved; everything else is lost. If you need a stroked headline, design it as a shape or rasterise the styled text into its own pixel layer before exporting.
- Adjustment layers (Hue/Saturation, Curves, Photo Filter, etc.). Bake their effect into the layer below before saving the PSD if you need the look to come through.
- Group / folder structure. Freedam imports a flat list of layers in render order. Group names are not preserved.
- Mixed styling within one text run (different colours or fonts inside the same text layer). The colour and font of the first character is used for the whole layer. Split a multi-style headline into separate text layers.
- Justified alignment. Only left, center, and right alignment carry over. Justified text falls back to left.
- Photoshop-specific blend modes. Common modes (multiply, screen, overlay, etc.) are mapped to their web equivalents; exotic ones (e.g. Linear Light, Pin Light) may not match exactly.
- Embedded colour profiles. Imports always render in sRGB. If your PSD uses CMYK or a wide-gamut profile, expect colours to shift slightly toward sRGB.
- Smart filters and live effects. Whatever the preview shows in Photoshop at save time is what gets rasterised; the filter parameters are not preserved.
Font review: what each option does
When the import dialog asks you to resolve each detected font, you have these choices per family:
- Brand typeface: pick a typeface already uploaded in the Brand library. Best for any in-house font you've already prepared.
- Previously uploaded font: a per-template font you uploaded for an earlier import. Reuses the file without re-uploading.
- Google Font: pick from the Google Fonts catalogue. Freedam downloads the file once and stores it with the template, so generation works even if the user is offline.
- System font: maps to a generic web-safe font (Arial, Helvetica, Times New Roman, etc.). Fast and reliable but probably not pixel-perfect.
- Upload a font file: drop in an OTF/TTF/WOFF/WOFF2. The file is stored with the template and used for rendering.
- Skip: the font is left unresolved. The text layer's font name is preserved, but rendering will fall back to a generic font on the server. Use this only when the layer is decorative and you intend to re-style it manually.
Auto-resolution runs first and pre-selects the best guess in this order:
- A previously uploaded font in your library that matches the family or weight.
- An exact Google Fonts match.
- A known proprietary alias (e.g. Helvetica → web-safe Helvetica fallback).
- Skip.
You can override every auto-suggestion before confirming.
Things to expect right after import
- The new template lands in the editor with Active = off. End users won't see it yet. Review the layout, save, then flip Active on.
- The first list-view thumbnail may take a few seconds to appear - Freedam queues a fresh render in the background.
- Text-layer heights are auto-expanded if they would clip the rendered text. Photoshop fits text bounds tightly; Freedam needs a little extra room. Layer positions stay anchored to the top-left corner Photoshop reported.
- For text layers that were rotated in Photoshop, Freedam reverses the rotation maths so the unrotated frame matches your original. Text rotated very close to 45° may be a few pixels off - nudge the layer if needed.
- All imported layers are not customizable for end users by default - open the Allow end users to customize this layer sub-panel on each layer you want exposed.
Complete Workflows
Workflow: Creating a Responsive Social Media Template
- Goal: Create a template that works for both Square and Portrait posts.
- Prerequisites: Admin permissions and brand assets (logos/fonts).
Steps:
- Click New Template on the main Templates page.
- In the Settings tab (right panel), choose a Preset (e.g., Instagram Square).
- Click Add Element > Image Placeholder and drag it to cover the background.
- In the Layer tab, enable Constraints and select all four Pin Edges and both Stretch toggles.
- Add a Text Layer for the headline.
- Click the Sparkles icon in the top toolbar to open AI Constraint Suggestions.
- Review the suggestions and click Apply Constraints.
- Click Save.
- Expected result: The template is saved, and you can use the Resize Preview tool (Scaling icon) to see it adapt to different sizes.
- If it doesn't work: Ensure the template has a Name before saving; check that layers are not "Locked" if you cannot move them.
Workflow: Importing a Photoshop Design
- Goal: Quickly turn a PSD file into a generation template.
- Prerequisites: A
.psdfile (200 MB or smaller) with organised layers and meaningful layer names.
Steps:
- Click Import PSD in the top bar of the Templates index.
- Drag your file into the upload area or click to browse.
- Optionally edit the auto-filled Name (it defaults to the PSD's filename) and pick a Category.
- Click Continue. Freedam analyses the PSD and shows the Font Review screen listing every unique font family and weight it detected.
- For each font, pick a resolution: a brand typeface, a Google Font, a system font, an uploaded file, a previously uploaded font, or skip. Freedam pre-selects the best match it can find - review and override where needed.
- Click Import. Freedam creates the template and opens it in the editor.
- Verify that text layers, images, shapes, and shadows look right. Pay particular attention to:
- Multi-line text spacing
- Rotated layers
- Any shape that was supposed to be a rectangle but came in as an image (means it had effects, a stroke, or a non-axis-aligned path in the PSD)
- Any layer where the font fell back to a generic - that font was skipped or unresolved.
- Mark layers as End-user customizable where appropriate (see the Authoring an End-User-Customizable Template workflow above).
- In the Settings tab, review the canvas background colour (it imports as white) and the Active toggle.
- Click Save, then turn on Active when you're happy with the template.
- Expected result: A new draft template is created with layers matching the PSD structure, fonts resolved as you specified, and the layout matching what you saw in Photoshop.
- If the layout is off: This is almost always either a font that wasn't resolved (causing different metrics), or a multi-line text layer where the line-height differs from Photoshop's. Re-import after fixing the font, or nudge the line-height on the text layer in Freedam.
Tip: If you walk away after parsing but before confirming the import, the parsed result eventually expires and you'll be asked to re-upload the PSD. The font review step is meant to be quick.
Workflow: Authoring an End-User-Customizable Template
- Goal: Build a "Holiday Sale" template where end users can change the headline copy, the call-to-action background color, and the discount badge visibility - without touching anything else.
- Prerequisites: An existing template with at least a headline text layer and a CTA shape layer.
Steps:
- Open the template in the editor.
- Headline (text layer):
- Set Content to
{{input:headline}}(orSave up to {{input:percent}}% - {{input:tagline}}for a fill-in-the-blank pattern). - In the right panel, scroll to Allow end users to customize this layer and toggle it on. Color ticks automatically.
- (Optional) Tick Visible and label-override it to
Show headline. - Rename the layer to Headline in the Settings panel if it's still "Text".
- Set Content to
- CTA background (shape layer):
- Toggle Allow end users to customize this layer on. Fill color ticks automatically.
- Rename the layer to CTA Background.
- Discount badge (image_placeholder or shape layer, as designed):
- Toggle Allow end users to customize this layer on. Visible ticks automatically.
- Override the label to
Show discount badge. - Rename the layer to Discount Badge.
- Click Save.
- Expected result: When an end user opens the generation dialog for this template, they see a Text tab listing the input field(s) you tokenised, and a Style tab listing three sections - Headline (Color), CTA Background (Fill color), Discount Badge (Show discount badge). Coordinates, fonts, sizes, and other layout details remain locked.
- If it doesn't work: If a section is missing in the end-user dialog, confirm the layer's master switch is on and that at least one property is ticked. If a layer header reads as "Text" or "Layer 5", rename it for clarity - the editor surfaces an inline warning when this is the case.
What happens behind the scenes
- Every time you create, update, duplicate, or import a template, Freedam automatically queues a fresh preview thumbnail. The thumbnail is rendered with sample text and gray placeholder boxes for image slots, so the list view always shows an up-to-date snapshot.
- Duplicating a template copies every image and font attached to the original, remaps their references in the design, and then queues a new thumbnail for the copy.
- Imported PSD files are held on the server only while you complete the review step. Once the import is confirmed (or abandoned), the parsed result is cleared. If too much time passes between parsing and confirming, Freedam asks you to upload the file again.
- Single-asset generation and batch generation both run in the background so the editor stays responsive. Generation uses the same rendering pipeline whether you render one image or thousands.
Good to know
- Templates can be searched by name, code, or description, and filtered by category and tag from the list view.
- Categories available out of the box include Social Media, Print, Email, Banner, Presentation, and Custom.
- Bulk deletion is available from the list view for clearing out obsolete designs in one step.
Tips and Best Practices
- Primary Image: Always designate one Image Placeholder as the Primary image source in its properties. This tells the system which asset to use by default when generating from this template.
- Naming Layers: Give your layers descriptive names (e.g., "Headline", "Logo", "Background"). This makes it much easier for users to identify which fields they are modifying during image generation. Layer names are also used as section headers in the end-user generation dialog whenever a layer is customizable, so descriptive names directly improve the user-facing UX.
- Use Presets: Start with a Canvas Preset to ensure your base dimensions match standard social or print sizes.
- Locking: Lock background layers using the Lock icon in the Layers panel to prevent accidental movement while editing foreground elements.
- Keep customization narrow: Expose the smallest set of properties end users actually need. Every extra tick is one more decision your generators have to make. Most templates ship with one or two color knobs and at most a visibility toggle.
- Pick the right tool for text: Use
{{input:NAME}}tokens when the surrounding copy is fixed and only specific spans should be filled in (e.g. greetings, headlines with ornament words, slogans with a swappable product name). Don't try to exposeContentthrough the modifiable system - it's intentionally not available there. - Prep your PSD before importing: Rename layers to descriptive names in Photoshop before exporting the file - those names become the section headers end users see when the template is customizable. Flatten purely decorative groups so the imported layer list isn't cluttered, and bake any text effects you want preserved into a rasterised pixel layer (anything other than drop shadow is dropped on text). Keep your headline as a real type layer so its content stays editable.
- Use one font weight per text layer: If a single PSD text layer mixes a bold first word with a regular tail, only the first character's font and colour come through. Split it into two text layers in Photoshop before importing.
- Convert to rectangles when you can: A vector rectangle with a flat fill becomes a native, recolourable shape on import. The same shape with a stroke, gradient, or layer effect imports as a flattened image - losing the ability to recolour it through the End-user Customization sub-panel. If the recolour matters, simplify to a flat fill and apply the polish in Freedam after import.
Troubleshooting
Issue: Template won't save
- Symptoms: The Save button is disabled or clicking it does nothing.
- Cause: Missing required metadata or network interruption.
- Fix: Ensure the Name field in the Settings tab is not empty. Check for a red asterisk next to required fields.
- Prevention: Always name your template immediately after creation.
Issue: Text is falling outside the box
- Symptoms: Text overflows the layer boundaries on the canvas.
- Cause: Text Fit is disabled or the content is too long for the Min Font Size.
- Fix: Enable Text Fit in the layer properties and lower the Min Font Size if necessary.
- Prevention: Use the Resize Preview tool to test long strings of text at different canvas sizes.
Issue: AI Suggestions are unavailable
- Symptoms: The Generate Suggestions button in the dialog is disabled or returns an error.
- Cause: The template has not been saved yet, or no layers exist.
- Fix: Save the template at least once before requesting AI suggestions. Ensure you have added at least one layer to the canvas.
Issue: End user does not see a Style tab in the generation dialog
- Symptoms: A template you marked customizable shows only a Text tab - or no tabs at all - when an end user opens the generation dialog.
- Cause: No layers in the template have any property exposed (
exposed_propertiesis empty), or the template was saved before the customization sub-panel was filled in. - Fix: Open the template in the editor, select each layer you want users to customize, toggle Allow end users to customize this layer on, and confirm at least one property is ticked. Save again. The Style tab appears as soon as one layer is modifiable.
Issue: End user wants to edit the headline text but only sees a Color picker
- Symptoms: You ticked Color, Visible, and other properties for a text layer, but the end user still cannot type a new headline.
- Cause: The modifiable system is intentionally text-content-free. Color, visibility, opacity, and background color can all be changed through it, but the actual typed string is reserved for
{{input:NAME}}tokens. - Fix: Edit the text layer's Content field and replace (all or part of) the text with a token like
{{input:headline}}. Save. The end user will see a corresponding input field in the Text tab of the generation dialog.
Issue: Modifications submitted by an end user are silently ignored
- Symptoms: An end user changes a color in the Style tab, generates, and the output looks identical to the unmodified template.
- Cause: The property the user changed is not in the layer's exposed list - possibly because it was unticked after the user opened the dialog, or because the modification key was crafted manually and doesn't match the catalog.
- Fix: Re-open the template, confirm the property is ticked under Allow end users to customize this layer, and save. The renderer applies modifications only for whitelisted property keys; everything else is dropped silently for safety.
Issue: PSD import is rejected as "too large"
- Symptoms: The upload fails immediately with a file-size error.
- Cause: PSD files larger than 200 MB are not accepted.
- Fix: In Photoshop, flatten purely decorative groups, remove hidden non-essential layers, and resave. If you have many high-resolution embedded smart objects, consider replacing them with placed pixel layers at the size you actually need.
Issue: PSD upload returns "PSD parser service encountered an error"
- Symptoms: A clear error appears after the upload finishes, before the font review screen.
- Cause: Either the file is corrupted, uses unsupported features (e.g. a
.psbfile renamed to.psd, or a Photoshop version newer than the parser supports), or it includes layers the parser cannot read. - Fix: Open the PSD in Photoshop, Save As to a fresh
.psdfile (not.psb), and try again. If it still fails, try a copy with destructive groups (heavy 3D layers, video layers) flattened or removed.
Issue: Some layers are missing after import
- Symptoms: A layer you saw in Photoshop didn't appear in the imported template, and the success message mentions warnings.
- Cause: Most often the layer had no rasterised image data (an empty group, a placeholder layer, or a hidden layer that the parser couldn't render). Hidden text and image layers are imported with the eye toggle off, but layers with no visual content at all are skipped.
- Fix: Make the layer visible in Photoshop and re-export, or remove the empty layer if it wasn't intended to be there. Imported templates flag warnings on the post-import screen so you know which layer names were skipped.
Issue: A shape came in as an image and lost its editability
- Symptoms: A simple rectangle in your PSD imported as a flattened image. You can't change its colour through the modifiable system.
- Cause: Only axis-aligned vector rectangles with a solid fill import as native, recolourable shapes. Anything with a stroke, gradient, layer effect, custom path, or rotation falls back to a rasterised image.
- Fix: In Photoshop, simplify the shape to a flat-fill rectangle without effects, save, and re-import. You can re-add stroke or border-radius inside Freedam afterwards (those are editable on a native shape layer).
Issue: Text imported with the wrong font
- Symptoms: A text layer renders in a generic web font instead of the font shown in Photoshop.
- Cause: The font wasn't resolved during the Font Review step - either it was skipped, or the auto-suggested fallback wasn't right.
- Fix: Re-import the PSD and on the Font Review screen, explicitly resolve the font: pick the matching brand typeface, choose its Google Font equivalent, or upload the OTF/TTF/WOFF/WOFF2 file directly. Repeat for every weight - "Headline-Bold" and "Headline-Black" are listed separately so you can pick the right file for each.
Issue: Text is in the right font but renders slightly differently than Photoshop
- Symptoms: Letter spacing or line-height look subtly off, or text is positioned a few pixels lower than in Photoshop.
- Cause: Photoshop and Freedam use different rendering engines, and Photoshop's text-bounds are a tighter fit than what server-side rendering needs. Freedam adjusts the layer height upward when necessary so text isn't clipped.
- Fix: After import, fine-tune Line Height and Letter Spacing on the text layer in the Layer panel. For multi-line text, line-heights below 0.8 are clamped to 0.8 to prevent overlapping lines.
Issue: Layer effects are missing on a text layer
- Symptoms: Inner glow, outer glow, gradient overlay, bevel, or stroke that looked great in Photoshop is gone after import.
- Cause: Only drop shadow is preserved as a live effect on text layers. Every other Photoshop layer effect is dropped.
- Fix: If the effect is essential to the design, rasterise the styled text into a pixel layer in Photoshop before saving the PSD, then re-import. The text becomes a static image (so its content is no longer editable), but the styling is preserved exactly.
Issue: PSD import is unavailable
- Symptoms: The Import PSD button is missing or shows a "PSD import is not available" error.
- Cause: The PSD import feature is disabled or temporarily unavailable for your tenant.
- Fix: Contact your Freedam administrator. If you're the administrator, ensure PSD import is enabled in the system configuration.